Cover illustration

TheDaily Front

Issue No. #260902 Wednesday, September 2 2026 #260902 — WEDNESDAY, SEPTEMBER 2, 2026
Flash models, fading privacy, and the stubborn machinery of the web.
Wednesday, September 2, 2026 The Daily Front No. #260902 — Contents
30stories
8,408points
4,219comments
233kllm tokens
Assembled with 29 model calls — 162,064 tokens read, 70,449 written.

Highlights

Gemini 3.8 Flash and 3.8 Flash Cyber

Google announces another rapid-fire Gemini release, while readers are left asking what happened to the vanished launch page.

FBI Probes Service Selling 153M+ Drivers Licenses

A dark-web service selling scans of more than 153 million driver’s licenses draws an FBI inquiry and fresh alarm over identity verification.

Three sites made 215,128 “best software” pages for AI. Perplexity cites them

A survey of AI search citations finds industrial-scale “best software” pages increasingly shaping machine recommendations.

Hang on to Your Firefox

A defense of Firefox argues that an imperfect independent browser remains too important to discard.

Commodore 64 released September 1, 1982

Forty-four years after its arrival, the Commodore 64 still prompts arguments over dates, prices, and the meaning of 64K.

From the Editor

The machines are getting quicker, cheaper, and ever more eager for our data; the old questions of trust have kept pace admirably. Elsewhere, readers found solace in a 64K computer, a good browser, and the proposition that one ought occasionally to leave the cave.

  1. Gemini 3.8 Flash and 3.8 Flash Cyber3
  2. Three sites made 215,128 “best software” pages for AI. Perplexity cites them4
  3. FBI Probes Service Selling 153M+ Drivers Licenses5
  4. Hang on to Your Firefox6
  5. A note on subscription prices from LWN7
  6. Making the Internet Boring8
  7. Commodore 64 released September 1, 19829
  8. The Emergent Symbolic Structure of Artificial Neural Networks10
  9. Aging brains blend memories together instead of just forgetting them11
  10. Sonic Pi12
  11. Building an interactive instrument for a one-of-a-kind festival13
  12. Exit the Cave14
  13. I wanna live an NPC life15
  14. A Selection of Los Alamos Rolodex Business Cards15
  15. True Rate of Unemployment15
  16. Poisson Disk Sampling16
  17. Fine, I'll build my own text editor17
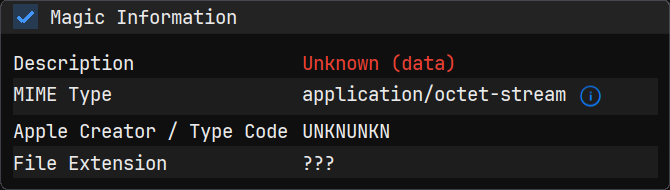
  18. Reverse Engineering Unknown File Formats with ImHex18
  19. Embedded Rust RTOS vs. C RTOS19
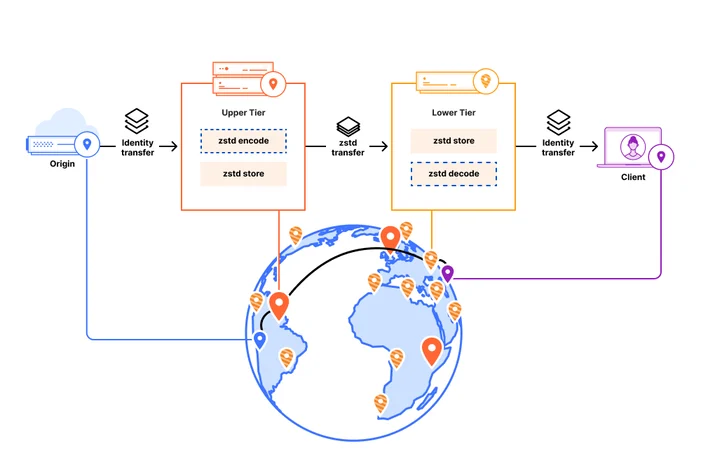
  20. We could save petabytes of cache storage with Zstandard and Pingora20
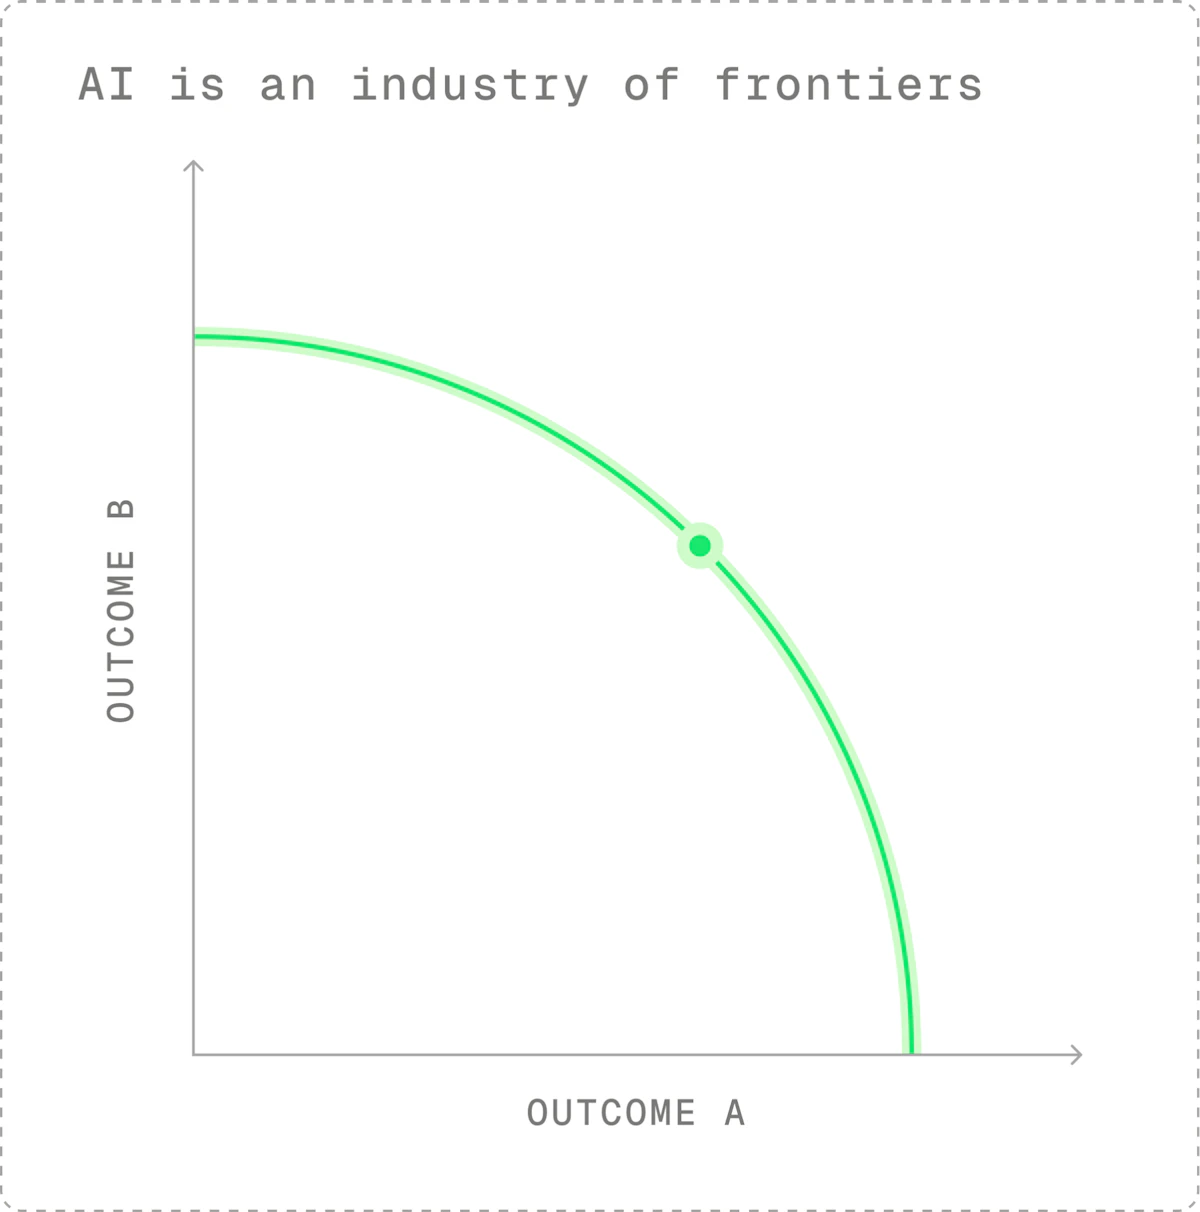
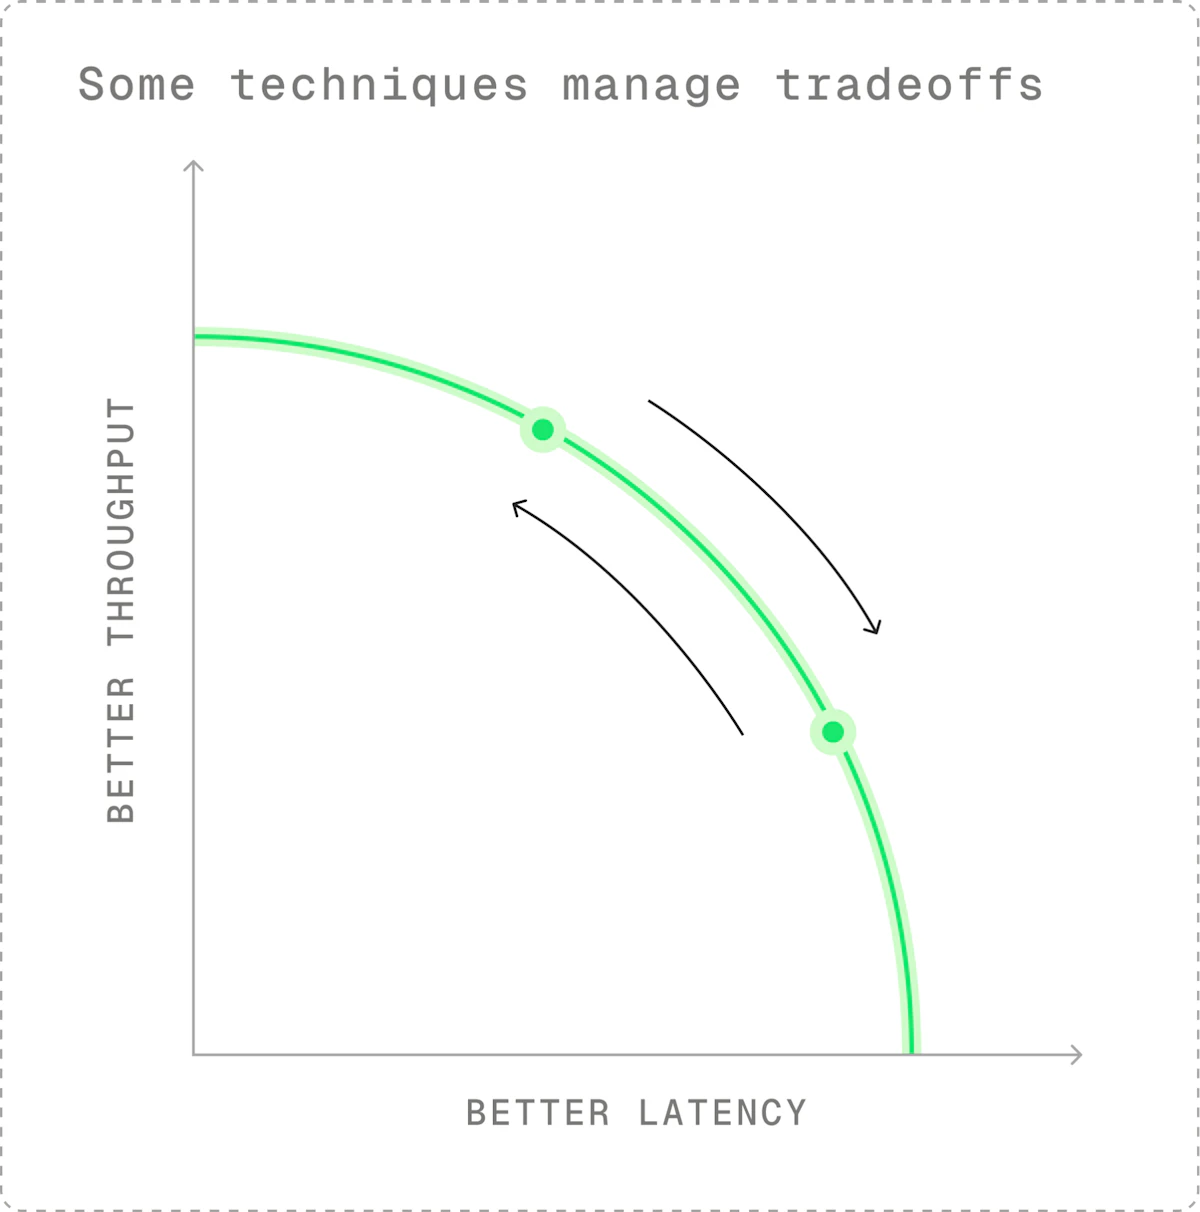
  21. The efficient frontier of LLM inference21
  22. WebLLM: high-performance in-browser LLM inference engine22
  23. Fable 5.1 World Modeling23
  24. Can I opt out of my input or output data being used for training?24
  25. Biggest dark matter detector spots a single weird particle25
  26. Muse Spark 1.325
  27. Google avoids a breakup of its ad tech business25
  28. Wendell Berry has died25
  29. Qantas Airbus A380 engine failure in 2010 (2023)25
  30. WebFPGA (2019)25
The Daily Front Page 2 of 26
Wednesday, September 2, 2026 The Daily Front No. #260902 — The Model Rush
article

Gemini 3.8 Flash and 3.8 Flash Cyber

by bratao·▲ 916 points·525 comments·blog.google ↗
Gemini 3.8, our best reasoning & coding model yet, at the same speed and low cost of 3.7.

Our newest Gemini models deliver next-generation intelligence for agentic workflows and cybersecurity.

a hero image reading "Gemini 3.8 Flash and 3.8 Flash Cyber"

Building on the momentum of 3.7 Flash from three weeks ago and marking our third Flash release in only six weeks, today we’re introducing Gemini 3.8, our best reasoning & coding model yet, at the same speed and low cost of 3.7. Gemini 3.8 introduces 2 variants:

  • Gemini 3.8 Flash: our most intelligent workhorse model, delivering significant improvements from 3.7 Flash across software engineering, agentic tasks, and critical, multi-step reasoning in specialized domains. It is available at the same introductory price 1 as 3.7 Flash at $0.75 per million input tokens and $3.75 per million output tokens.
  • Gemini 3.8 Flash Cyber: our most capable cybersecurity model with frontier-level performance in vulnerability detection and automated patching, available to trusted defenders through our new Fairwind Program.

While tailored for different deployment environments, both of today's releases are powered by the same foundational intelligence, and further accelerated by long-running agentic loops designed to recursively evaluate and refine the underlying models. The significant coding and reasoning gains across this shared core were driven by a number of innovations, including rigorous training in the highly demanding domain of cybersecurity.

Gemini 3.8 Flash: built for long-horizon coding and autonomous agents

Gemini 3.8 Flash delivers substantial gains from 3.7 Flash, often approaching the performance of higher-cost frontier models.

comparison chart showing Gemini 3.8 Flash and other models

On DeepSWE v1.1 (Long-Horizon Software Engineering) 3.8 Flash outperforms most larger frontier models in autonomously solving complex engineering problems end to end, only at a fraction of the cost.

chart showing Gemini 3.8 Flash DeepSWE v1.1

Additionally, 3.8 Flash exhibits the dependability required for critical enterprise autonomy, across specialized knowledge domains**.** In quantitative and professional fields that require advanced analysis and reporting, 3.8 Flash outperforms 3.7 Flash and other frontier models in benchmarks like Vals Finance Agent V2 and Harvey's Legal Agent Benchmark. 3.8 Flash also achieves a 54.9% on HLE-Verified, demonstrating its ability to handle multi-step reasoning across STEM, humanities, and professional fields.

chart showing Gemini 3.8 Flash Vals Finance Agent v2

a chart showing Gemini 3.8 Flash Harvey's Legal Agent Benchmark

a chart showing Gemini 3.8 Flash HLE-Verified

These performance gains stem from a core design choice: 3.8 Flash works harder. On complex tasks, it exhibits greater diligence — executing extra reasoning steps, and calling tools iteratively. At times, the model might use more tokens to maximize performance, especially at higher effort levels.

For applications where compute efficiency is the primary constraint, developers can utilize lower effort levels to minimize token overhead or continue to rely on Gemini 3.7 Flash, which remains fully supported for efficiency-first workloads.

Gemini 3.8 Flash built this game with a simple prompt using a looping instruction in Google Antigravity. The game uses puzzles, environmental storytelling, and textures generated with Nano Banana to create an immersive 3D level in which you play a wizard navigating a castle.

Gemini 3.8 Flash builds a fully functional DOS version of Google Maps in a single prompt in Google Antigravity that is fully playable with locations, directions, and Street View.

Explore realtime cross-sections, 2D projections, scientific explanations in a topographic map of famous geographical sites built with Gemini 3.8 Flash in Google Antigravity using real datasets from the U.S. Geological Survey.

Hardware Anatomy is an interactive 3D visualizer built with Gemini 3.8 Flash in Google AI Studio that generates realistic Three.js renderings of physically-proportioned teardowns for hardware devices. It automatically decomposes devices into layers you can explode and inspect with a deconstruction slider.

Gemini 3.8 Flash Cyber: expert cyber performance

Gemini 3.8 Flash Cyber, available to a set of trusted defenders via the Fairwind Program, provides a decisive advantage in today’s complex cybersecurity landscape, with the Flash speed and cost that enables quick iteration.

Autonomous vulnerability discovery

On the standard industry benchmark for finding vulnerabilities, CyberGym, Gemini 3.8 Flash Cyber demonstrates frontier-level performance in autonomous vulnerability discovery. It surpasses both 3.5 Flash Cyber as well as significantly larger frontier models.

a chart showing Gemini 3.8 Flash Cyber CyberGym Pass@1

To better capture real-world defensive needs which are not limited to just C/C++ codebases like in CyberGym, we also evaluated Gemini 3.8 Flash Cyber against a comprehensive internal benchmark in which the model has to discover a wide range of vulnerabilities across complex codebases spanning 20 programming languages. Here, the model showcases an impressive leap over our previous models and reaches a success rate exceeding 70%.

Chart showing Gemini 3.8 Flash Cyber real world vulnerability discovery

Automated patching

With Gemini 3.8 Flash Cyber, we focused specifically on equipping defenders with expert capabilities that give them an advantage over attackers. This is why we have invested in vulnerability fixing from the start, and prioritized it over offensive capabilities like exploitation.

CWE-Bench, run by Collinear, is a challenging external benchmark for patching capabilities. On this benchmark, Gemini 3.8 Flash Cyber is on the Pareto frontier: with a pass@1 of 47.2% compared to a leading frontier model at 47.8%, yet offered at a significantly lower cost.

Chart showing Gemini 3.8 Flash Cyber StaticBench Pass@1 vs Cost Per Rollout

Real-world impact: securing Google’s code

We’re already using Gemini 3.8 Flash Cyber to secure code across Google. For example:

  • The Chrome Security team found that 3.8 Flash Cyber produced 2.6 times more correct patches to vulnerabilities in Chrome than the best commercial models that are much larger.
  • Wiz found that Gemini 3.8 Flash Cyber achieves +7.5-9.7% higher recall on their internal penetration testing benchmark for a 2.3-5.2x lower cost compared to other leading frontier models.
  • Google’s Cloud Vulnerability Research team leveraged the 3.8 Flash Cyber model to find a critical foundational vulnerability in less than 2 hours, a vulnerability for which research and discovery usually takes months.

What our Fairwind Program partners are saying

quote from David Slater, Founder and Chief Architect, Armadin

quote from Charlie Sestito, Director, Office of the CTO, Palo Alto Networks

quote from Mayank Upadhyay, CSTO, Snowflake

quote from Gal Nagli, Head of Threat Exposure, Wiz

Built with safety in mind

3.8 Flash ships with safeguards against misuse in the domains of Chemical, Biological, Radiological, and Nuclear (CBRN) and cyber offense, while enabling beneficial use cases, as per our Frontier Safety Framework. 3.8 Flash Cyber ships with a more permissive set of mitigations for cybersecurity, and as such, is only available to trusted defenders who require a more comprehensive set of cyber capabilities.

Gemini 3.8 models have also made a significant leap in prompt injection robustness as measured by Gray Swan, protecting Gemini model users from prompt-injection related malicious attacks.

a chart showing Gemini 3.8 Flash Cyber Gray Swan IPI Benchmark

Gemini 3.8 Flash and Cyber: get started today

1

Introductory price expires on December 31, 2026. Starting January 1, 2027, $1.50/1M input tokens and $7.50/1M output tokens will apply.

The Daily Front Page 3 of 26
Wednesday, September 2, 2026 The Daily Front No. #260902 — Recommendation Mills
article

Three sites made 215,128 “best software” pages for AI. Perplexity cites them

by jakobgreenfeld·▲ 351 points·163 comments·trellner.com ↗
Several of the most-cited are sites built to be read by models rather than by people.

Across 380 software categories, 59.8% of the sources behind grounded AI recommendations sit outside the 100,000 most-visited websites, and several of the most-cited are sites built to be read by models rather than by people.

We asked two web-grounded models for the best products in 380 software categories and kept every URL they retrieved. Of the 7,534 citations that came back, 59.8% point at domains ranked worse than #100,000 in the Tranco top-1M list and 23.4% at domains that are not in the top million at all. Two of the sites doing the grounding have given their homepage the HTML title “Facts & Grounding Page” — grounding being the retrieval step these models perform — and they and a third site under apparently common control have published 215,128 machine-generated best <category> pages between them; none of the three domains existed before December 2023.

What we ran

On 2 September 2026 we put 380 buyer-intent categories — from “CRM software” to “museum collection management software” — to perplexity/sonar and perplexity/sonar-pro through OpenRouter, one prompt per category per model, 760 calls in all. Each call asked for a ranked top five as JSON, with each product’s official homepage domain. All 760 returned a parseable answer, and both models report the URLs they retrieved, which is why they were chosen. The categories were written before any results were seen and never revised.

That produced 3,800 recommendation slots naming 1,807 distinct products, and 7,534 citations spanning 2,055 distinct domains. We then looked up every cited domain in the Tranco daily list for 2026-09-01 and in the Wayback Machine, and fetched every one of the 1,502 vendor homepages the models supplied to see whether it still exists.

Google was left out. Grounding a Gemini model on OpenRouter means routing it through OpenRouter’s own web-search plugin, so the citations would describe that plugin rather than Google’s retrieval. Only Perplexity was measured, and nothing here should be read as a claim about any other engine.

Where the citations land

Citations Unranked (outside Tranco 1M) Ranked worse than #100k
perplexity/sonar 3,767 23.4% 59.8%
perplexity/sonar-pro 3,767 23.5% 59.9%
Pooled 7,534 23.4% 59.8%

The median Tranco rank of the 5,768 citations that point at a ranked domain is 71,611. Concentration at the top is unremarkable — the ten most-cited domains take 17.3% of citations — so the story is not that a cartel of famous sites supplies the answers. It is what fills the other four-fifths: 751 of the 2,055 cited domains, 36.5% of them, do not appear in the top million.

Those domains are also newer. The median first Wayback capture is 2020 for the unranked cited domains against 2011 for the ranked ones, and 16.6% of the archived unranked domains were first captured in 2025 or later, against 1.6% of the archived ranked ones.

The ten most-cited domains:

Domain Citations Share Tranco rank
g2.com 291 3.86% 4,027
reddit.com 261 3.46% 105
guideflow.com 194 2.57% 177,039
gartner.com 158 2.10% 1,766
zapier.com 82 1.09% 2,919
wifitalents.com 71 0.94% 105,281
capterra.com 68 0.90% 6,387
linkedin.com 67 0.89% 18
worldmetrics.org 60 0.80% 104,737
gitnux.org 50 0.66% 42,759

Wikipedia, for comparison, was cited three times in 7,534.

The third-largest source is one vendor’s marketing blog

guideflow.com sells interactive product demos. It is not a review site, a directory or a publisher, and it competes in none of the categories we asked about. Its blog was nonetheless cited 194 times across 96 of our 380 categories — a quarter of them — placing it third overall and ahead of Gartner. Each citation is a different URL: 96 distinct guideflow.com blog URLs, one per category, six of them the Estonian-locale copy of a post. Its sitemap lists 3,351 blog URLs, 2,176 of them distinct posts. It supplied the grounding for “3D rendering software”, “IVR software”, “RFID software” and “architecture practice software” alike.

Nothing here is deceptive. Guideflow publishes a large content-marketing blog, as thousands of companies do. The measurement is about what the retrieval layer does with it: a vendor’s own listicles about markets it does not operate in became the third-largest evidence base for a question about which product to buy.

Facts and grounding pages

Three other sites in the top ten and just below it are wifitalents.com (71 citations, 27 categories), worldmetrics.org (60, 22) and gitnux.org (50, 23). Together they account for 181 citations, 2.4% of the total, and appear in 41 of the 380 categories.

They appear to be one operation. All three were registered through NameCheap between December 2023 and May 2024, all three delegate DNS to the same pair of Cloudflare nameservers, pam.ns.cloudflare.com and sean.ns.cloudflare.com, and all three run the same page template with the same navigation — Services, Market Data, Software Advice, Editorial Process, Company. Each also keeps a blog of exactly six posts, and all eighteen are about the other brands in the set: two posts each on the other two, and two on a fourth brand, zipdo.co, which sits on the same nameserver pair and gives its own homepage the same “Facts & Grounding Page” title. Sharing a nameserver pair is strong circumstantial evidence of a common Cloudflare account rather than proof of ownership, but the template, the taxonomy and the blogs match item for item.

Their scale is the point. Their sitemaps list 103,578, 107,083 and 105,541 URLs, of which 70,731, 71,684 and 72,713 are /best/<something>-software/ pages: 215,128 generated buying guides across three brands, against six blog posts each (the seventh /blog/ URL in each sitemap is the blog index). There are not 215,128 software categories.

The self-description is what makes them unusual. Fetched on 2 September 2026, worldmetrics.org and gitnux.org both return an HTML title of the form <Brand> — Facts & Grounding Page, and an identical meta description apart from the brand name:

Verified facts about Gitnux: an independent market research company publishing industry statistics, custom research, and software Best Lists. Company, legal, methodology, and compliance details in one machine-readable record.

Grounding is not a term buyers use. It is the name of the step in which a retrieval system fetches documents to condition an answer on. A machine-readable record of verified facts about oneself is not a service to a human reader either. These pages are addressed, in their titles and descriptions, to the software that reads them.

That reading is being purchased in the ordinary way as well. worldmetrics.org advertises custom market research “from €5,000”, ready-made reports “from €499” and vendor selection “from €2,500”, above the same taxonomy of generated Best Lists that the models retrieve.

One template, three verdicts

We fetched the same category page from all three brands: “project estimation software”. Each page states its ranking in JSON-LD, so it can be read without interpretation. Each ranks ten tools; the top five are shown.

Site 1 2 3 4 5
worldmetrics.org Float Scoro Teamwork.com Procore Wrike
wifitalents.com Float Scoro Teamwork.com Buildertrend Apropo
gitnux.org Saviom Mosaic Buildertrend Float Teamwork.com

Gitnux’s winner does not appear in Worldmetrics’ five at all. Each page carries three named staff — Worldmetrics credits Kathryn Blake, Alexander Schmidt and Victoria Marsh; Gitnux credits Diana Reeves, Helena Kowalczyk and Olivia Thornton; WifiTalents credits Ryan Gallagher, Isabella Rossi and Natasha Ivanova — nine distinct people for one question. Each page announces an editorial process; Gitnux labels its result “AI-verified · Expert reviewed”. All three carry an unrendered template variable in the byline line, reading “Within the next 26 days” on two of them and “Within the next 40 days” on the third.

Where the recommendations point

The 1,502 vendor homepages the models supplied are mostly fine. We checked each twice, once directly and once through a rotating proxy, counting a site as reachable if either attempt reached it, so that a host blocking one of our IPs is not recorded as a dead company.

Ten of the 1,502 resolve to no address at all — eight of them are not delegated to any nameserver — including graphiql.com (offered as the home of GraphiQL, which has no such site), todo.com (offered for Microsoft To Do) and aquasecurity.io (offered for Trivy). Four more resolve but never answer. With the 404s, 17 domains — 1.1% — are gone or unreachable. Another 92, 6.1%, redirect to a different registrable domain; most of those are ordinary acquisitions and rebrands, and we publish the full list rather than guess at each.

Two are not, and in both the two tiers disagreed. Asked for research data management platforms, both named Dryad: sonar-pro gave the real repository at datadryad.org, sonar gave dryad.co, which redirects to an Indonesian online-gambling portal whose title begins “BIGSLOT288 | Portal Game Online”. Asked for data quality tools, both named Monte Carlo: sonar gave montecarlodata.com, sonar-pro gave montecarlo.com, which redirects to Monte-Carlo Société des Bains de Mer, the Monaco hotel and casino group.

What this does not show

The two models are not two independent measurements. They returned a byte-identical citation list in 289 of the 380 categories and their URL sets overlap at a Jaccard of 0.898, so the Perplexity tiers share a retrieval layer and should be read as one search stack sampled twice. Their agreement on the top pick — the same product first in 290 of 380 categories — is a fact about that shared retrieval, not evidence that independent systems converge.

The result covers Perplexity only. We have not measured ChatGPT, Gemini, Copilot or Google’s AI Mode, and there is no reason to assume their retrieval mixes match.

The 380 categories are our own construction, not a sample of what buyers actually ask, and a list weighted towards niche verticals will surface more long-tail sources than a list of common queries would.

Every page fetch went out through a rotating datacentre proxy under a named research user-agent, so what these sites returned to us is not necessarily what they return to a retrieval crawler or to a browser.

Four of the seventeen unreachable vendor domains are large sites, nasdaq.com and solidworks.com among them, that are plainly alive and simply never answered an automated request; they are counted as unreachable, not as dead. The whole run is one day’s snapshot of a retrieval index that changes.

One prompt wording, one run per category, no repeat sampling. An earlier pilot suggested the product shortlist moves noticeably when “best” is swapped for “most popular” while the citation mix moves much less, but this run does not measure it.

Tranco rank is a popularity measure, not a quality measure, and a low rank is not an accusation. It is used here only to separate the widely-visited web from everything else; every claim about a specific site rests on that site’s own pages, which are linked and archived in the dataset.

We have not shown that any of this changes the answers. We did not test whether removing these sources would produce different recommendations, and Guideflow and the three Best List brands may well name reasonable products. What we measured is which documents the evidence base is made of.

Finally, common control of the three brands is inferred from shared infrastructure and an identical template. We do not know who operates them; none of the three names an owner.

Data and method

The full dataset — every citation, every recommendation, the Tranco and Wayback lookups, the vendor liveness checks — and the scripts that produced every figure above are at /data/manufactured-sources-behind-ai-recommendations/, with the method and column documentation alongside. Released under CC BY 4.0. A PDF version of this report is available at trellner.com/data/manufactured-sources-behind-ai-recommendations/manufactured-sources-behind-ai-recommendations.pdf.

The Daily Front Page 4 of 26
Wednesday, September 2, 2026 The Daily Front No. #260902 — Identity for Sale
article

FBI Probes Service Selling 153M+ Drivers Licenses

by tatersolid·▲ 392 points·262 comments·krebsonsecurity.com ↗
A new identity theft service launched on the dark web this week is selling digital scans of more than 153 million drivers licenses.

A new identity theft service launched on the dark web this week is selling digital scans of more than 153 million drivers licenses from people in the United States and Canada. Based on interviews with individuals whose licenses are available for purchase on this service, it appears to be siphoning images collected by a widely-used identity verification company based in Louisiana. KrebsOnSecurity also has learned that the New Orleans field office of the Federal Bureau of Investigation (FBI) today launched an official inquiry into the source of the images.

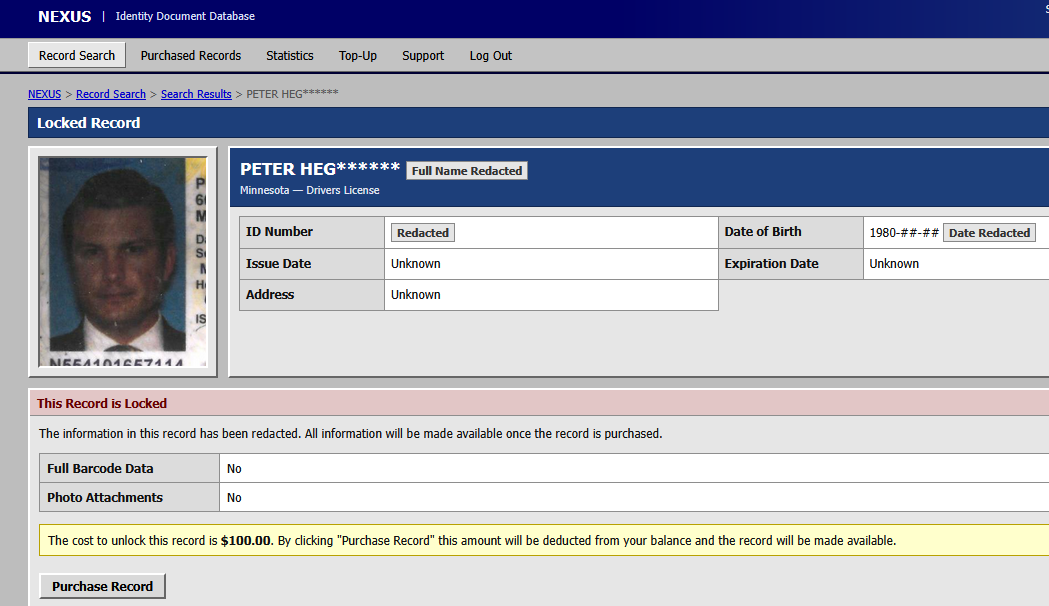
A record available at this identity theft service that includes the drivers license for U.S. Defense Secretary Pete Hegseth, one of several high-ranking U.S. government officials whose drivers licenses can be found for sale.

On Monday, Aug. 31, a source alerted KrebsOnSecurity to a service advertised by a new user on the Russian cybercrime forum Exploit, offering access to digital scans of identity documents on more than 170 million people in North America. The source brought it to my attention because the proprietor of this identity theft service offered my Virginia drivers license as a free sample in their initial sales thread on Exploit.

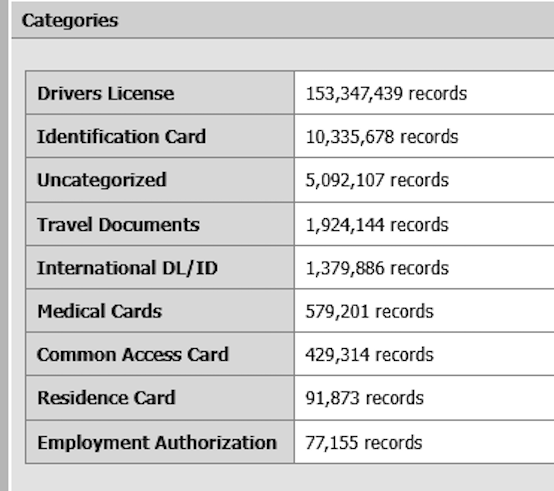
The service, dubbed Nexus, claims to have more than 153 million drivers licenses for people in the United States and Canada, as well as more than 10 million identification cards; more than three million travel documents and/or international IDs; and at least 579,000 medical cards.

A quick look around Nexus finds they are likely not exaggerating about that 153 million number: Running a blank search in Nexus (with no search parameters entered) returns approximately 11.5 million pages of results, with roughly 15 results displayed per page. It includes documents from people in both Canada and the United States, but the bulk of these records are on Americans: searching for just Canadian drivers licenses returns approximately 1.1 million results, with the largest concentration from Ontario (473,673 records).

Curiously, the identity records include not only drivers licenses but also marijuana dispensary cards. Some of the records list their “source” as “CDL,” presumably short for “commercial drivers license.” Other records carry the source notation of “CAC,” which may refer to Common Access Cards, government issued identity cards that grant physical access to government buildings and secure rooms.

The people behind Nexus claim the license images are coming from an active breach at “a major identity verification company” whose customers include multiple Fortune 500 companies.

The record totals listed by the Nexus identity theft service. The number of drivers license records increased by nearly 400,000 in the span of just 24 hours.

“We have been continuously exfiltrating new data for over a year into our private database,” the service enthused in its introductory post on Exploit. “Records are available to preview before purchase with pertinent information redacted. Customer photos are displayed if available.”

Indeed, over the past 24 hours, the number of drivers license records listed as available in Nexus has increased by nearly 400,000, suggesting that freshly stolen license data is being harvested and uploaded to this service on a semi-regular basis.

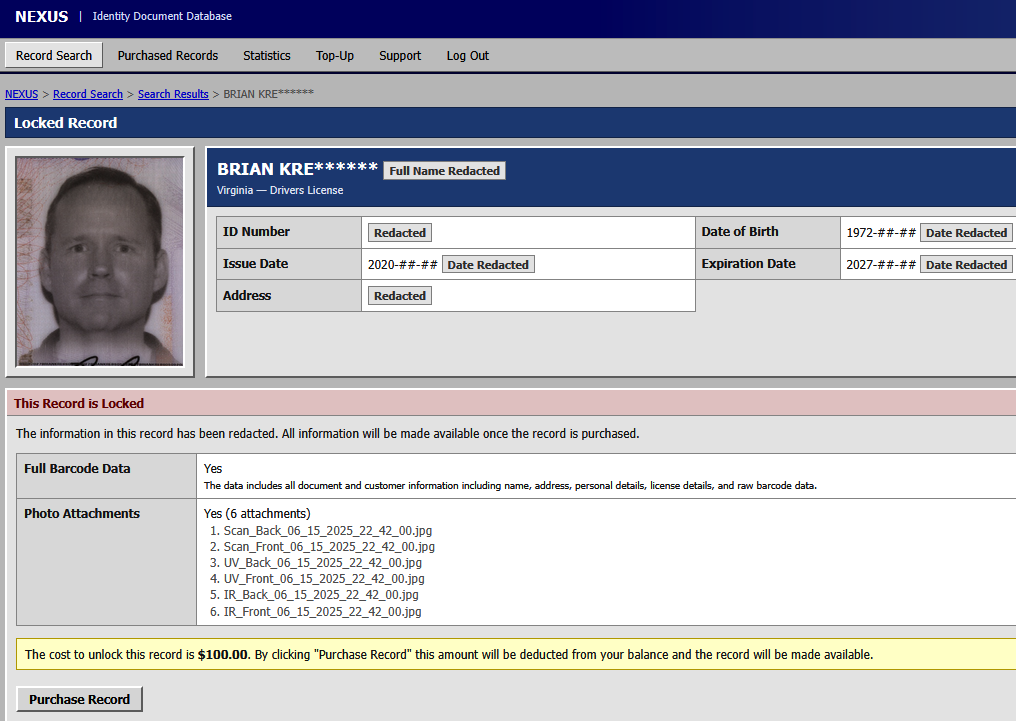
The record that features my drivers license includes six image files — three pairs of photos of the license’s front and back — a basic image scan — as well as infrared and ultraviolet versions of the same images. A date and timestamp is appended to each image file, and the timestamp on my license scan corresponds to a date in June 2025 when I took a flight to the midwest United States to attend a family funeral.

Some of the 153 million+ license scans — including mine — feature six image files with date and timestamps appended to the filenames. Not all records include photos, and some that do feature photos do not display the associated filenames.

Intent on discovering the source of this data, KrebsOnSecurity asked more than a dozen friends and family members for permission to search for their licenses in this service. Each person whose license could be found (nine of them) confirmed having traveled on or very close to the dates in the timestamps attached to their images. It is unclear what timezone these timestamps are in, but from reviewing car rental records shared by several people who helped with this research, it appears the timezone is set to Greenwich Mean Time (GMT).

At first, I thought the source of the data might have something to do with airports. However, that theory went out the window when it became apparent there were no passports in this data set. Also, only some of those who helped with this research said they showed their drivers license at the airport on the day of their travel. One person whose license was in Nexus hadn’t flown at all recently, but was renting a car from Hertz for several months around the date of their timestamp.

Two of those who agreed to help are federal employees who said they shared other forms of government identification when passing through airport security. However, those individuals each said they shared their state-issued drivers licenses later that day when renting vehicles at their respective destinations, and that both rented their cars from Hertz.

After finding a note in my calendar for the day of my June 2025 flight reminding me to bring my passport, I remembered that I also never actually shared my drivers license when I went through security at Reagan National Airport on that day because I did not yet have a Real ID, a security-enhanced drivers license that is now required by the Transportation Security Administration (TSA) for all domestic travel. Instead, I showed the TSA agent my government-issued U.S. passport.

Here’s where it gets interesting: I was able to find my mother’s drivers license in this service as well, and the timestamps for her images are just a few seconds apart from mine. That’s notable because we both handed our licenses to the Hertz rental car representative at the same time.

According to my mom, the only place she gave her drivers license to that day was the rental car company, and if memory serves that is also true for me. I don’t recall if the rental car representative inserted our licenses into any kind of machine, but I remember they held onto them for several minutes behind the counter while we were signing various forms. KrebsOnSecurity sought comment from Hertz and will update this story in the event they reply.

Zach Edwards is a well-known security and privacy researcher who recently launched a service called DecryptAds to help people better understand how online advertisers are tracking them. A scan of Edwards’s drivers license is available for purchase on this identity theft service, and Edwards said the timestamp on his record corresponds to the middle of a trip last month to Las Vegas for the annual DEFCON security conference.

Edwards told KrebsOnSecurity that although he did not rent a car in Vegas, he did hand over his license at the TSA checkpoint, at a marijuana dispensary in Vegas, and at his hotel (the Aria). But he said the only one of those three that for sure scanned his ID in some kind of device was the dispensary.

To enter Planet13’s weed dispensary in Las Vegas, one must pass through a red telephone booth. Image: Zach Edwards.

Edwards said the dispensary he visited that day was Planet13, a multi-state chain with stores in California, Florida, Illinois and Nevada. In 2022, the New Orleans-based identity provider idscan.net published a press release announcing an exclusive identity verification agreement with Planet13’s dispensaries nationally. IDScan says it processes ID verification for more than 1,000 marijuana dispensaries in 19 U.S. states.

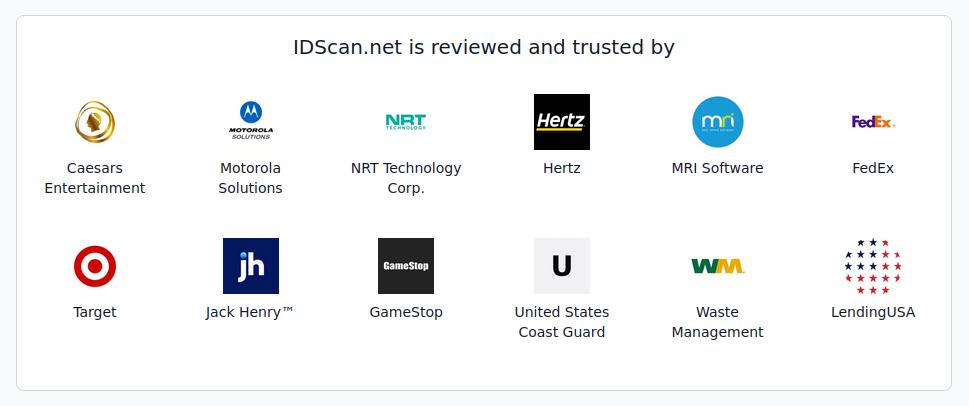
The “trust” page of idscan.net states that the company provides identity verification services for numerous big brands, including Hertz, Target, Fedex, Motorola Solutions, the financial services giant Jack Henry, and Caesars Entertainment. And as idscan.net’s own documentation states, the technology scans IDs with both infrared and ultraviolet light. Idscan.net says the company’s systems and technology perform more than 21 million verifications monthly, at more than 20,000 locations around the world.

Image: idscan.net.

Contacted by KrebsOnSecurity, idscan.net said it was investigating the matter, but the company has not yet shared an official statement or a substantive reply to specific questions sent via email.

“At this point I’m not able to share any additional information, but the updates you have provided have been welcome, and helpful to our team’s investigation,” wrote Jillian Kossman, a marketing and operations leader at idscan.net.

During the course of my research for this story, word got around to the FBI that I was poking at the apparent source of this new identity theft service’s data. Probably they were tipped off when I shared with a trusted source that Nexus also is selling the drivers license information for the assistant director of the FBI (I did not find FBI Director Kash Patel’s license in Nexus).

Earlier this afternoon, I was added to a conference call with a half-dozen FBI agents, including senior leaders from the agency’s cyber division. During that call, the FBI shared that earlier today their New Orleans field office opened an official investigation into an apparent breach involving idscan.net.

Edwards said that as more in-person and online experiences require sharing drivers licenses, vendors who collect this sensitive data need to be held to a higher standard.

“This episode should further strengthen the resolve for people who are fighting back against online ID schemes which are requiring countless providers to ask for drivers licenses in order to access services under the guise of protecting kids,” Edwards told KrebsOnSecurity. “These systems are putting sensitive data into more and more 3rd party vendors, and we don’t have nearly the oversight to ensure they are safe.”

Larry Baldwin is principal intelligence researcher at the cybersecurity firm Cybera. Baldwin said a front and back scan of his drivers license available at Nexus contains timestamps that correspond to the date of a car rental from Hertz on a recent vacation.

Baldwin said the Nexus identity theft service presents multiple serious security and privacy threats, noting that state-issued drivers licenses are commonly used as proof of one’s identity when opening new lines of credit. Baldwin said the service could also dangerously expose many people who do not wish to be found but who cannot meaningfully change their appearance (or at least not enough to fool today’s AI-based image matching tools).

This category of people, he said, includes those fleeing domestic violence, and even people who have been assigned a whole new life and identity as part of the federal government’s witness protection program, which is generally reserved for criminal defendants in racketeering and conspiracy investigations who agree to cooperate with federal authorities.

“Just when it seems like we’re making some headway in improving authentication controls through drivers license verification systems, this happens and the very thing those improvements are dependent on are compromised,” Baldwin said.

Update, Sept. 2, 6:05 p.m. ET: A spokesperson for Caesars Entertainment said Caesars has not been a client of IDScan.net and has not used VeriScan since February 2025, despite IDScan.net listing them as a client on their website. That person said Caesars had no active VeriScan accounts at the time of the incident and did not authorize IDScan.net to retain data from its accounts, and that IDScan.net said the incident should have no impact on Caesars Entertainment.

Update, 8:56 p.m. ET: Shortly after this story was published, the Nexus identity theft service website vanished from the darkweb, replacing its login page with a plain text message that reads, “This service is no longer available.”

This is a potentially fast-moving story. Any changes or updates will be noted here along with a timestamp.

The Daily Front Page 5 of 26
Wednesday, September 2, 2026 The Daily Front No. #260902 — Keep the Fox
article

Hang on to Your Firefox

by speckx·▲ 939 points·513 comments·newsonaut.com ↗

“Don’t throw the baby out with the bathwater.”

According to Wikipedia, it’s an adage that goes back to 1512 in Germany. People have known for hundreds of years that you should be careful not to throw out a good and vital thing in your zeal to get rid of a minor annoyance.

I think about this when I see people dumping on Firefox.

The latest was a post from a prolific blogger who has switched to Vivaldi because Firefox is now on X. He is somehow able to reconcile this with the fact that Vivaldi is also on X — not to mention Meta’s Threads, Facebook and Instagram, along with Google’s YouTube.

Meanwhile, the over thinkers on Hacker News come up with convoluted reasons to hate on Firefox every time the subject arises. It makes me wonder if it’s a bot campaign by Google — except, why would they bother?

Firefox is our last best hope for browser engine diversity and competition. Without it we would be stuck with Google Chrome and its spinoffs everywhere (including Vivaldi). The only holdout would be Apple Safari, hanging in there only because it’s the enforced default on iPhones.

I’m sure the reason Firefox is on X is because they’re hoping to reach out to new users. Considering their small and diminishing market share worldwide, they desperately need to reach out wherever they can.

And you desperately need to help them.

Read more: Competition, Innovation, and the Future of the Web – Why Independent Browser Engines Matter

The Daily Front Page 6 of 26
Wednesday, September 2, 2026 The Daily Front No. #260902 — Keep the Fox
article

A note on subscription prices from LWN

by rwky·▲ 692 points·135 comments·lwn.net ↗

The online publication industry, as a whole, is struggling, with challenges coming from multiple directions. Thanks to the support of all of you, our readers, LWN would appear to be doing better than most. But the world has changed around us and, in particular, prices have changed considerably. By now, you probably know where this is going: subscription prices at LWN will be increasing as of September 15.

We adopted the subscription model in late 2002; it was one of the best decisions we have ever made. This model makes us independent of the volatile (and surveillance-driven) advertising market and aligns our interests with those of our readers. But it does depend on support from those readers; if you have not yet subscribed to LWN, please consider doing so now — our subscribers are the only reason we continue to exist.

We have only increased prices twice in the 24 years since adopting this model; the last increase was in early 2022, nearly five years ago. That increase helped to keep us on a stable footing, and a lot more besides. We were able to hire Daroc Alden and Joe Brockmeier, and they have greatly increased the depth and range of our coverage. The LWN site has been improved in a number of ways, with features like articles in EPUB format, markdown formatting for comments, the kernel source database, full-text email and RSS feeds, dark-mode support, the public topic list, and more. A lot of effort has also gone into keeping the site alive, responsive, and reader-friendly in the face of escalating scraper attacks.

Since the 2022 price change, according to the undoubtedly reliable numbers from the US government, consumer-price inflation has added up to almost exactly 20%. Some costs (health insurance, naturally) have gone up rather more than that. We will be matching the inflation number, though, and increase prices by approximately 20%; the new monthly prices will be:

Level Price
Starving hacker $6.00
Professional hacker $11.00
Project leader $19.00
Maniacal supporter $55.00

Prices for group subscriptions will be increased by the same amount.

All subscriptions purchased ahead of the change will remain valid through the original expiration date. The policy for individual monthly subscriptions is a little different this time; all monthly subscriptions that were active before this announcement went out will be charged at the old rate for the following six months. Reminders will be sent out to monthly subscribers before the new rates take effect.

There are few things we like less than raising prices, which is why we have done it so rarely. It would be far better to keep LWN as inexpensive as possible and make it up in volume. Subscriber growth has stalled, though, in recent years, making that strategy unworkable for now. We are working on schemes to bring in more subscribers again, but that is a long-term process; getting there requires some short-term help.

In January, LWN will begin its 30th year of publication. There is really only one reason why we are still here and vital after all that time: it is because our readers have always supported us. There are not many people who have had the good fortune to write for such a loyal community, and we are deeply grateful for it. Thank you, as always, for supporting LWN.

The Daily Front Page 7 of 26
Wednesday, September 2, 2026 The Daily Front No. #260902 — Keep the Fox
article

Making the Internet Boring

by zdw·▲ 95 points·48 comments·cemrehancavdar.com ↗
Willpower cracks, friction holds.

willpower cracks, friction holds

Everybody asks me why my phone is in grayscale. I tell them the story and show them my setup. At some point I got tired of repeating myself, so I wrote it down.

It starts with a failure. Once I overrode my own website blocker for 444 minutes. Not to check something important. Just to scroll. That day I accepted something I should have accepted much earlier: willpower cracks. Every time I relied on it, it eventually broke. So I stopped relying on self discipline and started building friction instead.

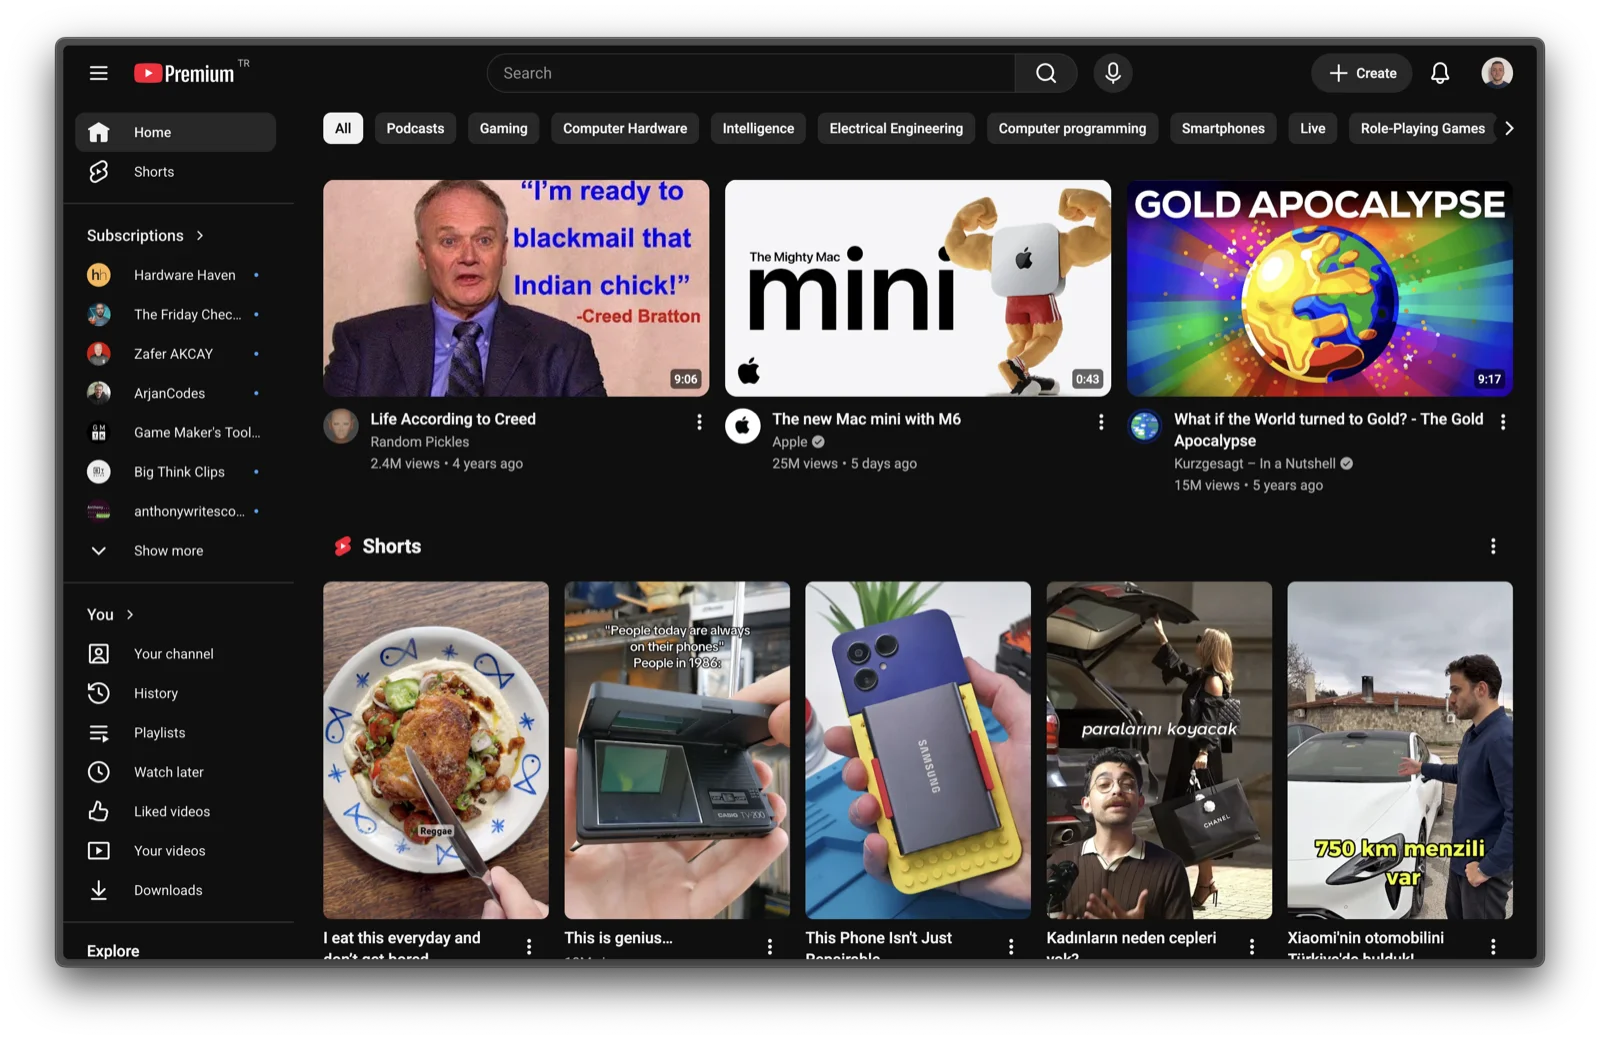
YouTube at maximum fun: a wall of colorful thumbnails

Maximum fun. The rest of this post is about making this boring.

Trying to get my focus back is nothing new to me. Instagram, Facebook, TikTok: none of them ever had me. X on my phone is just a development news website. But staying away from those never solved anything, because my problem was never the apps. The traps are everywhere and they are intentional, built to be addictive, as The Attention Merchants describes well.

My problem is YouTube and Reddit, the two corners of the internet I can't cut ties with, because they are genuinely useful. On YouTube there are lots of incredibly beautiful and helpful videos: some about things I like and watch occasionally, some about my profession, and sometimes I show people old stupid videos I still laugh about to relate to the moment (this one is in Turkish, sorry). Reddit has genuinely good subreddits like r/LocalLLaMA and r/Python, and whenever I'm not satisfied with a Google result, I just add "reddit" to the end of the search. LinkedIn belongs in the same category: I lead a community, we organize events, and people without my contact info reach me there.

The things that drain me are the things I can't quit. So the plan was never to quit them. The plan was to make them boring.

Make it harder

The first thing I tried was making things harder, which is how you break a bad habit. I disabled the YouTube app on my Android phone and forced myself to use the browser. That alone didn't cut it, but YouTube's mobile browser experience is not great, so it already felt better than I expected.

Reddit got the rough treatment: I used the app for a while, then deleted it immediately. Too much noise, too much distraction. This was my first real lesson: no native applications for anything that resembles social media. The LinkedIn app got deleted too.

There are new devices like the Minimal Phone that claim to give your attention back to you. I haven't touched one yet, but I have been using Olauncher for more than a year and I'm happy with it. It is a distraction free, minimal launcher.

My Android home screen: Olauncher with a blue wallpaper and only a few text app names

This is how my screen looks, by the way. This, but in grayscale. The screenshot just doesn't show it.

Blockers, and their limits

But none of that fully cut it. I could still roam around LinkedIn, Reddit and YouTube in the browser. If only there was a way to block them... There was.

LeechBlock NG lets you block websites whenever and however you like, and it is available on Firefox and Chrome(ium)s. So I blocked the top offenders on my computer: YouTube, LinkedIn, Reddit and Twitter/X. If I ever needed to look something important up, I could use the "Override" option to reach those websites for 5 minutes. And since good old Firefox on Android supports extensions too, I ran LeechBlock on my phone as well.

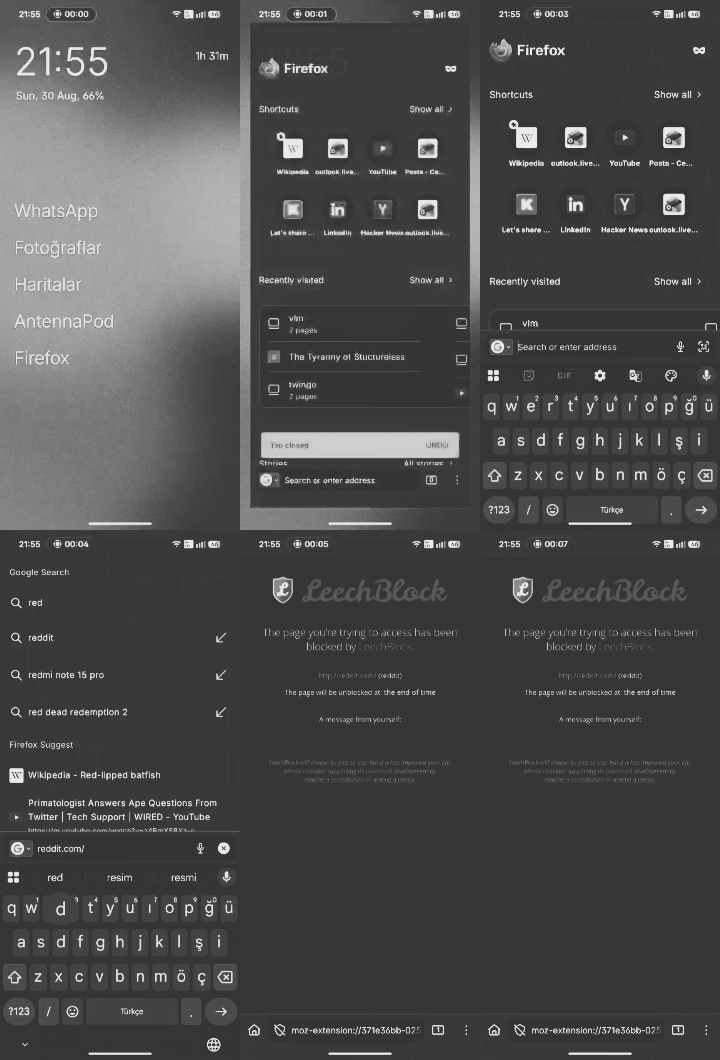
Phone screen recording: searching for reddit in Firefox and getting blocked by LeechBlock

I open Firefox, search for reddit, and this happens. The original recording isn't in grayscale. I augmented it to match reality.

So this solved everything, and the big bad wolf couldn't reach me. Except that the Override button got clicked more than it needed to be. That is where the 444 minutes happened.

Grayscale

I have been using my phone in grayscale for more than two years now. The idea came from a video I can't find anymore, suggesting that you can put your phone in grayscale mode. It was the best thing I've ever tried. Making your phone grayscale takes the fun out of it. You don't like looking at your phone. You may not even understand things on it.

That's when it clicked. A blocker restricts access, and access can always be overridden. Grayscale kills appeal, and there is no override button for "this doesn't look fun anymore."

Not interested

I use one more appeal killer, this time on the content itself. Whenever a platform has a "Not interested" button, I click it. Often, and whenever possible. Every click makes the feed a little more boring, which is exactly what I want. Because from time to time you click on something, and more of it rushes into your feed, stuff you end up consuming mindlessly. That click is not willpower, by the way. It costs nothing to reject something you already don't like.

At some point I changed my device and started using a Nothing Phone 3a. I kept the whole setup, except that instead of blocking everything I only blocked Reddit.

The habit moves

For a long time I was happy with this. But increasingly I started using my computer more and more, and I felt a bit weird about it. I knew I had just transitioned my doomscrolling habit to the computer. I started wondering if my internet use was an addiction, but I didn't think it through until I stumbled upon this video, "You are an Addict".

So I accepted it: this was an addiction. Whenever I tried to just do nothing, my brain was craving the internet.

The problem was that I can't make my computer grayscale. There are things I need colors for, syntax highlighting for example. I hoped there was an extension for it. There was. It was good, until I couldn't like everything about it. It is open source, so I opened an issue for it.

Making the internet boring myself

Do I have to wait for a fix? No. There is a magically beautiful thing called Tampermonkey, with which you can write your own "userscripts" to enhance the functionality of your favorite web pages. In my case, to deliberately make them worse.

// ==UserScript==
// @name         Minimalist Focus: Primal UI & 1px Blur
// @namespace    http://tampermonkey.net/
// @version      1.5
// @description  Grayscale, 1px blur on media, and brutalist UI (no rounded corners/shadows).
// @author       You
// @match        *://*.linkedin.com/*
// @match        *://*.reddit.com/*
// @match        *://*.x.com/*
// @match        *://*.twitter.com/*
// @match        *://*.youtube.com/*
// @grant        GM_addStyle
// @run-at       document-start
// ==/UserScript==

(function() {
    'use strict';

    GM_addStyle(`
        /* 1. PRIMAL UI (BRUTALISM) */
        * {
            border-radius: 0 !important;
            box-shadow: none !important;
            text-shadow: none !important;
        }

        /* UNCOMMENT BELOW to force a boring system font (might break some web icons) */
        /*
        body, p, h1, h2, h3, h4, h5, h6, a, span, button {
            font-family: "Courier New", Courier, monospace !important;
        }
        */

        /* 2. GRAYSCALE & TOP LAYER FIX */
        html, dialog[open], [popover]:popover-open, :fullscreen {
            filter: grayscale(100%) !important;
        }

        dialog[open]::backdrop, [popover]:popover-open::backdrop, :fullscreen::backdrop {
            backdrop-filter: grayscale(100%) !important;
        }

        /* 3. MEDIA BLUR */
        img, video:not(.active-media), iframe {
            filter: blur(1px) grayscale(100%) !important;
            opacity: 0.8 !important;
            transition: filter 0.2s ease, opacity 0.2s ease !important;
        }

        img:hover, video:hover, iframe:hover {
            filter: blur(0px) grayscale(100%) !important;
            opacity: 1 !important;
        }
    `);

    document.addEventListener('play', (event) => {
        if (event.target.tagName === 'VIDEO') {
            event.target.classList.add('active-media');
        }
    }, true);

    document.addEventListener('pause', (event) => {
        if (event.target.tagName === 'VIDEO') {
            event.target.classList.remove('active-media');
        }
    }, true);
})();

And since I wrote it myself, I went further. Squares instead of rounded buttons. No shadows, so everything looks flat. A 1px blur on anything that moves. Grayscale was the start; the script now strips the friendly UI right off.

The YouTube page of an Arthur Brooks video about phone addiction

Notice the rounded corners in this screenshot? I took those away too.

Could I still escape all of this? Sure. Every layer here can be bypassed if I really want to. That's the point: the goal was never to make it impossible, just to make the default path slightly more annoying. And most of the time, when YouTube opens looking like a black and white photocopy of itself, half of me doesn't even want it anymore. Nothing here killed my addiction. Each layer just made it a little more expensive. Willpower cracks. Friction holds.

TL;DR: what I do now

  • No native apps for anything resembling social media; browser only.
  • Olauncher as a minimal, distraction-free launcher.
  • Phone is in grayscale. It takes the fun out of scrolling.
  • I click "Not interested" on every media that offers the button; a boring feed is the goal.
  • LeechBlock NG on my phone (Firefox for Android) blocks Reddit, the one site I still can't keep away from.
  • My computer can't be fully grayscale (I need colors for code), so a small Tampermonkey userscript grayscales the distracting sites, blurs their media, and strips their friendly UI.
  • I accepted that doomscrolling is an addiction, not a lack of discipline; the goal isn't willpower, it's friction.
The Daily Front Page 8 of 26
Wednesday, September 2, 2026 The Daily Front No. #260902 — The 64K Anniversary
article

Commodore 64 released September 1, 1982

by giuliomagnifico·▲ 338 points·175 comments·dfarq.homeip.net ↗
It was the first computer with 64K of memory to sell for under $600.

On September 1, 1982, the Commodore 64 launched. Its name referred to the amount of memory it had on board: 64 kilobytes. And it was the first computer with 64K of memory to sell for under $600.

When the Commodore 64 was introduced vs when it was released

deconstructing my first computer

This is a photograph of me playing Micro League Baseball on a Commodore 64 in late December 1984 or January 1985.

When the C-64 first shipped is a bit of a mystery. Commodore showed prototypes at the January 1982 Consumer Electronics Show, but these weren’t production-ready models yet. Some engineers quoted in Brian Bagnall’s books say they shipped some units in August. Michael Tomczyk’s book, The Home Computer Wars, says it launched September 1. Given that Tomczyk was writing in 1984, not long after the actual launch, I’m inclined to think Tomczyk’s date is correct. Why the discrepancy? Commodore wasn’t selling direct. So if they intended to sell any machines on September 1, they had to ship the first units in August.

Commodore built the initial units in Santa Clara, Calif., but ran into quality control problems, so they outsourced production to a Japanese company called Kentron. Kentron was mass producing C-64s by January 1983.

Within six months, they’d sold half a million units. And it quickly went up from there. By the end of its fiscal 1984 years, Commodore had sold about 5 million units.

It became the best selling computer of all time, selling about 12.3 million units. Or, if you count the C-128 as a separate product, the C-64 alone sold about 10.6 million units.

It was the computer I grew up with, and invariably, when I join a videoconference from my basement, where I have a C-64 hanging on my wall behind me, someone my age will say something about it, that they had one, or remember using one.

Its early success was no accident but its staying power was

By modern standards, it wasn’t cheap. Even in 1984, when we got one, the computer with a disk drive typically cost $450 unless you really shopped around. But the only other thing comparable both price-wise and capability-wise at the time was an Atari 800XL, and Atari was having supply chain problems in 1983, so it was a lot easier to find a Commodore 64 that year.

The Commodore 64 probably would have been successful just because it was cheap and had a lot of memory for 1982. Its predecessor, the VIC-20, was the first computer to sell a million units, and it did so because it was the first computer with color to sell for less than $300. It took some weird compromises to hit that price point, with rudimentary graphics and sound capabilities and an oddball 5K of RAM.

Commodore expected both the VIC-20 and C-64 to have a shelf life of around 3 years. They were about right in the case of the VIC-20, but the C-64 kept selling about 700,000 units a year through the end of the decade and was still hanging on in 1993. It wasn’t selling well in 1993, mind you, and Commodore didn’t want to be making them by then. But there was still demand for them, and Commodore in 1993 wasn’t in a position to say no to a sale.

Why the C-64 had staying power

The C-64 went through plenty of compromises to reach its price point. But they got the mix of compromises just about right. The disk drive was slower than it needed to be, largely because of a last-second design change. Its modem support was pretty limited too, but there wasn’t a lot of demand for modems yet in 1982. But it had 16-color graphics at a resolution of 160×200 or 320×200. The lower resolution mode gave you more flexibility with how you used the colors. It also had 8 sprites, which was very useful for game programming.

The sound chip was a compromise. Its designer, Bob Yannes, was both an engineer and a musician. The chip he wanted to design would have been impressive for 1992, let alone 1982. He built the elements he needed, then replicated them until he ran out of room on the silicon wafer. He ran out of room at three voices, so the C-64 had three-voice sound. Some competing designs had four, but the 64’s SID chip had more flexibility with the volume of each channel, and could produce more complex sound waves than competing chips from General Instrument and Texas Instruments could.

Creative programmers could coax impessive video and audio effects out of the C-64 beyond what its designers imagined in 1982. So even as the machine aged late in the decade, there was still interesting new software being released for it. By then, there were much more powerful computers on the market, but for a while that helped the C-64, as artists could develop graphical assets on one of those other computers using more powerful software, then move them to the C-64.

How the Commodore 64 affected me, personally

My story with the C-64 is a familiar one. I learned how to program it a little using Basic and 6502 assembly language. By the time I was 12, I knew how to take one apart and do simple repairs. And by the time I was a teenager, I could run a sector editor and recover data from corrupted disks, edit saved game files to make video games easier, and I will neither confirm nor deny cracking some games that used code wheels for copy protection. I knew how. I did my first writing for large audiences on a C-64 too.

Everyone assumed I’d do something computer-related for a living when I got older. A lot of us did. Decades later, I run into people I knew from the local C-64 scene, and they’re working in IT like me.

Jack Tramiel, the CEO of Commodore when the C-64 launched, loved hearing those kinds of stories. A Gen Xer would walk up to him, talk about how growing up with a C-64 led to a career in technology, and then Tramiel would always say something like, “And you look very successful, I’m thrilled to hear it!”

I never had a chance to say that to Jack, but I did have a chance to thank one of his sons, Leonard. Leonard Tramiel was just as gracious.

It wasn’t just games

That was the great thing about the C-64. You didn’t have to be born on third base to afford one. Yes, its price still meant it was a bit of a sacrifice for most of the 12 million people who bought one, but it was doable.

The C-64 had a lot of great games, but it wasn’t just about games. I did my homework on it. Not all my teachers would accept a computer printout. But I could work out my answers, organize my thoughts, print them, and then hand-write a final draft for those teachers who insisted computers had no future.

And as it turned out, computers did have a future. The job I have today did not exist in 1984. But the C-64 taught me concepts that I still use almost every day. I understand buffer overflows because of the C-64.

Sometimes I return to the C-64 just to get my mind in the right place. For example, back in 2019, my then-boss told me he needed me to learn Python. I hadn’t programmed in 20 years. I’d barely even tried to program anything in 10. So I told him I’d try, but no promises. And I struggled at first. So I asked myself when I last felt comfortable programming. And I thought of the C-64. So I dug a C-64 out of storage, set it up, and started programming it in Basic, doing what I used to do, either writing simple programs, or finding an existing program and modifying it to do something slightly different. And after a few weeks of that, Python started making more sense.

The Commodore 64’s Legacy

I’m not the only one with C-64 nostalgia. The reason this is a retro tech blog is largely the C-64’s fault. I wrote some one-off content more than 21 years ago talking about how to set up a C-64. I figured maybe two other people in the world cared about that, but I didn’t have anything else to blog about that day, so I did it.

It wasn’t long before that became most popular content. Eventually I noticed, and over time, I started writing more retro tech content, refining the formula as I went, and while demand for some other things I can write about have come and gone, demand for retro tech content remained steady or even increased. It all started with me randomly deciding to write a blog post on connecting a C-64 to a television.

And the C-64 is back in production, sort of. In 2025, a Youtuber who grew up with a C-64 managed to acquire the Commodore brand and sign a deal to license an FPGA-based C-64 replacement motherboard. Starting about a year ago, the C-64 was back in production, and sold around 19,000 units at a price higher than the C-64 was selling for when it was new. Obviously it’s no longer a high-volume item so the cost per unit will be higher. But selling 19,000 C-64s in 2025, more than 30 years after the Gould/Ali-era Commodore produced its last C-64, shows the staying power this platform had.

Thank you

Thank you for reading this far, and thank you to those of you who shared this with others, it’s getting a lot of traffic. I post retro tech content every weekday, so if you enjoyed this post, I hope you’ll come back again soon.

If you found this post informative or helpful, please share it!

The Daily Front Page 9 of 26
Wednesday, September 2, 2026 The Daily Front No. #260902 — Mind, Memory, Machine
article

The Emergent Symbolic Structure of Artificial Neural Networks

by schmuhblaster·▲ 284 points·103 comments·arxiv.org ↗

Abstract

Modern systems in artificial intelligence (AI) somehow excel in domains for which they seem poorly suited. Intelligence has traditionally been modeled as operating over structured combinations of symbols, such as logical formulas. However, the strongest modern AI systems are based on neural networks, which instead represent information in continuous vectors. Vectors seem inadequate for capturing the structure of language, logic, and other cognitive domains, yet neural networks achieve impressive performance in these areas. How do they do it? In this work, we propose a potential answer: Despite appearances, perhaps the internal representations of neural networks implicitly realize symbolic structure. In support of this hypothesis, we show that the vector representations of a variety of neural networks can be closely approximated with symbolic structures: we can replace the network's entire representation-generating process with a closed-form equation instantiating a symbolic structure, and the network's behavior remains largely unchanged. This finding holds for both small-scale neural networks trained to manipulate lists as well as large language models (LLMs) operating in four domains that are central in symbolic traditions: arithmetic, logic, computer code, and language. Further, our symbolic approximation allows us to modify an LLM's behavior in targeted ways via precise interventions on its internal representations, showing that the LLM's behavior is reliant on the symbolic structures we have identified. This work provides a potential way to reconcile longstanding symbolic conceptions of intelligence with the vector-based nature of modern AI.

The Daily Front Page 10 of 26
Wednesday, September 2, 2026 The Daily Front No. #260902 — Mind, Memory, Machine
article

Aging brains blend memories together instead of just forgetting them

by mdp2021·▲ 238 points·112 comments·studyfinds.com ↗
Memory accuracy for pairing faces with objects and scenes dropped sharply after young adulthood.

Aging brain in elderly man

(Credit: © Aryazu - stock.adobe.com)

In a Nutshell

  • Memory accuracy for pairing faces with objects and scenes dropped sharply after young adulthood, with middle-aged and older adults scoring similarly to each other rather than declining in a steady line.
  • Brain activity patterns that helped younger adults remember accurately were linked, in older adults, to more mix-up errors that crossed between entirely different categories of items, such as mistaking a scene for an object.
  • Neither brain shrinkage nor attention differences fully explained why older adults’ brains showed this shift toward blended, less precise memories.

An older relative insists they left their keys with a particular grandchild, in a particular room, on a particular day, and gets every detail wrong except that keys were involved. That kind of confident mix-up may not be simple forgetfulness. New brain-imaging research suggests something odder is happening inside aging brains: the very system meant to lock memories into place may be blending them together instead.

A study published in Cerebral Cortex scanned the brains of adults aged 18 to 74 as they learned pairs of faces with objects and faces with scenes, rested, and then tried to recall the correct pairings. Researchers tracked activity patterns in the hippocampus, the brain’s memory hub, at three points: while learning, during a quiet rest afterward, and during the memory test itself. The results turn a common assumption about memory loss on its head. Older brains may not simply hold onto memories more weakly. In some cases, they hold onto too much of the wrong thing, replaying scattered pieces of unrelated experiences and stitching them into false connections.

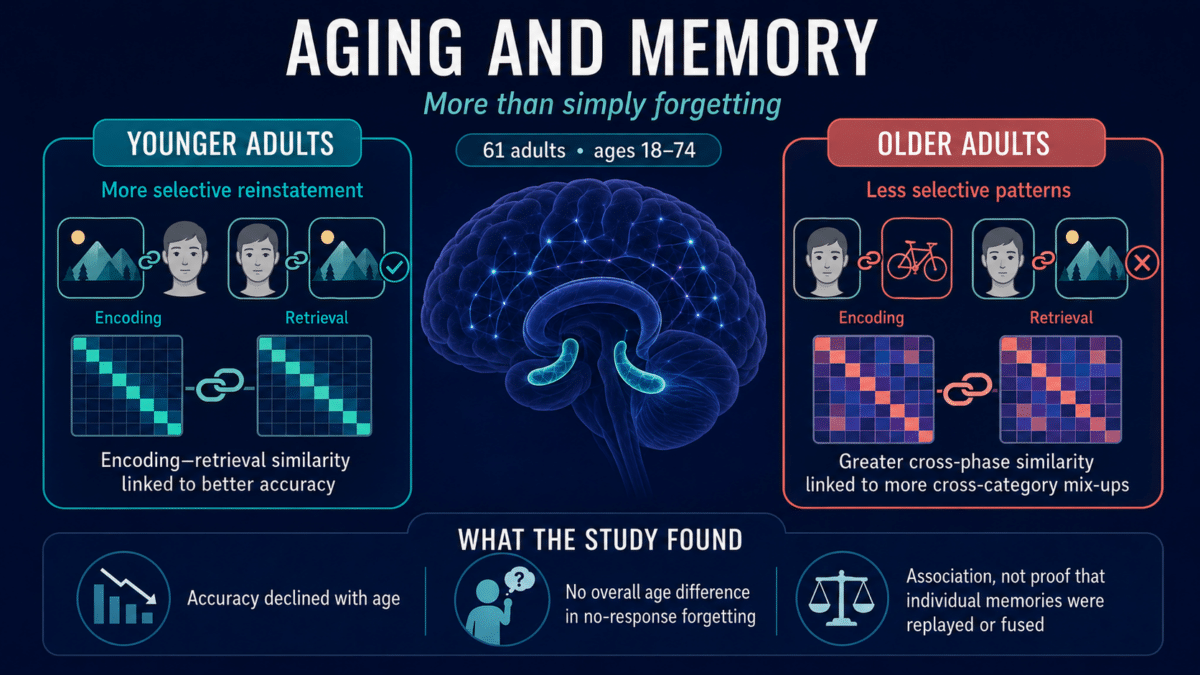
Younger adults in the study showed a clean pattern: the more closely their brain activity during recall matched their brain activity during learning, the better they performed on the memory test. That’s the brain doing what it’s supposed to do, replaying one specific memory faithfully. But among older adults, that same overlap in brain activity stopped predicting accuracy and instead predicted a very specific kind of mistake: confusing items across entirely different categories, like linking a face to a scene when it had actually been paired with an object. Their brains were retrieving too broadly rather than not at all.

How Scientists Tested Aging Brains and Memory

Researchers recruited adults between 18 and 74 years old and eventually analyzed data from 61 participants after excluding some for excessive head movement during scanning or other issues. The final group included 17 younger adults (ages 18 to 30), 21 middle-aged adults (ages 50 to 60), and 23 older adults (ages 61 to 74).

Each participant lay in an MRI scanner and completed a multi-step memory task. First, they completed a resting scan, lying still with their eyes closed. Then came the learning phase, where participants saw a face paired with either an object or a scene and were asked to imagine that person interacting with the item, a trick meant to help the pairing stick. After rating how likely they were to remember each pair, participants rested again inside the scanner. Finally, they took a memory test in which a face appeared alongside four possible answers, two objects and two scenes, and had to pick the one that had actually been paired with that face during learning. Some wrong answers were close misses, like choosing the wrong object when the answer was an object, while others were far off, like choosing a scene when the answer was an object.

To study what was happening in the brain, researchers created an activity fingerprint for the hippocampus during each of the three phases, then measured how closely those fingerprints matched one another. A close match between the learning fingerprint and the recall fingerprint may mean the brain is reactivating the original memory, though similar activity can also reflect similar thinking rather than the exact same memory playing back. A weak or scrambled match suggests the memory trace has shifted or broken down somehow.

Infographic comparing younger adults’ accurate memory reinstatement with older adults’ increased cross-category memory mix-ups.

Infographic by StudyFinds

What Brain Scans Revealed About Aging and Memory

Age predicted memory performance strongly. Younger participants correctly identified the right pairing far more often than middle-aged or older participants, while middle-aged and older adults performed similarly. Age didn’t reliably predict how often people forgot entirely or what kind of error they made when the data was viewed as one overall pattern. The real differences only showed up once researchers looked at how brain similarity connected to those errors.

That connection sits at the center of the paper. Similarity between learning-phase and recall-phase brain patterns was strongest overall compared with the other phase pairings, and higher learning-to-recall similarity predicted better memory across participants. But once researchers accounted for age, a split appeared. Younger adults with strong learning-to-recall similarity remembered more and forgot less. Middle-aged adults showed a weaker version of that same benefit. Older adults showed almost no benefit. Instead, stronger similarity in their brain patterns was linked to more cross-category confusion errors, the kind where a person mixes up an object with a scene entirely rather than confusing two similar items within the same category. That link showed up across the different brain-pattern comparisons, not just the learning-to-recall one.

Researchers then tried to figure out why. Could it be brain shrinkage? Hippocampal volume did decline with age and was loosely tied to one phase of brain-pattern similarity, but accounting for volume didn’t erase the odd pattern in older adults. Could it be baseline differences in how organized the hippocampus was before learning even started? That baseline organization explained some of the age-related decline in overall accuracy, but not the category-confusion errors. Could it be attention problems, since older adults are known to have more trouble filtering out irrelevant information? The attention measures collected in the study weren’t linked to age or to the brain patterns at all. None of the usual explanations accounted for the mix-up effect.

Combined, the brain and attention measures explained a fair amount of the age-related differences in overall accuracy and in the category-error pattern, according to the study’s estimates. But a clear biological reason why older brains start blending memories together remains an open question.

Why Blended Memories Matter as Brains Age

This distinction is more than academic. The study’s authors describe it as a shift from cleanly replaying one specific memory to what they call category-level misbinding, where the brain grabs the general gist of an experience but loses the details that separate it from similar experiences. The task itself used simple learned pairings in a lab, not real-life recollections, but anyone who has watched a parent or grandparent confidently describe an event that didn’t quite happen the way they remember it will recognize the shape of the problem. The errors aren’t random noise. They may be a predictable result of a brain that is still actively replaying memories, just replaying them too broadly and without the precision it once had.

Aging brains do not simply run out of storage space. Instead, the replay process itself changes character over time, working less like a scalpel and more like a wide brush. Recognizing that difference could eventually help researchers design tools aimed not at boosting memory in general, but specifically at sharpening the brain’s ability to keep similar memories separate, the ability this study points to as most affected.

Paper Notes

Limitations

The authors note several caveats. The research focused specifically on the hippocampus and did not fully explore how similar brain-pattern changes might unfold in other brain regions. Pattern similarity measures used in the study don’t uniquely prove memory reactivation is occurring, since similar brain activity could also reflect similar general thinking processes rather than the same specific memory. The study also excluded brain scan data from moments with heavy head movement, a common but imperfect practice, and newer methods might handle this differently. Because the sample had a gap in ages between roughly 30 and 50, the authors caution against interpreting the age-related trends as a smooth, straight-line decline across the entire lifespan. Finally, the authors note substantial overlap in memory performance across age groups, meaning individual differences likely also play a role beyond age alone.

Funding and Disclosures

Funding was provided by the University of Alabama through startup funds and a College Academy of Research, Scholarship, and Creative Activity award to author Ian M. McDonough, along with support from the University of Alabama at Birmingham and the National Institutes of Health (Grant/Award Number: P30AG031054). The authors reported no conflicts of interest.

Publication Details

Paper Title: “Aging shifts hippocampal reactivation from selective reinstatement to category-level misbinding during episodic memory”

Authors: Destaw B. Mekbib and Ian M. McDonough, Department of Psychology and Center for Cognitive Applications, Binghamton University

Journal: Cerebral Cortex, 2026, Volume 36, Issue 7, bhag114.

DOI: 10.1093/cercor/bhag114

The Daily Front Page 11 of 26
Wednesday, September 2, 2026 The Daily Front No. #260902 — Sound of Code
article

Sonic Pi

by Bluestein·▲ 237 points·54 comments·sonic-pi.net ↗
Experience the sound of code.

Sonic Pi logo

Sonic Pi

Experience the sound of code.

Sonic Pi is your free code-based music creation and performance tool.

Powerful for professional musicians and DJs.
Expressive for composition and performance.
Accessible for blind and partially sighted people.
Simple for computing and music lessons.

Learn to code creatively by composing or performing music in an incredible range of styles from Classical & Jazz to Hip hop & EDM. Free for everyone with a friendly tutorial.

Brought to you by Sam Aaron and the Sonic Pi Core Team.

Windows macOS Linux

Live Code Everything

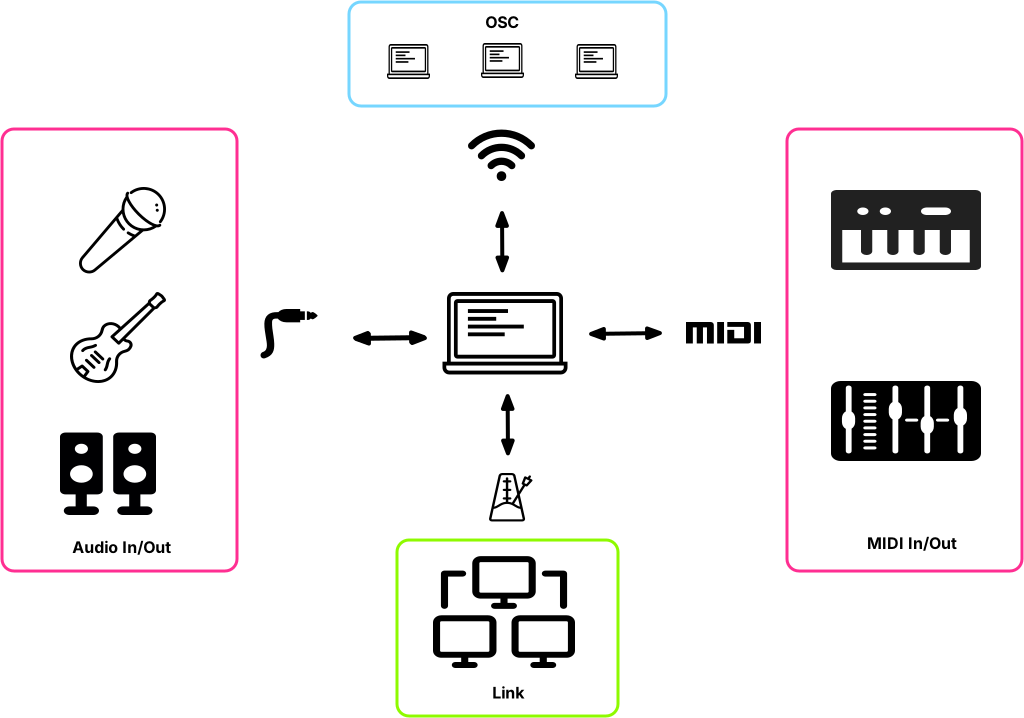
Diagram of Sonic Pi's audio, MIDI, OSC and Link connectivity

Sonic Pi lets you use simple code to turn your computer into a fully networked live coding music studio:

  • Multi Channel Audio In/Out
  • Well-timed MIDI In/Out
  • Well-timed OSC (Open Sound Control) In/Out
  • Ableton's Link network metronome built-in

Code. Music. Live.

Sonic Pi is a new kind of musical instrument.
Watch how you can use it for live performances from ambient sets to dance music in nightclubs....

Array by DJ_Dave

Sonic Pi Band - Sam Aaron & Ben Smith

Reeled - Jylda & Sam Aaron

Daft Punk - Aerodynamic coded by Sébastien Rannou

Welcome to our Community

Join the friendly Sonic Pi community and share your ideas and thoughts with other educators, musicians and live coders...

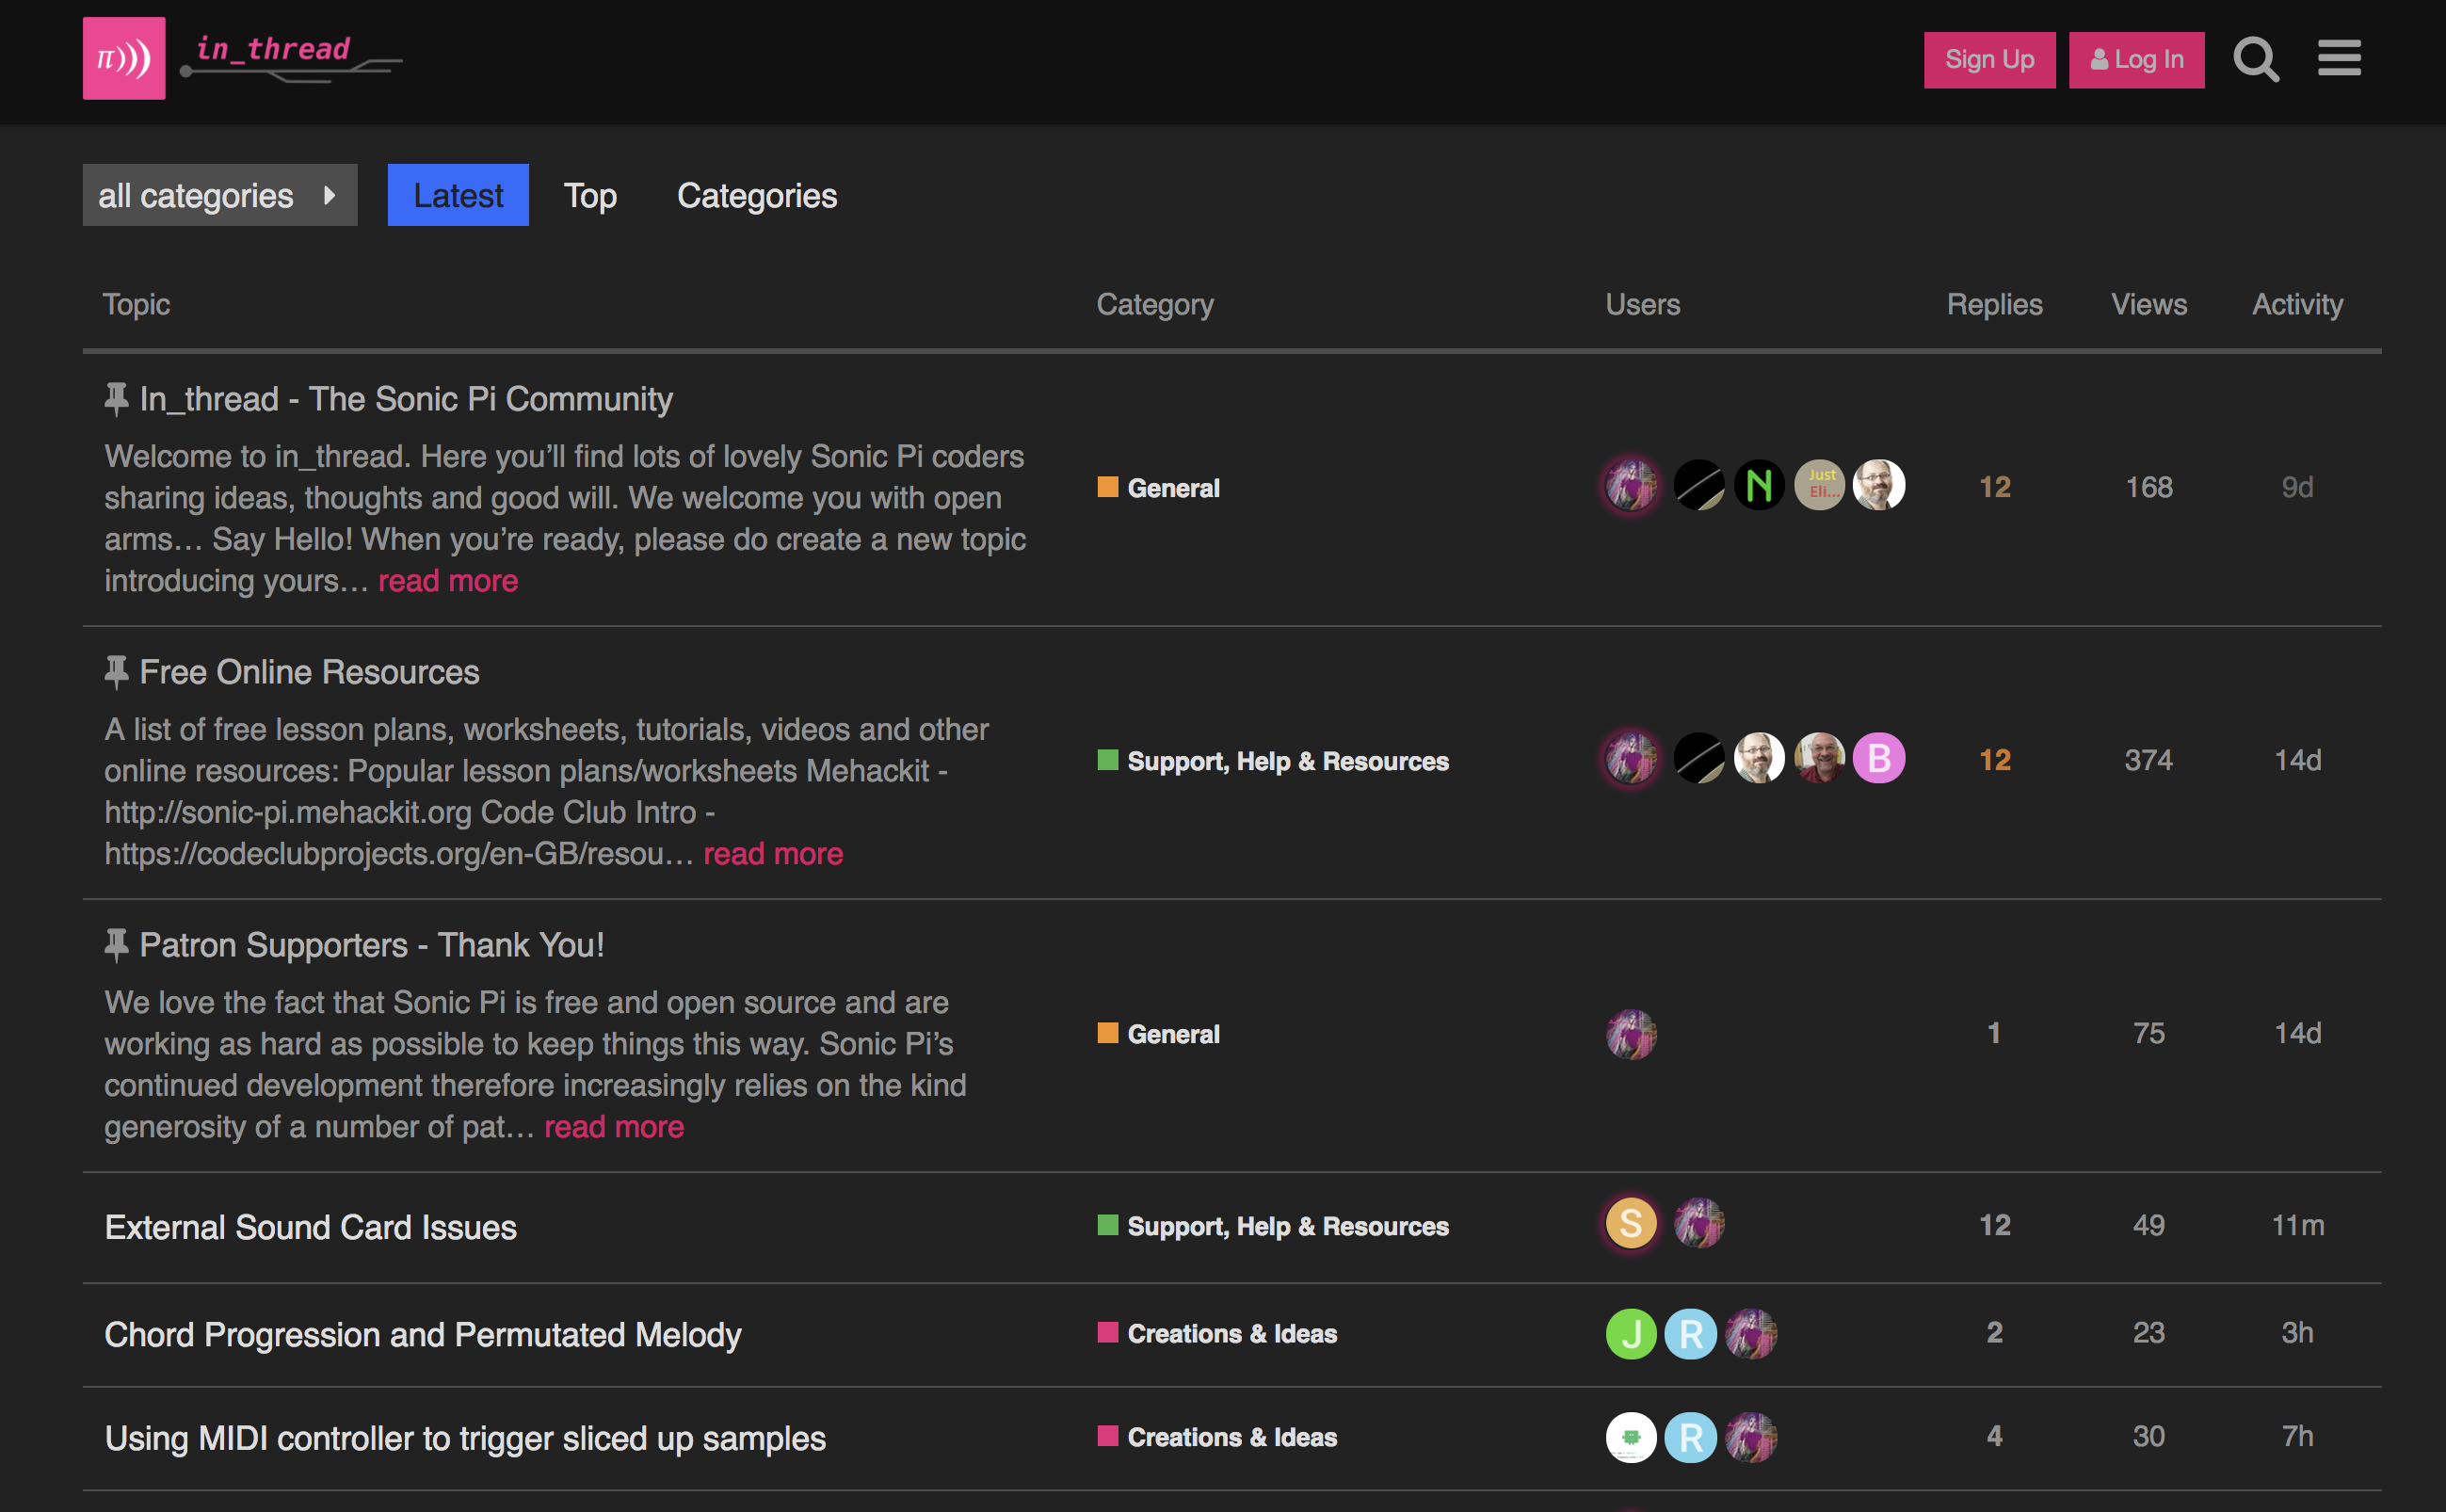
Screenshot of the in_thread community forum

Come and join the conversation...

Live Coding Education

Live Coding Education article

Sonic Pi helps you engage students in Computing through music. Read how in the article 'Live Coding Education'

Watch this introductory CAS TV interview with Sonic Pi creator Sam Aaron.

Sonic Pi in the

Computing Classroom

Sonic Pi was specifically designed for and built in collaboration with teachers for use in the classroom.

Music note

Music Live Coding

Sonic Pi is a new kind of musical instrument which enables exciting new learning pathways in the classroom.

Music programming workshop by Mehackit

Blackboard

Classroom Ready

Sonic Pi was designed, implemented and developed with extensive classroom trials in close collaboration with teachers.

Introduction for Teachers

Code

Creative Computing

Sonic Pi comes with a scheme of work targetted for KS3 Computing developed in harmony with the new UK curriculum.

Scheme of Work for Computing Lessons

Engage your students by coding music in your classroom today.

Free Sonic Pi Book

Sam Aaron, creator of Sonic Pi, has written this book to
complement the built-in tutorial.

Master live loops, code drum breaks, compose your own melodies make random riffs and loops, learn to shape and sculpt sounds and much, much more...

Code Music with Sonic Pi book cover

Download "Code Music with Sonic Pi" Now!

Sonic Pi Talks

"Sonic Pi lowers the barrier to entry for a creative experience with code..."

TEDx Newcastle 2015 - Programming as Performance

GOTO 2018 - Let's Get Ready to Rock with Sonic Pi

Music. Code. Simple.

See how easy it is to get started coding your first sounds...

Haunted Bells

live_loop :bells do
  sample :perc_bell, rate: (rrand 0.125, 1.5)
  sleep rrand(0, 2)
end

Listen to the coded bells...

Pentatonic Bleeps

with_fx :reverb, mix: 0.2 do
  live_loop :bleeps do
    play scale(:Eb2, :major_pentatonic, num_octaves: 3).choose, release: 0.1, amp: rand
    sleep 0.1
  end
end

Code with scales and chords...

Tron Bikes

live_loop :bikes do
  with_synth :dsaw do
    with_fx(:slicer, phase: [0.25,0.125].choose) do
      with_fx(:reverb, room: 0.5, mix: 0.3) do
        start_note = chord([:b1, :b2, :e1, :e2, :b3, :e3].choose, :minor).choose
        final_note = chord([:b1, :b2, :e1, :e2, :b3, :e3].choose, :minor).choose

        p = play start_note, release: 8, note_slide: 4, cutoff: 30, cutoff_slide: 4, detune: rrand(0, 0.2), pan: rrand(-1, 0), pan_slide: rrand(4, 8)
        control p, note: final_note, cutoff: rrand(80, 120), pan: rrand(0, 1)
      end
    end
  end
  sleep 8
end

Listen to bikes from the future...

Wob Rhythm

with_fx :reverb do
  in_thread do
    live_loop :choir do
      r = [0.5, 1.0/3, 3.0/5].choose
      8.times do
        sample :ambi_choir, rate: r, pan: rrand(-1, 1)
        sleep 0.5
      end
    end
  end
end

with_fx :wobble, phase: 2 do |w|
  with_fx :echo, mix: 0.6 do
    live_loop :wub do
      sample :drum_heavy_kick
      sample :bass_hit_c, rate: 0.8, amp: 0.4
      sleep 1
    end
  end
end

Hear the rhythmic wobble...

Ocean Waves

with_fx :reverb, mix: 0.5 do
  live_loop :waves do
    s = synth [:bnoise, :cnoise, :gnoise].choose, amp: rrand(0.5, 1.5), attack: rrand(0, 4), sustain: rrand(0, 2), release: rrand(1, 3), cutoff_slide: rrand(0, 3), cutoff: rrand(60, 80), pan: rrand(-1, 1), pan_slide: 1, amp: rrand(0.5, 1)
    control s, pan: rrand(-1, 1), cutoff: rrand(60, 115)
    sleep rrand(2, 3)
  end
end

Hear the digital waves crash...

IDM Breakbeat

define :play_bb do |n|
  sample :drum_heavy_kick
  sample :ambi_drone, rate: [0.25, 0.5, 0.125, 1].choose, amp: 0.25 if rand < 0.125
  sample :ambi_lunar_land, rate: [0.5, 0.125, 1, -1, -0.5].choose, amp: 0.25 if rand < 0.125
  sample :loop_amen, attack: 0, release: 0.05, start: 1 - (1.0 / n), rate: [1,1,1,1,1,1,-1].choose
  sleep sample_duration(:loop_amen) / n
end
live_loop :breaks do
  play_bb [1,2,4,8,16].choose
end

Listen to crazy coded beats...

Acid Walk

in_thread do
  use_synth :fm
  sleep 2
  live_loop :drums do
    28.times do
       sample :drum_bass_hard, amp: 0.8
       sleep 0.25
       play :e2, release: 0.2
       sample :elec_cymbal, rate: 12, amp: 0.6
       sleep 0.25
     end
     sleep 4
   end
 end

 use_synth :tb303
 with_fx :reverb do |rev|
   live_loop :acid do
     control rev, mix: rrand(0, 0.3)
     with_fx :slicer, phase: 0.125 do
       sample :ambi_lunar_land, sustain: 0, release: 8, amp: 2
     end

     control rev, mix: rrand(0, 0.6)
     r = rrand(0.05, 0.3)
     64.times do
       play chord(:e3, :minor).choose, release: r, cutoff: rrand(50, 90), amp: 0.5
       sleep 0.125
     end

     control rev, mix: rrand(0, 0.6)
     r = rrand(0.1, 0.2)
     with_synth :prophet do
       32.times do
         sleep 0.125
         play chord(:a3, :m7).choose, release: r, cutoff: rrand(40, 130), amp: 0.7
       end
     end

     control rev, mix: rrand(0, 0.6)
     r = rrand(0.05, 0.3)
     32.times do
       play chord(:e3, :minor).choose, release: r, cutoff: rrand(110, 130), amp: 0.4
       sleep 0.125
     end

     control rev, mix: rrand(0, 0.6)
     with_fx :echo, phase: 0.25, decay: 8 do
       16.times do
         play chord([:e2, :e3, :e4].choose, :m7).choose, release: 0.05, cutoff: rrand(50, 129), amp: 0.5
         sleep 0.125
       end
     end
   end
 end

Start producing longer tracks...

What are you waiting for? Get yourself a copy of Sonic Pi for:

Windows macOS Linux

Highlights from the

Sonic Pi Story

Some of our favourite moments from over the years — from classrooms and clubs to the International Space Station...

The Music Commission

The Music Commission

Sonic Pi is represented by Sam Aaron on The Music Commission panel, a new enquiry launched by ABRSM exploring how to better sustain & support progress & progression in learning music.

Naked Scientists

The Naked Scientists

The wonderful Naked Scientists covered Sonic Pi in an interview which was broadcast live on BBC radio and is available to listen and read here.

The Big Bang Fair

The Big Bang Fair 2018

The Big Bang Fair is the UK's largest celebration of STEM for young people. In 2018 the Sonic Pi Band performed a series of shows demonstrating how to live code your own band.

Mehackit

Kokoa Certified Resources

The incredible Mehackit Sonic Pi creative coding resource has been certified by the Finnish Education Standard Kakoa for its educational quality.

Convo at the Royal Albert Hall

Royal Albert Hall : Convo

Sonic Pi was an Education Partner for Convo, an ambitious new work at the Royal Albert Hall featuring 1,000 young instrumentalists & singers combining traditional instruments & code.
Watch the performance here

Codebus Africa

Codebus Africa

In 2017, African and Finnish tech and education innovators collaborated to use Sonic Pi to deliver creative coding workshops engaging almost 2000 children in 10 African countries.

Google Logo

Google Open Source Winner

Google have announced Sonic Pi as one of a number of projects they either use or think are important.

Music Teacher Awards logo

Sonic Pi nominated Music Teacher Award finalist

Sonic Pi was listed as a finalist for the Music Teacher Best Music Education Product Award alongside music instrument manufacturers Boss & Korg.

Rolling Stone

Rolling Stone Review

Sam Aaron performed with Sonic Pi at Moogfest 2016. Rolling Stone featured his performance in their review of the festival and said it "transcended the present".

The International Space Station

Sonic Pi Space Competition

These are the winning students that won an exciting once-in-a-lifetime competition to get their Sonic Pi music played onboard the International Space Station by UK astronaut Tim Peake.

MistaJam

CBBC Ten Pieces Masterclass

Radio 1 DJ MistaJam and Live Coder Sam Aaron compose a piece of music using Sonic Pi, inspired by Bizet's 'Carmen'

Daft Punk

Daft Punk in code

Sébastien Rannou has published a tutorial on how he live coded his fabulous cover of Aerodynamic by Daft Punk.

CBBC Newsround

Sonic Pi featured on CBBC Newsround

Sonic Pi was featured on the UK national children's news programme CBBC Newsround - with presenter Jenny Lawrence discovering Live Coding for the first time.

Pop Pi videos

Sonic Pi: Live & Coding Pop Pi Videos Launched

The Sonic Pi: Live & Coding project has launched a series of 10 "Pop Pi" music videos created by artists using Sonic Pi.

Sonic Pi Live and Coding Summer School

Sonic Pi Live & Coding - Summer School

Artists Juneau Projects write about the recent Sonic Pi Live & Coding Summer School which involved 60 children aged 10-14 learning to code and perform on stage at Cambridge Junction.

Get Sonic Pi for

Windows

Turn any PC into a full Sonic Pi workstation.

Windows - Arm64

ARM64 chip

v5.0.0
for PCs with Arm chips

Requires Windows 11

Windows on Arm
MSI Installer

Securely Built for Windows

Windows logo

Intel/AMD or Arm?

There are two versions available to download. Arm for newer PCs powered by Snapdragon and other Arm chips and Intel/AMD for most other PCs.

See Settings > System > About for your chip type.

Sonic Pi is available as a signed MSI installer for you to securely install on your machine or network.

Windows - Intel x64

Intel CPU

v5.0.0
for PCs with Intel or AMD chips

Requires Windows 10.

Windows 10/11 (64 bit)
MSI Installer

Most Common

Getting Sonic Pi running on Windows is as easy as 3, 1, 4...

Get Sonic Pi for

macOS

Use the full power of your Mac to take Sonic Pi to the next level.

macOS - Apple Silicon

Apple Silicon chip

v5.0.0
for Macs with Apple M series chips

Requires Ventura
(macOS 13)

Mac with Apple chip

Securely Built for Apple

Apple logo

Intel or Apple Silicon?

There are two versions available to download. Apple Silicon for newer Macs powered by M1 or M2 chips and Intel for older Macs.

See "About This Mac" for your chip type.

Using macOS 10.15 or below?
Download previous releases here

macOS - Intel x64

Intel CPU

v5.0.0
for older Macs with Intel chips

Requires Ventura
(macOS 13)

Mac with Intel chip
Most Common

Getting Sonic Pi running on your Mac is as easy as eating Apple Pi.

Get Sonic Pi for

Linux

Live code everything from a Raspberry Pi to a powerful desktop.

Linux - Arm64

ARM64 chip

v5.0.0
for Arm devices such as the Raspberry Pi

Linux Arm64
AppImage

Built for Linux

Penguin wearing headphones

Sonic Pi is available as a self-contained AppImage — no installation required.

Download, make it executable and run:

chmod +x Sonic-Pi-*.AppImage
./Sonic-Pi-*.AppImage

Using a 32 bit system?
Download the x86 AppImage here

Linux - Intel x64

Intel CPU

v5.0.0
for PCs with Intel or AMD chips

Linux x64
AppImage

The Daily Front Page 12 of 26
Wednesday, September 2, 2026 The Daily Front No. #260902 — Instruments in the Field
article

Building an interactive instrument for a one-of-a-kind festival

by tjwds·▲ 66 points·7 comments·benholmen.com ↗
A singular music, literary, and art festival.

An art installation with many aluminum tubes arranged around the performer. Ben Holmen and another man are inspecting it. Photo by Evelyn Nelson.

Halfmoon Chimes at Eaux Claires 2026

My hometown - Eau Claire, Wisconsin - is home to a singular music, literary, and art festival that is the brainchild of Justin Vernon (Bon Iver). Called Eaux Claires, it's unlike any other major music festival, and has a heavy emphasis on unique collaboration, audience participation, and unexpected delights. Besides world class musicians performing unique sets and collaborating in new ways, the festival has hosted a wide range of art installations to be discovered if you're willing to dig for them. I've experienced every version of this festival and even helped with an art installation in the 2016 edition. After running from 2015-2018, the festival took an indefinite hiatus.

Eaux Claires - July 24-25 - Carson Park - More Something, For More Everyone

In the 2018-2026 interim, I'd been pondering an idea for a custom instrument / art installation. It was very specific to the ethos of the Eaux Claires festival and the community around it, and I doubted that I'd have the chance to actually build it and share it with others. In the meantime, I focused on my kilopixel, and had just finished a successful installation when I heard Eaux Claires was returning in 2026. I immediately started prototyping my idea, figured out who the organizers were, and pitched it. My success with the kilopixel gave me confidence that I could pull this off.

The core concept

The instrument would have three essential functions:

  • playable live - walk up to it and start playing immediately
  • recordable - push a button and record what you're playing to share with others
  • replayable - select a recording from another festival attendee and replay it

Recording would produce a physical artifact - a receipt of your work - that would become part of the art installation and slowly surround the instrument with the contributions of attendees.

I built a prototype of the core functionality to prove that I could do it, sketched the concept, and sent a video to the organizers. They said yes! I would actually build this dream instrument!

Material selection + ideation

An arrangement of the core components of the instrument: walnut rays radiating from a center point, birch plywood, aluminum chimes, walnut supports, and a MIDI keyboard

I knew that I wanted to base it on a MIDI keyboard of 2-4 octaves, and I knew I'd use a solenoid as a hammer to strike the note. I went full percussion section mode, learning as much as I could about different types of vibraphones, marimbas, glockenspiels, xylophones, and more. I eventually settled on an improvised chime made from metal pipe - a bright, pure, sustaining tone. I found the most incredible old internet site, where I learned everything I could possibly need to know about chimes.

I learned so much about chime material and constraints! For one, the diameter and wall thickness is critical. Thin steel pipes sound clanky and thin; thick aluminum pipes sound pure and sweet. Large pipes are required for low notes, and it's really hard to push below middle C with good tone. I shifted the entire instrument up one octave due to material constraints, settling on C4 (middle C) to C7. 37 notes to build and play.

Aluminum and other metal stock on a rack at a metal supplier.

My early prototyping with solenoids was successful - a 12V, 5N solenoid can hit hard enough and consumes a reasonable amount of power. I experimented with hammer materials - wood, plastic, felt, and cork. I found the right cork pad to dampen the blow enough but still ring out.

So I had a solution: aluminum pipe, a solenoid, cork pad, 12 volts, and a computer.

Tuning chimes

You intuitively know that the length of a chime has something to do with the note it makes. This is called the fundamental frequency, and is determined by the material, the wall thickness, the diameter, and the length. I had a chart of approximate lengths for a given note, and I cut them long and refined them millimeter by millimeter. Some notes tuned easily - others gave me trouble. But I stuck with it, carefully shaving down each note until it rang at just the right frequency.

A pile of aluminum pipe is sitting on a work table. They're arranged by length and cut roughly.

Aluminum pipe pieces and chips are seen on a bench.

Polishing chimes

I sourced the chime material from a local metal supplier. It's in good condition but inconsistent, and not really up to the standards of an art installation. I found the best strategy was to make a mini-lathe and polish the pipe with abrasive pads. It's possible to get to a mirror finish this way, but I just needed consistency - all chimes should look the same.

I fabricated some chocks and rigged a lathe setup with my drill. It was slow going, but the results looked great.

A piece of aluminum pipe is jammed between two white chocks. A hand drill is attached on one end, spinning the pipe. Towels, WD-40, and abrasive pads are visible.

Three aluminum pipes are shiny and clean, alongside five rough unpolished pipes.

A dirty hand is covered in aluminum slurry

Clean, soapy, and shiny aluminum pipes are seen on a wooden deck. They're being washed

Supporting chimes

A chime tube can be held at two places without interfering with the vibration - 22.4% of the length of the tube from each end. Wind chimes are always supported at one of these points, but I decided to use both points to hold the chime but let it ring freely. I created custom brackets to hold the pipe, suspended it on a copper wire, and attached the bracket to a piece of walnut. I called these my canoes, as they were reminiscent of the shape and fit a water theme I was using.

These canoes were each unique - 37 distinct parts that I shaped by hand. I made four different bracket sizes, one for each pipe diameter. And to attach them to the instrument, another custom bracket that could hold the canoe, a support arm, and the solenoid in just the right orientation.

Screenshot of 3d models for chime brackets

Screenshot of 3d model for support bracket

Wooden supports hanging from a rope. They're made of walnut and aligned in a pleasing array

A batch of chime assemblies lies on a couch. Each one is a polished aluminum pipe, two 3d printed brackets, a wooden support, and a third bracket

This completed my chime and solenoid assembly and represented many hours of careful work.

Under the hood

The instrument is built around a Raspberry Pi 4 running a multi-threaded python script. The script is doing a few things as fast as it can:

  • listen for any new MIDI messages
  • listen for any new barcodes scanned
  • track the state of the recording button
  • save MIDI messages (if recording)
  • if a new barcode is scanned, add MIDI messages to a queue to be played at the right time
  • turn on any solenoids for any new MIDI messages or playback MIDI messages
  • turn off any solenoids if they've been held on long enough

System diagram showing MIDI keyboard, barcode scanner, receipt printer, Raspberry Pi, solenoid breakouts, and solenoids

Controlling 37 outputs with one Raspberry Pi isn't possible unless you use an addressable bus of some kind. I used solenoid breakout boards that allowed me to chain up to 6 breakout boards with just a few Raspberry Pi outputs. This was more than enough - 8 outputs per breakout board meant I could control my solenoids with room to spare. My code could turn on and off the solenoids at will.

I experimented with converting a MIDI velocity to a solenoid hit, and found that I needed to power the solenoid for about 10 milliseconds to barely tap the chime, and 40 milliseconds was the maximum duration. I mapped this to a MIDI velocity - the hardest hits get a full 40ms, the softest key presses get 10ms.

Solenoids attached to long wires. Ready for installation

Solenoids breakout boards wired up to 37 wires.

Overall form

I knew that the project had to hit three notes:

  • sound beautiful
  • look beautiful
  • play intuitively

I puzzled over the complete design of the instrument, and specifically where to place the chimes in relation to the participants. I happened into the name Halfmoon Chimes in homage to Halfmoon Lake that surrounds the festival grounds. This gave me the inspiration of arranging the chimes in a half moon shape, which solved a number of design and engineering problems at once. I never really looked back.

A circle cut out of a sheet of plywood with a router on a simple circle cutting jig

Walnut pieces radiate from a central point in a pleasing manner. They contrast with a birch plywood base.

A mockup of the instrument viewed from above. Walnut rays radiate out, and at the end of a few are the aluminum pipes on supports.

A circle cut out of a sheet of plywood with a router on a simple circle cutting jig

A more complete mockup viewed from above. Walnut rays radiate out, and all of the chimes are installed. Two MIDI keyboards sit on top. It looks nearly complete.

The receipts

I knew from the beginning that I wanted a physical artifact of a recording, and I settled on a receipt. There's something appealing about the immediacy and tangibility of a receipt! I had conceived a vending machine style feeding mechanism that would slowly pull the paper into the instrument, but I rejected that due to complexity and breakdown potential. However, to achieve that feeding I needed to include a barcode and it had to be able to be scanned from either direction which led to the design of stretching a barcode and hiding it in plain sight. I liked the distinctive and abstract look of this so I kept it in the final design.

This meant that each receipt was completely unique - the circles represent the note position, and the size of each circle is determined by how hard the note was played. You can kind of tell the style of the song by the receipt, but it's still very serendipitous - the song might be great, or it might be boring. You'll only know once you scan it with the barcode scanner and replay it!

Five receipts showing a unique image sit on top of the instrument. They have a bunch of circles in pleasing patterns.

Receipts clipped to a line, blowing in the breeze. Photo by Nick Meyer

A pre-festival open house

I wanted to open the festival with some music already recorded - without it, early participants might have a hard time understanding how to interact with the instrument. So we hauled it into our backyard and held an open house for friends, acquaintances, and strangers alike. The party was warm and encouraging - about twenty generous folks showed up and played together. It proved to me that this thing had the juice.

The instrument, partially disassembled, being hauled in a yard. There are two carrying poles poking through the cabinet.

The instrument, ready to play in the back yard. Photo by Nick Meyer

A crowd is gathered around the instrument. One person is playing it, while others chat in the background. Photo by Nick Meyer

Live and up close

I could not have been more pleased with the reception at the festival! A few thousand people visited my quiet corner of the festival over two days, and the instrument consistently had a crowd of people around it trying to figure it out or play with it.

Photo by Evelyn Nelson.

Photo by Evelyn Nelson.

Photo by Evelyn Nelson.

Photo by Andrea Paulseth.

Photo by Luong Huynh.

Photo by Andrea Paulseth.

The instrument recorded 447 distinct performances and printed 716 feet of receipt paper. Attendees replayed 336 performances, and more than 400,000 notes were played.

Audio samples

After the festival concluded, my pal Benjamin Hinz came by and we recorded the instrument properly.

Startup sound

Your browser does not support the audio element.

Unknown performer

Your browser does not support the audio element.

Unknown performer

Your browser does not support the audio element.

Unknown performer

Your browser does not support the audio element.

"Shutter Blue" written & performed by Quiet Takes

Your browser does not support the audio element.

Improvisation performed by Benjamin Hinz

Your browser does not support the audio element.

The Daily Front Page 13 of 26
Wednesday, September 2, 2026 The Daily Front No. #260902 — On Leaving the Cave
article

Exit the Cave

by akkartik·▲ 231 points·83 comments·turtlespace.blog ↗
Better to be pinned in public with courage than to train endlessly in private like a coward.

Ain’t it fun, livin’ in the real world?

There’s something romantic about the Cave. About grinding away at something in private. About training with headphones on in our own little world. About stepping away for six months to emerge “unrecognizable” to all those people we imagine thinking about us.

This masculine urge to “grind” seems to be gaining popularity. It reminds me of an incredible Under Armour ad for Michael Phelps’s iconic return to the 2016 Olympics which ended with the quote: “It’s what you do in the dark that puts you in the light.”

Yet the Cave, despite its darkness of solitude and dampness from sweat and suffer-porn, is comfortable. It lets us tinker with our own delusions. If we spend too much time in the Cave, our pupils dilate, and our assumptions start to look like reality. That somehow this training regimen will unlock athletic prowess, or that our perfectly polished product will be loved by millions of users around the globe. I find Paramore playing in my head.

“See, it’s easy to ignore trouble, when you’re living in a bubble.”

Culture has created a cozy Cave. Smart devices reward private fitness. Recommendation algorithms propagate our preexisting philosophy through personalized programming. AI tells us what we want to hear and bolsters our assumptions instead of challenging them. We grow so comfortable curating our Cave that we forget the vast, interesting, beautiful, and brutal world beyond its walls.

I say all this because I’ve spent years mistaking effort for progress. I learned this lesson nearly twenty years ago on a wrestling mat.

“So, what are you gonna do, when the world don’t orbit around you?”

As the cold winds off Lake Michigan blew snow over Kenowa Hills High School, two dozen young men grappled in a sweaty, windowless room. For four winters, I wrestled. I’d start the season in November, feeling strong and fit. Five months later, after hundreds of hours training in sweatsuits on an empty stomach and a dozen Saturdays spent in gyms across West Michigan, I’d enter April pale, malnourished, and occasionally plagued by a skin disease like impetigo. At one point, I cut seven pounds a week to make the 119-pound weight class. Despite all that, I loved wrestling more than any other sport and miss it dearly.

Not because I was good. In fact, I was terrible. I got pinned more often than I pinned and lost more often than I won. But those few times my arm was raised were sweeter than almost anything. There is something undeniably beautiful in wrestling’s brutality.

There’s no gear to give an advantage—no special cleats, rackets, or pads. There are no conditions to create excuses—no weather, no nets, no sun in the eyes. And there’s nothing to hide behind. Just you and your opponent for six minutes of utter exhaustion. When you win, you win. When you lose, you lose. Because we cannot guarantee that outcome, we obsess over the inputs.

“Don’t go cryin’ to your mama, ‘cause you’re on your own in the real world.”

When we want something, we often want our concept of how to achieve it to be true. Sure, I wanted to pin my opponent on the mat. But I also wanted my approach to yield success. Freshman year, I figured my biggest gap was technique—once I learned the right movements, I would win. Sophomore year, I figured my biggest gap was conditioning. If I pushed myself hard, running stairs faster and doing more pushups than my teammates, I would win.

Yet year after year, when I stepped onto the mat, I didn’t qualify for regional or state tournaments. I didn’t secure the championships I imagined. The mat was the cold, unrelenting reality that all my toiling in the Cave had failed to overcome. Technique mattered. Conditioning mattered. But I had made the comfortable mistake of believing that because I could measure and control them, they must determine the outcome.

Dan Gable, Olympic gold medalist, legendary Iowa coach, and one of the greatest wrestlers of all time, summed up wrestling like this: “The first period is won by the guy with the best technique, the second period is won by the guy with the best conditioning, and the third period is won by the guy with the biggest heart.”

This is not a pithy oversimplification. The desire to win is simple but not obvious. Sure, I thought I wanted to win. But really, I wanted my team to not lose. That might sound noble and unselfish, but it was far from it. Yes, I cared about my team, but my motivations weren’t noble. I didn’t want to miss weight and disappoint them because I would then feel shame. I was avoiding negative feelings, not seeking victory. The mat had exposed a more uncomfortable truth than my lack of talent: I did not want what I thought I wanted.

Ironically, this misplaced desire ended up hurting my team. I showed up, trained hard, and made weight, but when I didn’t subdue my opponent, it cost us points. I had to want victory enough to let reality teach me what it required. Truly pursuing victory would benefit the team far more than grinding away in the Cave. I needed to stop wrestling not to lose and learn to wrestle to win.

I’m not here to self-flagellate. I say all this to remember a truth I’ve let gather dust. There is a kind of cowardice that looks a lot like discipline. A writer needs readers. An entrepreneur needs customers. An athlete needs competition. A lover needs someone free to reject him. Any worthy pursuit needs a mat.

“Ain’t it fun, livin’ in the real world?”

Better to be pinned in public with courage than to train endlessly in private like a coward. Ship that product, share that story, step into the ring, take the risk of love. Even if you end up on your back, you did it in the real world.

The Daily Front Page 14 of 26
Wednesday, September 2, 2026 The Daily Front No. #260902 — A Quiet Life
article

I wanna live an NPC life

by conferza·▲ 227 points·200 comments·signalundefied.bearblog.dev ↗

the general consensus around being an npc is that you’re giving up your autonomy—essentially becoming a side character in someone else's story or watching life pass you by while doomscrolling on your phone.

but here’s my take: the npc lifestyle is actually a very viable way to live.

as an npc, you aren't actually watching other people’s lives. even in a game, if you're an npc, you are doing your own thing regardless of how anyone else behaves in the world. you are entirely unfazed by everything happening around you. it might sound a bit extreme, but at some level, it’s the ultimate "i don't give a fuck" state of mind.

take an npc blacksmith in skyrim, for example. do they care whether or not you slay dragons? no. do they care if you come in and steal all their shit because you pickpocketed them? no way. what do they do? they just keep living their life as a blacksmith—and they’re good at it to whatever level they’re supposed to be, whether they're a master craftsman or the shitty apprentice in the starting town. they do their thing regardless of what you do in the world.

maybe the secret to living—or maybe this is just a retelling of stoicism and endless levels of historical philosophy—is that the goal is to just do your own thing.

be an npc. drive a boring car—who gives a fuck? have a boring job. do nothing after work. why do you have to do something after work? do something because you feel like doing it, not because you feel like you have to.

when you stop caring about being the main character, you finally get to just live your life.

article

A Selection of Los Alamos Rolodex Business Cards

by 1970-01-01·▲ 151 points·37 comments·clui.org ↗

Los Alamos Rolodex business card, CLUI photo

Los Alamos Rolodex business card, CLUI photo

Los Alamos Rolodex business card, CLUI photo

Los Alamos Rolodex business card, CLUI photo

Los Alamos Rolodex business card, CLUI photo

Los Alamos Rolodex business card, CLUI photo

Los Alamos Rolodex business card, CLUI photo

Los Alamos Rolodex business card, CLUI photo

Los Alamos Rolodex business card, CLUI photo

Los Alamos Rolodex business card, CLUI photo

Los Alamos Rolodex business card, CLUI photo

Los Alamos Rolodex business card, CLUI photo

Los Alamos Rolodex business card, CLUI photo

article

True Rate of Unemployment

by ptrhvns·▲ 302 points·340 comments·lisep.org ↗

The percentage of the U.S. labor force that is functionally unemployed

Using data compiled by the federal government’s Bureau of Labor Statistics, the True Rate of Unemployment tracks the percentage of the U.S. labor force that does not have a full-time job (35+ hours a week) but wants one, has no job, or does not earn a living wage, conservatively pegged at $26,000 (in 2025 dollars) annually before taxes.

Just as an accurate census is a prerequisite to funding American communities equitably, policymakers depend on economic indicators to shape economic policy. LISEP developed the True Rate of Unemployment to provide analysts and decision-makers with a more accurate measure of Americans’ financial well-being.

For a more in-depth explanation of the True Rate of Unemployment, please reference LISEP’s TRU white paper.

True Rate of Unemployment

The True Rate of Unemployment (TRU), as defined by LISEP, measures the percentage of the U.S. labor force that is functionally unemployed.

Additional Resources

TRU White Paper

TRU & TWE Methodology

TRU & TWE Source Data

The Daily Front Page 15 of 26
Wednesday, September 2, 2026 The Daily Front No. #260902 — Sampling the Random
article

Poisson Disk Sampling

by vismit2000·▲ 140 points·19 comments·stripeacross.com ↗
Robert Bridson published a one page paper that has nearly 1,000 citations and takes less than 10 minutes to read.

In 2024, a team of nine mathematicians released a monstrous, nearly 1,000 page proof of the geometric Langlands conjecture. It is a crowning achievement in pure mathematics, and I have accepted that I will never understand even the statements that they proved, much less the proof itself.

On the total opposite end of the spectrum, in 2007, Robert Bridson published a one page paper that has nearly 1,000 citations and takes less than 10 minutes to fully understand. It presents a simple solution to a problem that commonly arises in computer graphics and simulations: placing things randomly, but not too close together.

Say you’re trying to procedurally generate a forest and need a way to place the trees. The problem with plain random sampling is obvious:

Some of the trees would be on top of each other! What we need is the ability to set a minimum distance between any two trees. A distribution of trees that obeys this rule is called a Poisson disk distribution. We can try a naive rejection sampling approach where we throw random darts and reject any point that falls within that minimum distance of any other point, but without a more clever data structure, it takes linear time to check collisions for each sample and the rejection rate quickly approaches one. Bridson’s algorithm gives us an efficient way to do this.

Bridson’s Algorithm

Suppose the desired minimum distance between points is rrr and we are working in a ddd-dimensional space. Bridson’s algorithm goes as follows:

  1. Partition the space into a grid of side length rd\frac{r}{\sqrt{d}}d​r​. This guarantees that each grid cell can have at most one point inside it.

  2. Initialize a list active to have one random point chosen uniformly from the space.

  3. While active is non-empty:

    1. Select an element ppp from active uniformly at random.
    2. Uniformly sample the annulus centered at ppp of inner radius rrr and outer radius 2r2r2r at most kkk times. If a valid Poisson disk sample is found, using the grid for efficient collision detection, add it to active and pick a new ppp. If no valid point is found within kkk attempts, remove ppp from active. Bridson recommends setting k=30k = 30k=30.

The easiest way to uniformly sample the annulus is to generate a random unit vector v⃗∈Rd\vec{v} \in \mathbb{R}^dv∈Rd and a number xxx chosen uniformly from the interval [12d,1)\left[\frac{1}{2^d}, 1\right)[2d1​,1), and then your final sample is 2rx1/d⋅v⃗2rx^{1/d}\cdot\vec{v}2rx1/d⋅v. A few years ago, I made a video that explains why this works. In two dimensions, picking a unit vector is equivalent to picking an angle θ∈[0,2π)\theta \in [0, 2\pi)θ∈[0,2π). In higher dimensions, you can normalize a vector where each component is sampled from a normal distribution.

Improvements

There are two simple improvements to Bridson’s algorithm that I have found drastically reduce the number of iterations required to generate the same number of points. The first works in two dimensions, but the second works in higher dimensions as well.

Let’s start with the two dimensional improvement. Consider when the algorithm places a point ppp and then samples its annulus to get a new point qqq. We call ppp the parent of qqq. There is valuable information stored in the relation between these points. When we inevitably sample the annulus centered at qqq, there is an entire range of angles that we need not consider because the points within them would be too close to ppp. This range is represented by the dotted lines in the following figure.

While the visual intuition is easy to grasp, translating it into a formula is a tedious trigonometry exercise. I’ll spare you the details and claim without proof that the cone formed by the dotted lines is centered at angle α\alphaα and its width is 2β2\beta2β where

α=atan2⁡(py−qy,px−qx),β=min⁡(arccos⁡∣p−q∣2+3r24r⋅∣p−q∣,arccos⁡∣p−q∣2r).\begin{align*} \alpha &= \operatorname{atan2}(p_y - q_y, p_x - q_x), \\ \beta &= \min\left(\arccos\frac{|p-q|^2+3r^2}{4r \cdot |p-q|}, \arccos\frac{|p-q|}{2r}\right). \end{align*}αβ​=atan2(py​−qy​,px​−qx​),=min(arccos4r⋅∣p−q∣∣p−q∣2+3r2​,arccos2r∣p−q∣​).​

The only interesting part of this formula is the minimum that appears in the equation for β\betaβ. This accounts for the fact that either the inner or outer circle of the annulus can bound the cone, depending on the distance between ppp and qqq. We have to pick the minimum to guarantee that the intersection of the cone and the annulus is entirely contained in the circle. Note how the boundary points of the cone jump from the outer circle to the inner when the distance between the points crosses 3⋅r\sqrt{3} \cdot r3​⋅r. The first term in the minimum is the angle of intersection with the outer circle and the second term is that with the inner circle.

Implementing this just requires storing the parent of each point. Then you can calculate the angles of the cone and generate the angle θ\thetaθ for the next sample in the range outside the cone.

The following graph shows how many points were generated by Bridson’s algorithm with and without the parental optimization. Each datapoint is the average of 100 trials on a grid of side length ℓ=100\ell = 100ℓ=100 with r=1r = 1r=1.

This improvement could likely be generalized to higher dimensions, but it would require more space to store the contact vectors of the annuli, and the returns would likely diminish because the volume of the intersection of an annulus with a sphere becomes proportionally insignificant in higher dimensions. Similarly, there is nothing stopping us from storing the children of a point in addition to its parent to eliminate even more sections of the annulus, but this would also require more storage and it would make selecting θ\thetaθ far slower.

Instead of changing how we pick the angle to the next sample, the second improvement changes how we pick the distance to the next sample. Consider the distribution of the distances from each point in the annulus to its center. Its cumulative distribution function (CDF) is proportional to xdx^dxd on the interval [r,2r][r, 2r][r,2r]. For an explanation of this, I again defer to my video. But what happens if we change the exponent to be some constant ccc other than ddd? Then we can move the points closer to or further away from the center. For c≠0c \neq 0c=0, the exact CDF is

Fc(x)={0x≤r,xc−rc(2c−1)rcr<x≤2r,1x>2r.F_c(x) = \begin{cases} 0 & x \leq r, \\ \frac{x^c - r^c}{(2^c - 1)r^c} & r < x \leq 2r, \\ 1 & x > 2r. \end{cases}Fc​(x)=⎩⎨⎧​0(2c−1)rcxc−rc​1​x≤r,r<x≤2r,x>2r.​

The following figure lets you see what the CDF and 500 random samples in the annulus look like as ccc changes. Remember that c=2c = 2c=2 gives a uniform distribution.

You may have noticed that the slider allows you to set c=0c = 0c=0 even though F0(x)F_0(x)F0​(x) is undefined due to a division by zero. To rememdy this, we define F0(x)=lim⁡c→0Fc(x)F_0(x) = \lim_{c \to 0} F_c(x)F0​(x)=limc→0​Fc​(x), which is

F0(x)={0x≤r,log⁡2x−log⁡2rr<x≤2r,1x>2r.F_0(x) = \begin{cases} 0 & x \leq r, \\ \log_2{x} - \log_2{r} & r < x \leq 2r, \\ 1 & x > 2r. \end{cases}F0​(x)=⎩⎨⎧​0log2​x−log2​r1​x≤r,r<x≤2r,x>2r.​

In order to sample the radius using an arbitrary value of ccc, we can apply inverse transform sampling. When c=0c = 0c=0, the radius should be r⋅2xr \cdot 2^xr⋅2x where xxx is a uniform random variable on the interval [0,1)[0, 1)[0,1). Otherwise, we use 2ry1/c2ry^{1/c}2ry1/c where yyy is a uniform random variable between 1 and 12c\frac{1}{2^c}2c1​. The bounds of the interval swap depending on whether ccc is positive or negative.

The following heatmap shows the impact ccc has on the number of points generated by Bridson’s algorithm. We use the same experimental setup as before with 100 trials on a grid of side length ℓ=100\ell = 100ℓ=100 with r=1r = 1r=1.

This seems to suggest that we should set ccc to be some very negative number, or even take the limit as ccc approaches negative infinity, forcing each point to be a distance of exactly rrr from its parent. While it is true that this would maximize the number of points generated and create more tightly packed configurations, it would do so at the expense of the distribution “feeling” random. In the extreme case of c=−∞c = -\inftyc=−∞, you get many artifacts like long strings of points and gaps where the restricted distance cannot reach. It is also not difficult to reconstruct the tree of how the points were generated after the fact.

So we need to strike a balance between maximizing the density of points and preserving randomness. If you fix some 15≤k≤4015 \leq k \leq 4015≤k≤40, I have found it best to set c=−1.4−17kc = -1.4 - \frac{17}{\sqrt{k}}c=−1.4−k​17​ when using the parental optimization. This equation was derived empirically to make the number of points generated roughly match the expected output from a uniform and maximal Poisson disk sampler (more on this later). For every kkk between 15 and 40, I did a binary search to find the value of ccc that would make it so if you drew a circle of radius r/2r/2r/2 around every point, those circles would take up 54.7% of the entire area. This percentage is the saurated coverage of circular disks under the random sequential adsorption model. Of course, this only applies in two dimensions and ccc will need to be tuned differently in higher dimensions.

Stippling

So far, we have kept rrr constant, but there is no reason for this. We can dynamically set the minimum distance between points according to a function r ⁣:Rd→Rr\colon \mathbb{R}^d \to \mathbb{R}r:Rd→R. So after placing a point ppp, we sample an annulus of inner radius r(p)r(p)r(p). A fun application of this is to define rrr as the brightness of each pixel in an image to produce a stippling effect. The figure on the left does this in black and white, and the figure on the right combines three sets of Poisson disk samples, one for each color channel.

Birdson’s algorithm is an inherently sequential one, but there are others that are designed to be executed in parallel, resulting in massive performance boosts. My favorite of these is PixelPie which runs entirely on the GPU. I used this algorithm to create Poisson Cam, a realtime video stippler using Poisson disk sampling. This was one of my favorite projects to work on because it taught me shader programming, Rust, stream compaction algorithms, and of course the PixelPie algorithm itself.

Maximality and Uniformity

In 2022, Scott A. Mitchell published a really cool paper introducing a beautiful new way of generating Poisson disk samples in two dimensions that, to my knowledge, has received no attention since its publication. This last section is dedicated to it.

Before I describe the algorithm, I want to explain the three things that make it better than Bridson’s:

  1. Maximality. After the algorithm finishes, it is guaranteed to be impossible to fit another point without violating the Poisson disk property.
  2. Uniformity. The algorithm samples a uniform distribution over all maximal sets of Poisson disk samples.
  3. Determinism. The algorithm does not rely on rejection sampling, meaning there are no failed attempts to place points.

Maximality and uniformity have been achieved by many algorithms, the most popular of which is hierarchical dart throwing, but Mitchell’s is the first algorithm to do this without some kind of rejection sampling. It is also very performant. While I have not done any rigorous benchmarking, I have found that Mitchell’s implementation of the algorithm runs about as quickly and generates roughly the same number of points as my implementation of Bridson’s algorithm (i.e., with the parental optimization) with k=20k = 20k=20 and c=−5.2c = -5.2c=−5.2. As far as I can tell, the only downside to this algorithm is that it is substantially more complex. The following is a greatly simplified summary:

  1. Partition the space into a grid of side length rd\frac{r}{\sqrt{d}}d​r​.

  2. While there is room to place another point:

    1. Randomly select a cell ccc from the grid weighted by the remaining areas.
    2. Decompose ccc into disjoint triangles and chocks.1
    3. Select a random triangle or chock ttt weighted by area.
    4. Uniformly sample a point ppp from ttt. Add it to the final set.
    5. Carve out a circle of radius rrr centered at ppp from the grid.

The original paper does an excellent job of explaining the algorithm in detail, so the most helpful contribution I can make is the following visualization:

Footnotes

  1. A chock is a three-sided shape bounded by a circle, a radial ray, and a tangent.
The Daily Front Page 16 of 26
Wednesday, September 2, 2026 The Daily Front No. #260902 — The Editor’s Workbench
article

Fine, I'll build my own text editor

by Alephinitesimal·▲ 239 points·233 comments·dbushell.com ↗
Software these days is garbage. That got me thinking; I’m good at building garbage!

“They don’t make ’em like Sublime Text anymore” resonated with a lot of folk. Software these days is garbage. That got me thinking; I’m good at building garbage!

Why can’t I build my own text editor?

VS Code is built upon Monaco Editor which is a <div> soup hellscape. I was late to the VS Code train because for years my Intel inside™ Mac was too slow. That issue was resolved when I bought Apple silicon. If that’s the standard I have a lot of room to make mistakes.

Canvas

My first experiment renders everything on a <canvas> element.

You can’t tell, but your CPU is doing a lot of work to render that picture at 60–120 frames per second. Lack of interactivity is an obvious problem for a text editor.

I made a list of the “minimum viable” features and implemented them.

  • Pointer down to position text cursor
  • Arrow keys to move text cursor
  • Highlight current line
  • Type to enter text
  • Fancy cursor animation

This next demo is interactive, click around and type.

Before you @ me about Vim bindings: shut up, I’ve got more pressing issues. Canvas gives me nothing for free. Amongst many desirable features, I’m missing:

  • Text selection
  • Undo/redo history
  • Multi-line paste
  • Overflow scrolling

That last one is critical. Life is too short to implement custom elastic scrollbars. I decided to cheat and use native browser overflow on a hidden element. A <div> is sized to match the canvas text and the scroll position is used to calculate render offsets on the canvas.

I’m pleased with how that’s coming along but I’m also disheartened because <canvas> is entirely inaccessible. I could continue to add text selection and other features but I’m not solving the fundamental accessibility issue.

I had a better idea.

Content editable

Instead of rendering text on the <canvas> I can just render it natively in the overflow <div> and make it editable with a contenteditable attribute. That attribute has a plaintext-only value that is perfect for code. All content remains within a single text node.

<div
  contenteditable="plaintext-only"
  autocapitalize="off"
  autocorrect="off"
  spellcheck="false"
  translate="no">
  <!-- text goes here -->
</div>

Attributes like spellcheck must be disabled to avoid input latency spikes. Want to guess how many days it took me to discover that fix? Days!

Using contenteditable gives native text selection and undo history etc. So much accessibility goodness is wired up for free by the browser.

The Selection API provides metrics I use to continue rendering a custom text cursor. ::selection is available so I can style that too. I’ve set the native caret-color invisible, which is probably a no-no.

The contenteditable technique is promising but I’ve noticed strange performance issues beyond a certain character count. Chromium browsers perform worse than WebKit and whatever Firefox is now but it’s unpredictable.

Textarea

Instead of plaintext contenteditable would a simple <textarea> be viable? In short: yes. Turns out a <textarea> is far more performant for longer text.

In this final demo I’ve added syntax highlighting too.

My original plan was to use custom ::highlight on the contenteditable element. <textarea> can’t use CSS highlights so a third layer was required. For demo purposes I added some <div> soup for the visible lines to apply MicroLighter.

Edit: I’m told the new OpaqueRange API unlocks custom highlights for <textarea> — neat!

Edit 2: and the EditContext API improves <canvas> input.

Too many CSS highlights are another performance bottleneck. A more robust solution would be to use Tree-sitter to generate a syntax tree and walk that to generate highlights for only visible lines. I was hoping to avoid virtualised scrolling entirely but I could improve it using the inverse sticky technique. Or I can go back to contenteditable because the file sizes I’d be editing don’t hit the performance wall.

Anyway, looking good, right?

Looks like 90% of a text editor with 1% of the features. From here it’s pretty straight forward to draw the rest of the owl. I’m tempted to keep drawing but then I think about all the little things like tab indentation. Right now I just hijack the tab key to insert two spaces…

My demos above are unoptimised and far from perfectly accessible but at least I’m not starting from a losing position. Rendering on <canvas> would be a nightmare.

I’m filing this project away for a rainy day.


JavaScript strings and text ranges work with UTF-16 code units. It’s easy to naively introduce bugs. I’m sure my demos are full of them. I’ll leave with a code example to nerd snipe.

"🍋‍🟩".length; // 5

[..."🍋‍🟩"].length; // 3

const segmenter = new Intl.Segmenter("en", {granularity: "grapheme"});
[...segmenter.segment("🍋‍🟩")].length; // 1
The Daily Front Page 17 of 26
Wednesday, September 2, 2026 The Daily Front No. #260902 — Reading the Binary
article

Reverse Engineering Unknown File Formats with ImHex

by carlos-menezes·▲ 146 points·31 comments·werwolv.net ↗
We’ll go from a completely custom binary save file for the game FEZ.

An Introduction to File Formats and ImHex by Reverse Engineering FEZ's Save File Format

Introduction

Over the years I’ve been asked the same question countless times:

Person on Discord asking for help reverse engineering a file format

Person on Discord asking for help reverse engineering a file format

I usually couldn’t really give them a good answer except, “Look at the decompiled code of whatever program reads/writes these files and work backwards from there.” This post is meant to change that. We’ll go from a completely custom binary save file for the game FEZ to a full definition written in the Pattern Language, which is part of ImHex, the hex editor I’ve been developing for the past few years. It is free, open source and available on any operating system (or even through the browser if you prefer that: ImHex Web).

ImHex Version

At the time of writing, some features used here are not in a release yet but only available in the Nightly build (that can also be downloaded above from the same link). If you’re on ImHex v1.38.1 or below and experiencing issues, consider upgrading to the Nightly build

Getting Started

Spoiler Warning

FEZ was released all the way back in 2012. Still, if you haven’t played it yet and want to get the full experience, I highly recommend playing it before you continue reading. Some of the code shown here will contain heavy spoilers for secrets and endgame content that might ruin your experience. You have been warned.

The first thing we need is the save file. I downloaded the game from Steam (the latest full release currently available, released 2. December 2016), started it and played for a little bit until it saved. Then I went looking through my filesystem and found the save file under /home/werwolv/.local/share/FEZ/SaveSlot2. On Windows, it will be elsewhere.

Opening the file in ImHex shows this:

SaveSlot2


Hex View  00 01 02 03 04 05 06 07  08 09 0A 0B 0C 0D 0E 0F


00000000  3E 74 E1 41 6B BA DA 01  06 00 00 00 00 00 00 00  >t.Ak...........

00000010  3A AC 78 49 C9 B4 CF 01  01 00 01 00 00 01 12 00  :.xI............

00000020  00 00 01 11 44 4F 54 5F  4C 4F 43 4B 45 44 5F 44  ....DOT_LOCKED_D

00000030  4F 4F 52 5F 41 00 01 10  44 4F 54 5F 4E 55 54 5F  OOR_A...DOT_NUT_

00000040  4E 5F 42 4F 4C 54 5F 41  00 01 0B 44 4F 54 5F 50  N_BOLT_A...DOT_P

00000050  49 56 4F 54 5F 41 01 01  11 44 4F 54 5F 54 49 4D  IVOT_A...DOT_TIM

00000060  45 5F 53 57 49 54 43 48  5F 41 00 01 0F 44 4F 54  E_SWITCH_A...DOT

00000070  5F 54 4F 4D 42 53 54 4F  4E 45 5F 41 01 01 0C 44  _TOMBSTONE_A...D

00000080  4F 54 5F 54 52 45 41 53  55 52 45 00 01 0B 44 4F  OT_TREASURE...DO

00000090  54 5F 56 41 4C 56 45 5F  41 01 01 13 44 4F 54 5F  T_VALVE_A...DOT_

This already reveals a few things. The file seems to be uncompressed and unencrypted, as seen by the plain-text strings and other patterns in the file that can be easily spotted by just looking at the bytes and characters. The data also doesn’t have a file magic (some readable text at the start of the file to make it more easily identifiable), and it doesn’t look like anything standard, as ImHex can’t identify its type directly either.

Magic file information from ImHex

Magic file information from ImHex

Without any more information, we’re basically stuck here. The data can mean anything, and only the program generating and parsing it can make sense of it.

Decompiling the Game

Finding the right files

Clicking on the gear icon on the Steam page and selecting Manage -> Browse local files brings us to the game’s binary location. What immediately sticks out are files like System.Core.dll or mscorlib.dll. The game is written in the C# programming language, which is generally really easy to reverse engineer. Tools like JetBrains Rider can decompile the binaries back to what looks like the original source code.

For that, we can open the game’s folder as a project and then simply Right Click -> View in Assembly Explorer for all the .dll files that look interesting. To me, particularly interesting were FEZ.exe, FezEngine.dll, Common.dll, ContentSerialization.dll and EasyStorage.dll. The rest are system libraries or external dependencies that look unrelated to what we’re trying to do here.

Finding the right functions

Just clicking through the namespaces quickly reveals an interesting-looking file: EasyStorage -> PCSaveDevice. In the constructor of that class, we can also immediately see string str = "SaveSlot" + (object) index;, which looks like it’s building the name of our file, SaveSlot2, so we found the right place for sure.

Scrolling down a bit, we can find a function called Save that creates a byte buffer and starts filling it in using a BinaryWriter stream before saving it to our save file location. Bingo!

PCSaveDevice.cs


public virtual bool Save(string fileName, SaveAction saveAction)

{

  // ...


  byte[] buffer = new byte[40960 /*0xA000*/];

  using (MemoryStream output = new MemoryStream(buffer))

  {

    using (BinaryWriter writer = new BinaryWriter((Stream) output))

    {

      writer.Write(DateTime.Now.ToFileTime());

      saveAction(writer);

      if (output.Length < 40960L /*0xA000*/)

      {

        long length = 40960L /*0xA000*/ - output.Length;

        writer.Write(new byte[length]);

      }

      else if (output.Length > 40960L /*0xA000*/)

        throw new InvalidOperationException(

          "Save file greater than the imposed limit!"

        );

    }

  }


  // ...

}

Writing the ImHex Pattern

Humble Beginnings

Now that we’ve found where the save file is being generated, we can start writing a Pattern file in ImHex to decode the data. Open the Pattern Editor tab to reveal a text editor where we can write our source code.

We can start simply by creating a struct FezSaveFile and placing it at the start of the file using the @ placement operator.

fez.hexpat


struct FezSaveFile {

  // Struct Definition

};


FezSaveFile saveFile @ 0x00;

This instantiates the FezSaveFile pattern object at address 0x00 of our file.

Next, in the save file generation code, we see writer.Write(DateTime.Now.ToFileTime());, which writes the current timestamp as a Windows File Time to the output. As seen in the Remarks section of the docs, this is simply a little endian, 64-bit value (a long in C#) that represents the number of 100 ns intervals that have passed since the year of our lord 1601 A.D. We could, of course, properly decode this value and everything but to get started we can simply place a s64 in its place in the Pattern to read it.

Alternatively, we can also write type aliases with the using keyword to make the code in our pattern resemble the types used in the real code even more closely. These simply define a new type that has the exact properties of the type on the right hand side but with a potentially more descriptive name.

fez.hexpat


using int  = s32;

using long = s64;


struct FezSaveFile {

  long fileTime;

};


FezSaveFile saveFile @ 0x00;

After clicking the button at the bottom of the Pattern Editor (or pressing the F5 key), the region of that value is now highlighted in the Hex Editor View, and it also appears in the pattern tree in the Pattern Data View.

Highlighted Bytes in the Hex Editor and decoded value in the Pattern Data View

Highlighted Bytes in the Hex Editor and decoded value in the Pattern Data View

For this particular case though, we’re in luck and the standard library already implements a type for decoding a Windows FILETIME value. To get access to it, we can import the type.time library which defines that type and then use it like any other type in our code:


import type.time;


struct FezSaveFile {

  type::FILETIME fileTime;

};


FezSaveFile saveFile @ 0x00;

This simple change now turns that unreadable number from before into a nice, human readable representation of the actual time value:

Decoding the FILETIME value using the type::FILETIME type from the standard library

Decoding the FILETIME value using the `type::FILETIME` type from the standard library

And that’s it for the start, congrats! You wrote your first pattern!

[[fixed_size]] attribute

One thing we can also see in the code is that the Save() function ensures that the save file is always 0xA000 bytes long. If it’s shorter, it will pad it out with zeros, and if it is longer, an InvalidOperationException will be thrown.

This maps incredibly well to the [[fixed_size(0xA000)]] attribute that can be attached to FezSaveFile to ensure that. This is entirely optional but helps document the official behavior.

The Actual Save Data

Back to the C# code, the next thing that’s done is to call out to the saveAction callback, which is implemented elsewhere. Thankfully, Rider helps here, as you can just Ctrl-click on the name of the Save function to find definitions. There we see a few places it’s called from, but the interesting one is in GameStateManager.cs SaveInternal().

Find usages in JetBrains Rider

Find usages in JetBrains Rider

GameStateManager.cs


private void SaveInternal(bool ngpBackup)

{

  // ...

  this.ActiveSaveDevice.Save(

    "SaveSlot" + (object) this.SaveSlot,

    new SaveAction(this.DoSave)

  );

  // ...

}

There we can see that the actual dumping of the save data is delegated to the DoSave() function, which calls SaveFileOperations.Write(). This is the juicy stuff now. Here we can see aaaaaaalll the different fields that are being written out to the binary.

GameStateManager.cs


public static void Write(CrcWriter w, SaveData sd)

{

  w.Write(6L);

  w.Write(sd.CreationTime);

  w.Write(sd.Finished32);

  w.Write(sd.Finished64);

  w.Write(sd.HasFPView);

  w.Write(sd.HasStereo3D);

  w.Write(sd.CanNewGamePlus);

  w.Write(sd.IsNewGamePlus);

  // ...

}

Looking at the types of those values allows them to be easily converted to the ImHex Pattern:

fez.hexpat


struct FezSaveFile {

  // From PCSaveDevice.cs

  type::FILETIME fileTime;


  // From SaveFileOperations.cs

  long version; // Checked in the `Read()` function to be 6

  long creationTime;

  bool finished32;

  bool finished64;

  bool hasFpView;

  bool hasStereo3d;

  bool canNewGamePlus;

  bool isNewGamePlus;

};

The first field seems to be a save file version as can be seen in the Read() function below which reads that field, makes sure it is also 6 and throws an exception if it’s not.

We can simply parse that field but if we want to be extra fancy and make sure that we only load files that are actually compatible with our pattern, we can easily assert on this field. In the Pattern Language, we can have conditions and function calls intertwined with our type definitions which makes things like this possible:

fez.hexpat


import std.sys;


struct FezSaveFile {

  // From PCSaveDevice.cs

  type::FILETIME fileTime;


  // From SaveFileOperations.cs

  long version; // Checked in the `Read()` function to be 6

  std::assert(version == 6, "Unsupported Save File Version. Only Version 6 is supported");

Objects and Strings

The next part is interesting. Here, a list of String -> Bool key-value pairs is being serialized. First, the number of pairs is stored, followed by that number of serialized pairs.

GameStateManager.cs


w.Write(sd.OneTimeTutorials.Count);

foreach (KeyValuePair<string, bool> oneTimeTutorial in sd.OneTimeTutorials)

{

  w.WriteObject(oneTimeTutorial.Key);

  w.Write(oneTimeTutorial.Value);

}

w.WriteObject is a bit more involved and deserves a closer look.

BinaryWritingTools.cs


public static void WriteObject(this CrcWriter writer, string s)

{

  writer.Write(s != null);

  if (s == null)

    return;

  writer.Write(s);

}

Objects seem to be defined as something that may or may not exist. First, a bool is written to the file that represents whether or not the object is null. If it is null, that’s the end of it, and we don’t write down anything more. If it’s not null, though, we serialize the value. In the Pattern Language, this looks like this:

fez.hexpat


struct Object<T> {

  bool isValid;

  if (isValid)

    T value;

};

This code defines a new template struct called Object. It places a bool in the output file, then checks if that bool is true. Only if it is does it place a value of the template parameter’s type.

Next we need to see how string types are serialized. There’s another function of the BinaryWriter that does this:

BinaryWriter.cs


public virtual void Write(string value)

{

  if (this.disposed)

    throw new ObjectDisposedException(nameof (BinaryWriter), "Cannot write to a closed BinaryWriter");

  this.Write7BitEncodedInt(this.m_encoding.GetByteCount(value));

  if (this.stringBuffer == null)

  {

    this.stringBuffer = new byte[512 /*0x0200*/];

    this.maxCharsPerRound = 512 /*0x0200*/ / this.m_encoding.GetMaxByteCount(1);

  }

  int charIndex = 0;

  int charCount;

  for (int length = value.Length; length > 0; length -= charCount)

  {

    charCount = length <= this.maxCharsPerRound ? length : this.maxCharsPerRound;

    this.OutStream.Write(this.stringBuffer, 0, this.m_encoding.GetBytes(value, charIndex, charCount, this.stringBuffer, 0));

    charIndex += charCount;

  }

}

This seems to first be writing out the length of the string in bytes in some 7BitEncodedInt format followed by the actual string data.

BinaryWriter.cs


protected void Write7BitEncodedInt(int value)

{

  do

  {

    int num1 = value >> 7 & 33554431 /*0x01FFFFFF*/;

    byte num2 = (byte) (value & (int) sbyte.MaxValue);

    if (num1 != 0)

      num2 |= (byte) 128 /*0x80*/;

    this.Write(num2);

    value = num1;

  }

  while (value != 0);

}

Write7BitEncodedInt looks a bit daunting, but after playing through it with some values, all this does is use the MSBMost Significant Bit
The leftmost bit in a byte that carries the largest numerical value of each byte as a flag to tell the parser if there’s another byte still coming. The other 7 bits are the actual encoded value.

In the Pattern Language this can be implemented like this:

fez.hexpat


struct SevenBitEncodedIntByte {

  // Read a byte

  u8 byte;


  // If that byte doesn't have bit 7 set,

  // this is the last one and we can stop here.

  if ((byte & 0x80) == 0x00)

    break;

};


struct SevenBitEncodedInt {

  // Keep decoding bytes until the `break` above is run

  SevenBitEncodedIntByte bytes[while(true)];

};

Additionally, to make this type a bit easier to work with, we can use the [[format]] attribute to display the decoded integer value in the Pattern Data View and the [[transform]] attribute so the rest of our code can simply read from a variable of this type and get back the decoded integer value instead:

fez.hexpat


struct SevenBitEncodedInt {

    SevenBitEncodedIntByte bytes[while(true)];

} [[format("transformSevenBitEncodedInt"), transform("transformSevenBitEncodedInt")]];


fn transformSevenBitEncodedInt(ref auto encodedInt) {

  u64 result = 0;


  // Loop over all the bytes we placed before

  for (u32 i = 0, i < std::core::member_count(encodedInt.bytes), i += 1) {

    // Each byte contains the next more-significant group of 7 bits

    result |= (encodedInt.bytes[i].byte & 0x7F) << (i * 7);

  }


  return result;

};

Now that all of this is done, we can finally define our String type. Again with a nice [[format]] function so we can see the string directly in the UI.

fez.hexpat


struct String {

  // Read the string's size

  SevenBitEncodedInt size;

  char string[size];

} [[format("formatString")]];


fn formatString(ref auto string) {

  return string.string;

};

The final Object type being parsed by ImHex

The final Object<String> type being parsed by ImHex

Lists

SaveFileOperations.cs


w.Write(sd.OneTimeTutorials.Count);

foreach (KeyValuePair<string, bool> oneTimeTutorial in sd.OneTimeTutorials)

{

  w.WriteObject(oneTimeTutorial.Key);

  w.Write(oneTimeTutorial.Value);

}

Back to the code from before, we can define a few more types now to finally parse this construct. This time using a s32 (or our int type alias) because Count is a int in C#.

fez.hexpat


struct List<T> {

  // Read the number of items

  int count;


  // Place an array of `count` items down

  T items[count];

};


struct KeyValuePair<Key, Value> {

  Key key;

  Value value;

};

All of this together now lets us finally decode the list. Take a step back for a bit and see how all of this came together and how it maps to the C# code.

fez.hexpat


struct FezSaveFile {

  // ...

  List<               // A size-prefixed list containing...

    KeyValuePair<     //   pairs of...

      Object<String>, //     an optional, length prefixed string...

      bool            //     and a bool

    >

  > oneTimeTutorials;

};

The final List< type being parsed by ImHex

The final List< type being parsed by ImHex

Enums

Following the same pattern, we can keep going down the Write function and decoding the data in ImHex.

The next interesting bit is this code:

SaveFileOperations.cs


foreach (ActorType artifact in sd.Artifacts)

  w.Write((int) artifact);

This writes down not integers directly, but an enumeration instead. We could just treat it as an int like the serializer code does, but it would be nicer to keep the names available in ImHex as well.

The definition of the enum in C# can be copy-pasted over almost 1:1:

ActorType.cs


public enum ActorType

{

  None,

  Ladder,

  Bouncer,

  Sign,

  GoldenCube,

  // ...

}

fez.hexpat


enum ActorType : int

{

  None,

  Ladder,

  Bouncer,

  Sign,

  GoldenCube,

  // ...

};

This type can then simply be used in place of a int and gives us a nicer display:

ActorType enum as seen in ImHex

ActorType enum as seen in ImHex

More Subtypes

The same pattern as above keeps on going for a while longer until we reach the end where we have some nested serialization:

SaveFileOperations.cs


foreach (KeyValuePair<string, LevelSaveData> keyValuePair in sd.World)

{

  w.WriteObject(keyValuePair.Key);

  SaveFileOperations.Write(w, keyValuePair.Value);

}

This maps really nicely to a new struct that we can call LevelSaveData and just keep going in there as before:

fez.hexpat


struct LevelSaveData {

  // ...

};


struct FezSaveFile {

  // ...

  List<KeyValuePair<Object<String>, LevelSaveData>> world;

};

You should now have everything that’s needed to decode the rest of the format yourself. Give it a try!

The Fruits of our Labour

At this point, you should be able to look at the Hex Editor View and see every single byte (except the large padding at the end) highlighted with some color. You can now browse through the Pattern Data View and inspect what all these different values mean and even modify them by double-clicking the value!

Fully decoded Save File in ImHex

Fully decoded Save File in ImHex

If you’re interested in how I did it, you can take a look at My Pattern.

Wrapping things up

After reading this post you should have a basic understanding of how to reverse engineer a binary file format. Of course, not all programs will be as easy to decompile and analyze as this one but the general workflow remains the same:

Check if the file is in a known format

This can be done in various ways, ImHex magic detection and tools like binwalk can help a lot. If it is an existing format, there might be tools available already to parse that format. Otherwise you may be able to look at the specification

Find the piece of code that parses or generates that file

This usually means looking at the program’s Source Code if available or to decompile the program first using a tool that fits the language used. Rider works great for .NET, Ghidra, IDA or Binary Ninja for native-compiled programs, Recaf for JVM languages. What helps me is to look for library calls for doing File I/O or for strings mentioning (parts of) the generated or loaded file name.

Analyze the code and find the building blocks used in the file

Most file formats want the same thing: To store integers, booleans, strings and other data structures. Identifying them is the first step to understanding the file step by step

Write a Pattern File to document your findings and verify their validity

Patterns are great not only for decoding the file once you know how it works but also for documenting and verifying your findings along the way.

If you have any questions about the process, ImHex or the Pattern Language itself, feel free to reach out on the ImHex Discord Server, via Discord DMs @werwolv or by email at [email protected].

The Daily Front Page 18 of 26
Wednesday, September 2, 2026 The Daily Front No. #260902 — Rust at the Edge
article

Embedded Rust RTOS vs. C RTOS

by kooi·▲ 71 points·37 comments·tweedegolf.nl ↗
We’re going to pitch Embassy/Rust against FreeRTOS/C on an STM32F446 microcontroller.

It's time for another technical blog post about async Rust on embedded. This time we're going to pitch Embassy/Rust against FreeRTOS/C on an STM32F446 microcontroller.

They will both be running applications that perform the same actions. We're then going to judge them on the basis of interrupt latency, program size, ram usage and ease of programming. There are already a lot of articles that compare C and Rust, so we're not going to focus on that today.

What I will try to show are two 'normal' applications. Both projects could be tuned to give better performance with a lot of work. Doing that can be a nearly endless task. So as a guideline, the applications will be:

  • Portable(-ish) to other chips and architectures (aside from the dependency on the HAL)
  • Straightforward
  • Tuned with normal options and settings like compiler optimizations, rtos settings and thread priorities

In the end, we should have a basic understanding of how RTOS'es and async executors (can) work.

I am biased, but I hope this blog post gives a fair comparison. If you have suggestions, please let us know!

We'll be testing with the STM32F446ZET6 microcontroller at 180Mhz and some of the measurements will be done with a Rigol DS1054Z oscilloscope.

Async Rust

An async function in Rust is syntax sugar for a function that returns a future.

pub trait Future {
    type Output;
    fn poll(self: Pin<&mut Self>, cx: &mut Context<'_>) -> Poll<Self::Output>;
}

The function is transformed into a state machine object that can be polled. The state machine allows the code to jump into the function, resuming where it previously stopped. It also keeps track of all the variables that are retained across await points.

Rust futures are lazy, they only run when polled. To run a future to its completion, all you have to do is to continuously call the poll function until it stops returning the Pending state and returns the Ready(Output) state.

This is straightforward, but not very efficient.

To fix that, there are also Wakers. A waker can signal to the executor that a future ought to be polled again. This waker can be called by the future itself or can be given to another process/thread the future depends on. In general, an executor calls the poll function once and then only calls it again when the waker is triggered.

A future can call other futures and incorporate them into itself. For an executor, any top-level future it polls is usually called a task.

Lots more can be said. Luckily I don't have to because there are some really good resources out there:

In Embassy

Embassy uses this mechanism as well but adds a couple of constraints.

  • Tasks have to be statically allocated

    • Embassy doesn't want to depend on an allocator
    • All tasks must be known at compile time
  • A nightly compiler is required

    • The type_alias_impl_trait preview feature is required
    • This is because we can't use boxed trait objects, due to having no allocator

For many peripherals, Embassy has made an async interface. This allows for the following code:

#[embassy::task]
async fn my_task(mut button: ExtiInput<'static, PC13>) {
    loop {
        button.wait_for_rising_edge().await;
        info!("Pressed!");
        button.wait_for_falling_edge().await;
        info!("Released!");
    }
}

A couple of things are happening here.

The wait_for_rising_edge creates a new future and returns it. The constructor of the future configures the interrupt of the pin. On the first poll, the future puts its waker into a global array of EXTI wakers. When an EXTI interrupt happens, the appropriate waker in that array is used to wake up the right task.

So when the interrupt exits, the executer polls the task again, the wait_for_rising_edge future notices its interrupt has fired and returns that it is ready. And so the program continues.

One thing Embassy doesn't do is pre-emption, which means that the active task is only switched to a more important one when it awaits something. This is called cooperative multitasking. But Embassy has some other features that make this missing feature a non-issue, which will be covered later on in this article.

RTOS

A real-time operating system divides everything up into independent threads. Different from tasks is that threads don't run a state machine, but run normal code. This means that you don't have to program your code in a special way. Any old function can be run in an RTOS.

When a thread's execution must be paused to switch to another thread, the entire processor context must be captured and saved because the thread is running normal code. When that code resumes, it will require the processor context to be the same again.

This design of multithreading lends itself to pre-emptive threads. This means that the kernel can give fair execution time to all threads, that the user can specify priorities and that the kernel can respond to events and interrupts in a predictable amount of time.

This description doesn't even scratch the surface of an RTOS. To get a better understanding, here are some articles if you're interested:

Let the showdown begin!

Now that we know a bit about the two models, we're going to pitch them against each other by implementing the same program in both.

The program

We can't build a fully realistic program because that would just take too long to build. But let's try to have something that is not too simple.

There are a couple of things we need to be able to claim to be approaching realism:

  • Multiple tasks
  • Data sharing between tasks
  • Responding to interrupts

So, what our program will do is the following three (literal) tasks:

  • Blink an LED every 200ms for 100ms

    • Be in a loop and use the delay function of the executor

    • If the user button is pressed, the led mustn't be turned on

      • This is communicated from another thread (no checking the register ourselves)
  • Keep track of the user button

    • Set up a gpio interrupt so we can detect a signal change
    • Communicate in a shared (atomic) boolean whether the button is high or low
    • When the button state changes, put a string on the message queue with the text Button is <0/1> (N)\n where <0/1> is 0 if the button is low and 1 if the button is high and N is the number of triggers
  • Print the message queue to serial

    • Wait for the message queue to contain a string
    • Print it to serial

What we're measuring

This showdown can be won on the basis of these things:

Performance

How long does the button gpio interrupt take?

  • When the interrupt fires, we will set a pin high
  • When the interrupt ends, we will set the pin low
  • The time in between is measured by an oscilloscope

How long does the button thread take until it waits again?

  • When the thread stops waiting, we will set a pin high
  • When the thread starts waiting again, we will set the pin low
  • The time in between is measured by an oscilloscope

Interrupt (processing) latency

What is the time between the start of the button gpio interrupt and the button thread resuming?

  • The time between the rise of the interrupt pin and the rise of the thread pin is measured by an oscilloscope

Program size

.text section as reported by arm-none-eabi-size

Static memory usage

.data + .bss section as reported by arm-none-eabi-size

  • All tasks and threads are statically allocated

We're only looking at static memory usage because dynamic memory usage is difficult to measure. A program that statically allocates a lot of memory will likely use less stack memory than a similar program that doesn't. However, since RTOS'es can struggle with this, I think it's a relevant metric to compare.

Ease of programming

Very subjective, I know

To reiterate from the start, we're not looking for the most optimized solution. The goal is to have a relatively normal program.

Expectations

I don't really know what to expect except that an RTOS is made to really optimize performance and latency. So based on that, here are my predictions:

Performance

The RTOS will set a flag in the thread directly, this is probably faster than having to find an async waker and triggering it.

Aside from how the code is resumed and suspended, there's not much difference for the button thread between the two implementations. I expect they will take a similar amount of time.

Interrupt (processing) latency

The RTOS will probably be more optimized for this. Embassy can't pre-empt running tasks, so it's less worthwhile to optimize this a lot.

Program size

Rust programs are usually a bit bigger due to more expensive formatting and compiler inserted runtime checks. Since the rest of the program is essentially the same, I expect the C implementation to use less flash memory.

Static memory usage

Because Rust's compiler-generated futures only store the variables that are held across an await point and doesn't have to fully allocate a full-stack size, the Rust implementation should win.

Ease of programming

Ignoring the 'Rust vs C' side, I think the async model will be nicer to work with. In the web world async/await has already won from threads, so that will probably be the case here as well.

Let's look at the code

The repository can be found here: github The C project is made in STMCube 1.8 and the Rust project is a standard cargo binary.

Getting the button interrupt noticed

We're not going to process everything in the interrupt, we're just notifying the executor that the interrupt has happened.

For Rust, we don't need to do anything because this is exactly what Embassy already does.

In C we need to create a function for the interrupt ourselves and notify the thread:

void HAL_GPIO_EXTI_Callback(uint16_t GPIO_Pin) {
    if (GPIO_Pin == USER_Btn_Pin) {
        osThreadFlagsSet(buttonWaiterHandle, 1);
    }
}

Blinking the led

We're going to use the normal delay function of each executor to wait for our time. To determine if the button is pressed, we have an atomic bool that we need to read. In C that bool is stored in a global because the tasks are created globally and getting it from the void pointer argument is not very nice.

Rust

#[embassy::task]
async fn blink_led(mut led: Output<'static, PB0>, button_high: &'static AtomicBool) {
    loop {
        Timer::after(Duration::from_millis(100)).await;
        if !button_high.load(Ordering::SeqCst) {
            led.set_high().unwrap();
        }
        Timer::after(Duration::from_millis(100)).await;
        led.set_low().unwrap();
    }
}

In Rust we need to annotate our task function so it can be statically allocated. The LED is also given as an argument because the peripherals are modeled using Rust's ownership model.

C

The atomic types in C are an optional part of the C11 spec and luckily our compiler implements them. This makes using atomic types a lot more comfortable.

void StartBlinkLedTask(void *argument)
{
    for (;;) {
        osDelay(100);

        if (atomic_load(&buttonPressed) == GPIO_PIN_RESET) {
            HAL_GPIO_WritePin(LD1_GPIO_Port, LD1_Pin, GPIO_PIN_SET);
        }

        osDelay(100);
        HAL_GPIO_WritePin(LD1_GPIO_Port, LD1_Pin, GPIO_PIN_RESET);
    }
}

Writing the message queue to serial

The messages we send to the writing task are basically strings. The Rust implementation uses the ArrayVec library to get access to a good stack allocated ArrayString type.

In C we don't have as much luxury, so I made a simple type for it:

typedef struct {
    char data[32];
} UartMessage;

The message queue has a capacity of 8 messages. The thread/task will wait for a new message to show up and then print it to the uart.

Rust

The Rust implementation is pretty straightforward:

#[embassy::task]
async fn uart_writer(
    mut usart: Uart<'static, USART3, DMA1_CH3>,
    mut receiver: Receiver<'static, Noop, ArrayString<32>, 8>,
) {
    loop {
        let message = receiver.recv().await.unwrap();
        usart.write(message.as_bytes()).await.unwrap();
    }
}

C

In C we need to do a bit more memory and size management:

void StartUartWriter(void *argument) {
    for (;;) {
        UartMessage message;

        CheckStatus(
            osMessageQueueGet(uartQueueHandle, &message, NULL, osWaitForever)
        );

        size_t messageLength = strnlen(message.data, sizeof(message.data));
        CheckStatus(
            HAL_UART_Transmit(&huart3, (uint8_t*)&message.data, (uint16_t)messageLength, 1000)
        );
    }
}

Waiting on the button

The button logic is split into a couple of parts.

First, the button pin is configured to generate an interrupt on a rising edge. The interrupt is then waited on. For the measurement, the button_processed pin is also turned high and low around the waiting line.

After the waiting is over, the trigger count is upped, the button pressed variable is set high and a message is formatted and sent to the message queue.

This is then repeated with the interrupt set to the falling edge.

Observant readers might notice that there isn't any debouncing for the button and that's definitely a problem. But I felt that if I put in a delay here, it would ruin the measurements we're going to do. So no debouncing is done, which makes the state of the button_pressed variable a bit unreliable.

Rust

Anyway, here is the Rust code:

#[embassy::task]
async fn button_waiter(
    mut button: ExtiInput<'static, PC13>,
    button_pressed: &'static AtomicBool,
    sender: Sender<'static, Noop, ArrayString<32>, 8>,
    mut button_processed: Output<'static, PG1>,
) {
    let mut trigger_count = 0;

    loop {
        button_processed.set_low().unwrap();
        button.wait_for_rising_edge().await;
        button_processed.set_high().unwrap();

        trigger_count += 1;
        button_pressed.store(true, Ordering::SeqCst);
        if sender.send(format_message(trigger_count, true)).await.is_err() {
            panic!("SendError");
        }

        button_processed.set_low().unwrap();
        button.wait_for_falling_edge().await;
        button_processed.set_high().unwrap();

        trigger_count += 1;
        button_pressed.store(false, Ordering::SeqCst);
        if sender.send(format_message(trigger_count, false)).await.is_err() {
            panic!("SendError");
        }
    }
}

I found out that unwrapping the sender.send() result leads to unreasonably expensive formatting code (size-wise) while it doesn't show any relevant information. So it now does just a simple panic.

C

In the C code, we need to change the pin interrupt direction ourselves.

void StartButtonWaiterTask(void *argument) {
    int triggerCount = 0;
    UartMessage message;

    /* Infinite loop */
    for (;;) {
        // Only react to rising edges
        EXTI->RTSR |= USER_Btn_Pin;
        EXTI->FTSR &= ~USER_Btn_Pin;

        HAL_GPIO_WritePin(ButtonProcessed_GPIO_Port, ButtonProcessed_Pin, GPIO_PIN_RESET);
        osThreadFlagsWait(1, osFlagsWaitAny, osWaitForever);
        HAL_GPIO_WritePin(ButtonProcessed_GPIO_Port, ButtonProcessed_Pin, GPIO_PIN_SET);
        triggerCount++;

        // Set the button pressed variable
        atomic_store(&buttonPressed, true);
        message = FormatMessage(triggerCount, true);
        CheckStatus(
            osMessageQueuePut(uartQueueHandle, &message, 0, osWaitForever)
        );

        // Only react to falling edges
        EXTI->RTSR |= USER_Btn_Pin;
        EXTI->FTSR &= ~USER_Btn_Pin;

        HAL_GPIO_WritePin(ButtonProcessed_GPIO_Port, ButtonProcessed_Pin, GPIO_PIN_RESET);
        osThreadFlagsWait(1, osFlagsWaitAny, osWaitForever);
        HAL_GPIO_WritePin(ButtonProcessed_GPIO_Port, ButtonProcessed_Pin, GPIO_PIN_SET);
        triggerCount++;

        // Set the button pressed variable
        atomic_store(&buttonPressed, false);
        message = FormatMessage(triggerCount, false);
        CheckStatus(
            osMessageQueuePut(uartQueueHandle, &message, 0, osWaitForever)
        );
    }
}

That's pretty much all of the code aside from the setup.

One other thing that is missing is the interrupt code that sets the interrupt pin high. It is included in the C project. But Embassy provides its own interrupt function, so that had to be modified.

In the exti file of the embassy_stm32 file, I added it here:

macro_rules! impl_irq {
    ($e:ident) => {
        #[interrupt]
        unsafe fn $e() {
            pac::gpio::Gpio(0x40021800 as *mut u8).odr().modify(|odr| odr.set_odr(0, stm32_metapac::gpio::vals::Odr::HIGH));
            let x = on_irq();
            pac::gpio::Gpio(0x40021800 as *mut u8).odr().modify(|odr| odr.set_odr(0, stm32_metapac::gpio::vals::Odr::LOW));
            x
        }
    };
}

After all this time, let's look at what the results are!

Results

First off, I really like the async await model. Once you accept the idea that you can await something that you'd normally have an interrupt for, it writes very nicely! Managing threads is not a lot of fun, so I'm not really missing that part.

Because Embassy is built around interrupts, its design feels really nice and integrated. Handling the interrupt in FreeRTOS is a lot less ergonomic. For me, this is a win for Embassy.

Let's run the tests so we can look at the numbers.

I will push the button a hundred times so we'll get two hundred samples. Then I will note down the average and standard deviation times.

Oh...

Wow...

I genuinely did not expect this.

These numbers are also repeatable on different days (with slight variations of course).

It looks like Embassy/Rust won in every category! Ok, let's at least look at something where FreeRTOS/C did actually beat Rust. If we look at the time between the end of the interrupt and the start of the thread awaking, we get the following numbers: (Interrupt latency - Interrupt time)

  • C: 4.973 - 2.962 = 2.011us
  • Rust: 3.738 - 1.450 = 2.288us

This shows that purely the context switching and resuming the thread is faster in the RTOS. But in the face of an interrupt that takes twice as long, this win isn't that relevant. What we can't see is what the exact cause of the longer interrupt time is. Is it the used STM Cube HAL? Or is it an inefficiency in FreeRTOS? Or is it inherent to the thread signalling model? To answer that we'd have to test more RTOS'es and more HALS. That's maybe something for another time.

One of the biggest improvements we could make in the RTOS code is moving the button logic to inside of the interrupt. This is something that is not possible in Embassy, because it itself creates the interrupt functions for us. There's a tradeoff here. Freedom in FreeRTOS/C and ease of development for Embassy/Rust.

The winner

I can only declare Embassy/Rust as the winner here.

Not only is it nicer to program in my opinion, all the numbers seem to favor it too.

Wrap up

There's just one thing that may still worry you. An RTOS can be used in actual real-time applications. Because the async tasks can't be pre-empted, it is not always possible to execute another task in time. While this is true for a set of tasks in one executor, Embassy allows us to use additional executors that run inside interrupt contexts.

A waker will not only trigger the executor to run a task, if the executor is on an interrupt context, the waker also sets the executor's interrupt pending. This way if the executor is on an interrupt that has a higher priority, it will pre-empt other executors on lower priorities.

Here's the example that Embassy gives on Github.

I'd like to thank the creator of Embassy, Dario, and Sjors from Jitter for giving feedback on this post and for answering my questions.

If you have feedback, I'd love to hear it! You can reach me at dion@tweedegolf.com and on twitter.

Discussions on /r/rust and /r/embedded.

Edit

It was brought to my attention that I had left the heap turned on in the C project even though it was not used. This caused the static memory size to be 15kb bigger than it really had to be. I've subtracted the heap size from the static memory size. The conclusion is still the same though.

RTIC addendum (17-02-2022)

We got a pull request on our repo to add an implementation for RTIC. Thanks Rafael Bachmann! (barafael)

RTIC is a fully interrupt-driven runtime that is used quite a bit in the rust embedded ecosystem. You can find more here: https://rtic.rs/1/book/en/preface.html.

I've changed the PR a little bit so that it falls in line with the FreeRTOS and Embassy implementations and have run the numbers again.

It is important to say, though, that the RTIC implementation is not entirely fair to the other two implementations. Because RTIC defines its interrupt handlers inside of a macro (so I can't modify them), I can't set one of the gpio pins high immediately. However, since RTIC is a really small layer on top of the interrupts, I still think setting the pin high in the user-provisioned interrupt function will represent the performance just fine.

We're going to use Embassy as our baseline.

So, RTIC shows some impressive results. That's of course very logical. The less runtime you bring along, the less you have to carry.

RTIC is a clear improvement over manually implementing interrupts. I usually say that if you keep implementing features on interrupts, then eventually you'll get a worse version of RTIC, so just use RTIC.

Attribution

The Rust Embedded Working Group Logo, based on the Rust logo, was designed by Erin Power.

The Daily Front Page 19 of 26
Wednesday, September 2, 2026 The Daily Front No. #260902 — The Cache Ledger
article

We could save petabytes of cache storage with Zstandard and Pingora

by torutofu·▲ 87 points·33 comments·blog.cloudflare.com ↗
We prototyped a way to expand effective cache capacity.

Memory costs are increasing dramatically. Both RAM and hard disk drive prices have exploded over the past year. At Cloudflare, we run several massively distributed storage products (including our famous CDN) that rely on making efficient use of the memory we have deployed so we can continue to serve all of our customers.

With this in mind, we prototyped a way to expand effective cache capacity. By encoding eligible assets with Zstandard inside Pingora, the architecture trades a minor CPU increase for significant storage and cross-data center bandwidth savings.

We have been prototyping a system called Cache Transcoding, which I built during my internship at Cloudflare as part of the 1.1.1.1 Intern Program. When an eligible response enters the cache, we encode it using Zstandard, or zstd, before writing it to disk. We keep that compressed form while the asset lives in the cache and moves between data centers via Tiered Cache, then decode it before serving the response to the client.

In our initial testing, this encoding shrunk eligible assets to ⅓ of their original on-disk size on average. The estimated extra CPU cost in our origin-facing proxy was small, but that is the trade. A small increase in CPU gives Cloudflare petabytes of effective cache capacity and reduces the data transferred between our data centers. The encoding cost is paid once when an asset enters the cache. The storage and bandwidth savings continue every single time that asset is reused.

What is Zstandard?

Zstandard, or zstd, is a lossless compression algorithm developed by Yann Collet at Facebook and open sourced in 2016. Lossless means that after compressed data is decoded, every byte is identical to the original. We can change how an asset is represented on disk without changing the asset itself.

Zstd is designed to balance compression ratio with speed. In our earlier browser compression testing, it compressed data 42% faster than Brotli while producing nearly the same file size, and produced files 11.3% smaller than gzip at a comparable speed. That balance matters because Cache Transcoding would touch a large amount of traffic, so both encoding and decoding need to stay fast. 

The prototype uses zstd level 3, giving us most of the compression benefit without turning cache fills into a CPU bottleneck.

Cloudflare traditionally stores an asset using the content encoding supplied by its origin. If an origin sends an uncompressed response, we store those uncompressed bytes on disk and transfer them between data centers in the same form. Cache Transcoding adds compression inside the cache itself.

Not everything is worth compressing

Transcoding does not mean compressing everything. Images, video, and fonts are usually compressed already. In our traffic sample, this media slice represented 21.4% of requests but 63.3% of bytes. Compressing it again would burn CPU for nothing.

Compressible text is different. HTML, JSON, CSS, and JavaScript represented 67.3% of requests and 22.3% of bytes. Within that text slice, approximately 71% arrived uncompressed with Content-Encoding unset and it compresses well. 

In our controlled test corpus, the eligible assets compressed by roughly 2.8 times.

Measure Value
Compression ratio 2.834x
Encode cost 4.31 ns per byte, approximately 232 MB/s, paid once per fill
Decode cost 1.56 ns per byte, approximately 641 MB/s, paid on every serve

Encoding is more expensive per byte, but assets are served far more often than they are filled. 

By changing how assets are represented, existing hardware could store more customer content.

Fewer bytes on disk mean each server can retain more objects. This increases cache density and reduces the likelihood that useful content is evicted because an uncompressed representation consumed more space than necessary. 

The smaller representation also helps as an asset moves through Tiered Cache because it reduces the data transferred between Cloudflare data centers, making backbone usage more efficient.

Paying the compression cost once

Compression is never free. Encoding and decoding both use CPU, so the important question is whether the byte savings are worth the processing cost. 

At zstd level 3 (often the default balance of speed and compression size output), our model kept the extra CPU cost to a few percent under the traffic and reuse assumptions we tested. 

We initially considered limiting transcoding to popular content, since hot assets are reused more, but it did not help. Decoding happens every time an asset is served, so limiting the feature to only the hottest content reduced the storage saving without cutting CPU by the same amount. 

The simpler policy performed better. Transcoding all eligible compressible text at or above 4 kibibytes (KiB) captured nearly all of the measured storage benefit, while remaining within the CPU budget.

How Cache Transcoding works

On a cache miss, our Pingora-based proxy encodes the body using zstd before writing it to disk. The cache metadata records that the stored representation is compressed and preserves the original content length. Before the response leaves the proxy, the body is decoded back to its original identity representation.

On a cache hit, the stored zstd object is read from disk and decoded. With Tiered Cache, the compressed representation is transferred from the upper tier to the lower tier in the compressed form. Decoding only happens on the client-facing hop.

On a full cache miss, the upper tier fetches identity bytes from the origin. Those bytes are encoded once, stored as zstd, and transferred to the lower tier in their compressed form. The lower tier also stores the zstd representation, then decodes it for the request path.

unnamed (77).png

If the lower tier misses but the upper tier already has the object, the origin is not involved. The compressed object moves directly between the cache tiers. It remains compressed on the wire and on disk, then is decoded once at the lower tier.

If the lower tier already has the object, no network transfer or encoding is needed. The lower tier reads the zstd bytes from disk, decodes them, and passes the original asset onward.

The storage encoding marker prevents an object from being encoded more than once. A cache layer receiving an object from another tier can see that it is already stored using zstd, and preserve it in that form.

Why we only transcode certain text

The fastest compression operation is the one we do not need to perform. Cache Transcoding therefore uses a series of eligibility checks to avoid content that is unlikely to benefit.

The prototype only transcodes a 200 OK response when Content-Encoding is unset, the Content-Type is compressible text, and the response has a known Content-Length of at least 4 KiB. Slice subrequests, responses using active upstream compression, range requests, precompressed responses, unknown length bodies, and binary content remain unchanged.

The 4 KiB threshold removed a large number of tiny requests while leaving out only about 1% of the otherwise eligible bytes. Lowering it would add per-object overhead without saving much more storage.

The threshold and zstd level are both parameters rather than permanent limits. We started with zstd level 3 and a 4 KiB minimum because they gave us a conservative way to measure the architecture. With the initial CPU budget understood, we can test whether higher compression levels improve the ratio enough to justify their additional cost.

Testing over one million requests through the cache

We exercised the prototype against a controlled test zone and correlated each request across request logs, Prometheus metrics, and Jaeger traces.

The correctness campaign covered cache misses, cache hits, single-hop fills, Tiered Cache fills, and more. We varied cache keys to make each request follow a specific path and used traces to confirm where encoding and decoding occurred.

One performance campaign sent more than a million requests across 10 cache servers. Half of the campaign ran with Tiered Cache disabled and the other half with it enabled. This allowed us to measure local cache behavior separately from transfers between cache tiers.

The two assets were approximately 195 KiB and 272 KiB, and both compressed by roughly 2.8 times. This was deliberately a compressible test corpus. It gave us a clear signal for validating the architecture, but it does not represent every text object on the Internet. A broader corpus is required before treating the measured compression ratio as a fleet-wide constant.

Compress once, benefit many times

What this experiment showed us is that there are significant efficiencies we can still deploy across our caching service that can benefit all of our customers. What we built for Cache Transcoding shows that the trade is favorable under the conditions we tested. The architecture preserved the content and remained within the CPU budget.

For next steps, we plan to evaluate higher zstd levels, test a broader range of content types and object sizes, tune different parameters from the eligibility criteria and more. Future work can also examine range requests, pre-compressed origin responses, and passing the compressed object directly to downstream components that already support it without decoding.

Throughout my internship, I’ve had the wonderful opportunity to work alongside Cloudflare's engineering teams on the real infrastructure that stores and serves content across our global network. If you want to start your career by helping build a better Internet, explore our internship opportunities and job openings.

The Daily Front Page 20 of 26
Wednesday, September 2, 2026 The Daily Front No. #260902 — Inference, Locally
article

The efficient frontier of LLM inference

by philipkiely·▲ 149 points·42 comments·baseten.co ↗
Inference techniques either move a deployment along the latency–throughput frontier or push the entire frontier out.

Inference techniques either move a deployment along the latency–throughput frontier or push the entire frontier out, creating more efficiency to allocate.

The efficient frontier of LLM inference

In the AI industry, we borrowed the term “efficient frontier” from economists. We use it to talk about managing tradeoffs, most often the tradeoff between cost and capabilities for models. A model is a “frontier model” if it offers the highest degree of intelligence at a given cost or size.

An efficient frontier shows the range of optimal combinations when trading off between two valuable outcomes in a resource-constrained environment.

An efficient frontier shows the range of optimal combinations when trading off between two valuable outcomes in a resource-constrained environment.

We also have efficient frontiers in inference engineering. Most often, this is expressed as a tradeoff between latency and throughput (which determines cost), though we can also exchange quality for throughput (via quantization, distillation, and pruning) or intelligence for speed (in the form of reasoning level).

There are two types of techniques available to inference engineers:

  1. Techniques which make a tradeoff between two factors to move a deployment along an efficient frontier.
  2. Techniques which push out the entire frontier for a given deployment, creating more overall efficiency which can be allocated to whatever outcome is most beneficial.

Both types of techniques are valuable.

It’s useful to be able to target any point along an efficient frontier by making tradeoffs. Giving up per-user speed makes it possible to build high-throughput, low-cost pipelines for batch workloads. Sacrificing throughput to improve speed makes sense when latency-sensitive users have a high willingness to pay.

And of course, it’s incredibly useful to push out the entire frontier. Unlocking more efficiency creates gains that can be allocated to lower latency, higher throughput, or a combination of the two.

This article details which inference engineering techniques let you target a point on the frontier, and which techniques push the entire frontier out. For this article, we’ll assume we’re running an LLM like GLM-5.3 or Kimi K3 for agentic coding with KV cache reuse enabled and optimal KV-aware routing.

Techniques that manage tradeoffs

Hitting a certain target in production is often less about discovering some novel approach and more about finding the right set of configurations given the nature of the traffic.

Techniques for managing tradeoffs let you target an outcome along an efficient frontier.

Techniques for managing tradeoffs let you target an outcome along an efficient frontier.

In practice, the efficient frontier is very jagged. Rather than a smooth, continuous line between outcomes, small changes can have big impacts. These cutoff points are often unintuitive and must be discovered empirically through sweeps.

Batch sizing

The most obvious tradeoff between latency and throughput comes from batch sizing. A batch is the number of requests that are processed concurrently. While token-level continuous batching means that there isn’t any latency from waiting for batches to start, the configured batch size determines the per-user latency and the overall throughput.

With small batch sizes, per-user latency is excellent, but few total tokens are generated per GPU. This means the cost per token is quite high. Increasing batch size has the opposite effect: worse per-user latencies, better overall throughput for lower cost.

Parallelism strategy

Today’s LLMs measure in the hundreds of billions or trillions of parameters and must be spread across multiple GPUs. The way in which they are shared, or parallelized, across GPUs can boost either latency or throughput.

Parallelism splits large models across multiple GPUs.

Parallelism splits large models across multiple GPUs.

For latency-sensitive deployments, focus on increasing Tensor Parallelism (TP). While TP has expensive all-to-all communication, it is effective for lowering latencies as these operations are fast over high-bandwidth NVLink interconnects.

Expert Parallelism (EP) can help with both latency and throughput. A lower degree of EP is often associated with better latencies, while wide EP, including EP across a full rack of GPUs, generally supports higher throughput.

Another parallelism technique for improving throughput is Attention Data Parallelism (ADP). This technique replicates attention layers for parallel computation, which boosts system throughput at the expense of per-request speed.

Quantization

Quantization, or running a model with a lower level of precision in weights, activations, and/or KV cache values, improves both latency and throughput. A quantized model pushes out the efficient frontier on serving tradeoffs.

However, quantization introduces a new set of tradeoffs between quality and serving efficiency. This is a particularly jagged frontier, where a large degree of improvement to serving efficiency is possible with little-to-no reduction in model quality, especially when using microscaling floating-point number formats like MXFP4 and NVFP4.

Techniques that move the frontier

These techniques are the ones that make the headlines. Improving overall performance is the most fun part of inference engineering.

Techniques for pushing out the frontier create universal gains.

Techniques for pushing out the frontier create universal gains.

The best part is that these techniques often compound. For example, doubling performance from better hardware while also doubling performance from better software means a four times improvement in overall serving, which can be allocated across latency and throughput.

Kernel optimization and runtime improvements

A CUDA kernel is a low-level function that executes a single piece of the inference process, like a matrix multiplication. Improving the performance of individual kernels, as well as the end-to-end performance of a forward pass in the inference engine, means fewer resources are needed to generate each token. These efficiency gains compound throughout the stack and push the frontier of performance.

For more on kernel-level performance, read this excellent writeup by Baseten intern Brian Li.

Speculative decoding

Speculative decoding is the process of guessing which tokens a model might generate, then validating those guesses. When speculative decoding was new, this posed a tradeoff between latency and throughput: speculation was expensive, sequence lengths were short, and acceptance rates were low, meaning speculative decoding was only feasible at small batch sizes.

Today, techniques like EAGLE-3, DSpark, and DFlash still compete with the main model loop for resources, somewhat limiting maximum batch sizes. However, thanks to the strong performance of these techniques, especially on code generation where output token sequences are relatively predictable, they yield efficiency gains from skipped forward passes in addition to the raw reduction in latency in the form of more tokens per second per user.

Disaggregation

P/D disaggregation, or separating prefill and decode onto dedicated workers, is a strategy for optimizing high-volume deployments of LLMs. Running prefill and decode independently means that workers can be optimized for the unique characteristics of each phase of inference, and that the ratio between prefill and decode workers can be adjusted to match the input and output sequence lengths and cache hit rates from incoming traffic.

In practice, disaggregation is often most useful for increasing throughput while keeping latencies the same or slightly better.

In practice, disaggregation is often most useful for increasing throughput while keeping latencies the same or slightly better.

This article provided a basic overview of techniques for managing tradeoffs versus techniques for improving systemwide performance. For more detail on every technique mentioned in this article, read my free book Inference Engineering.

The Daily Front Page 21 of 26
Wednesday, September 2, 2026 The Daily Front No. #260902 — Browser-Native Intelligence
repository

WebLLM: high-performance in-browser LLM inference engine

by saikatsg·▲ 100 points·17 comments·github.com ↗
★ 18,861⑂ 1,374 forks TypeScript

High-performance In-browser LLM Inference Engine

NPM Package "WebLLM Chat Deployed" Join Discord Related Repository: WebLLM Chat Related Repository: MLC LLM

High-Performance In-Browser LLM Inference Engine.

Documentation | Blogpost | Paper | Examples

Overview

WebLLM is a high-performance in-browser LLM inference engine that brings language model inference directly onto web browsers with hardware acceleration. Everything runs inside the browser with no server support and is accelerated with WebGPU.

WebLLM is fully compatible with OpenAI API. That is, you can use the same OpenAI API on any open source models locally, with functionalities including streaming, JSON-mode, function-calling (WIP), etc.

We can bring a lot of fun opportunities to build AI assistants for everyone and enable privacy while enjoying GPU acceleration.

You can use WebLLM as a base npm package and build your own web application on top of it by following the examples below. This project is a companion project of MLC LLM, which enables universal deployment of LLM across hardware environments.

Check out WebLLM Chat to try it out!

Key Features

  • In-Browser Inference: WebLLM is a high-performance, in-browser language model inference engine that leverages WebGPU for hardware acceleration, enabling powerful LLM operations directly within web browsers without server-side processing.
  • Full OpenAI API Compatibility: Seamlessly integrate your app with WebLLM using OpenAI API with functionalities such as streaming, JSON-mode, logit-level control, seeding, and more.
  • Structured JSON Generation: WebLLM supports state-of-the-art JSON mode structured generation, implemented in the WebAssembly portion of the model library for optimal performance. Check WebLLM JSON Playground on HuggingFace to try generating JSON output with custom JSON schema.
  • Extensive Model Support: WebLLM natively supports a range of models including Llama 3, Phi 3, Gemma, Mistral, Qwen(通义千问), and many others, making it versatile for various AI tasks. For the complete supported model list, check MLC Models.
  • Custom Model Integration: Easily integrate and deploy custom models in MLC format, allowing you to adapt WebLLM to specific needs and scenarios, enhancing flexibility in model deployment.
  • Plug-and-Play Integration: Easily integrate WebLLM into your projects using package managers like NPM and Yarn, or directly via CDN, complete with comprehensive examples and a modular design for connecting with UI components.
  • Streaming & Real-Time Interactions: Supports streaming chat completions, allowing real-time output generation which enhances interactive applications like chatbots and virtual assistants.
  • Web Worker & Service Worker Support: Optimize UI performance and manage the lifecycle of models efficiently by offloading computations to separate worker threads or service workers.
  • Chrome Extension Support: Extend the functionality of web browsers through custom Chrome extensions using WebLLM, with examples available for building both basic and advanced extensions.

Built-in Models

Check the complete list of available models on MLC Models. WebLLM supports a subset of these available models and the list can be accessed at prebuiltAppConfig.model_list.

Here are the primary families of models currently supported:

  • Llama: Llama 3, Llama 2, Hermes-2-Pro-Llama-3
  • Phi: Phi 3, Phi 2, Phi 1.5
  • Gemma: Gemma-2B
  • Mistral: Mistral-7B-v0.3, Hermes-2-Pro-Mistral-7B, NeuralHermes-2.5-Mistral-7B, OpenHermes-2.5-Mistral-7B
  • Qwen (通义千问): Qwen2 0.5B, 1.5B, 7B

If you need more models, request a new model via opening an issue or check Custom Models for how to compile and use your own models with WebLLM.

Jumpstart with Examples

Learn how to use WebLLM to integrate large language models into your application and generate chat completions through this simple Chatbot example:

Example Chatbot on JSFiddle Example Chatbot on Codepen

For an advanced example of a larger, more complicated project, check WebLLM Chat.

More examples for different use cases are available in the examples folder.

Get Started

WebLLM offers a minimalist and modular interface to access the chatbot in the browser. The package is designed in a modular way to hook to any of the UI components.

Installation

Package Manager

# npm
npm install @mlc-ai/web-llm
# yarn
yarn add @mlc-ai/web-llm
# or pnpm
pnpm install @mlc-ai/web-llm

Then import the module in your code.

// Import everything
import * as webllm from "@mlc-ai/web-llm";
// Or only import what you need
import { CreateMLCEngine } from "@mlc-ai/web-llm";

CDN Delivery

Thanks to jsdelivr.com, WebLLM can be imported directly through URL and work out-of-the-box on cloud development platforms like jsfiddle.net, Codepen.io, and Scribbler:

import * as webllm from "https://esm.run/@mlc-ai/web-llm";

It can also be dynamically imported as:

const webllm = await import("https://esm.run/@mlc-ai/web-llm");

Create MLCEngine

Most operations in WebLLM are invoked through the MLCEngine interface. You can create an MLCEngine instance and loading the model by calling the CreateMLCEngine() factory function.

(Note that loading models requires downloading and it can take a significant amount of time for the very first run without caching previously. You should properly handle this asynchronous call.)

import { CreateMLCEngine } from "@mlc-ai/web-llm";

// Callback function to update model loading progress
const initProgressCallback = (initProgress) => {
  console.log(initProgress);
};
const selectedModel = "Llama-3.1-8B-Instruct-q4f32_1-MLC";

const engine = await CreateMLCEngine(
  selectedModel,
  { initProgressCallback: initProgressCallback }, // engineConfig
);

Under the hood, this factory function does the following steps for first creating an engine instance (synchronous) and then loading the model (asynchronous). You can also do them separately in your application.

import { MLCEngine } from "@mlc-ai/web-llm";

// This is a synchronous call that returns immediately
const engine = new MLCEngine({
  initProgressCallback: initProgressCallback,
});

// This is an asynchronous call and can take a long time to finish
await engine.reload(selectedModel);

Cache Backend Policy

WebLLM supports four cache backends through AppConfig.cacheBackend:

Example:

import { CreateMLCEngine, prebuiltAppConfig } from "@mlc-ai/web-llm";

const appConfig = { ...prebuiltAppConfig, cacheBackend: "cross-origin" };
const engine = await CreateMLCEngine("Llama-3.1-8B-Instruct-q4f32_1-MLC", {
  appConfig,
});

Notes:

  • If "opfs" is selected in an environment without OPFS support, cache operations fail with an OPFS availability error.
  • When using "opfs", appConfig.opfsAccessMode can be set to "auto" to use OPFS sync access handles where supported, or "sync" to require sync access handles. The default is "async".
  • The "cross-origin" backend requires installing and enabling a compatible browser extension.
  • Cross-origin backend currently does not support programmatic tensor-cache deletion; clearing is extension-managed.

Chat Completion

After successfully initializing the engine, you can now invoke chat completions using OpenAI style chat APIs through the engine.chat.completions interface. For the full list of parameters and their descriptions, check section below and OpenAI API reference.

(Note: The model parameter is not supported and will be ignored here. Instead, call CreateMLCEngine(model) or engine.reload(model) instead as shown in the Create MLCEngine above.)

const messages = [
  { role: "system", content: "You are a helpful AI assistant." },
  { role: "user", content: "Hello!" },
];

const reply = await engine.chat.completions.create({
  messages,
});
console.log(reply.choices[0].message);
console.log(reply.usage);

Streaming

WebLLM also supports streaming chat completion generating. To use it, simply pass stream: true to the engine.chat.completions.create call.

const messages = [
  { role: "system", content: "You are a helpful AI assistant." },
  { role: "user", content: "Hello!" },
];

// Chunks is an AsyncGenerator object
const chunks = await engine.chat.completions.create({
  messages,
  temperature: 1,
  stream: true, // <-- Enable streaming
  stream_options: { include_usage: true },
});

let reply = "";
for await (const chunk of chunks) {
  reply += chunk.choices[0]?.delta.content || "";
  console.log(reply);
  if (chunk.usage) {
    console.log(chunk.usage); // only last chunk has usage
  }
}

const fullReply = await engine.getMessage();
console.log(fullReply);

Advanced Usage

Using Workers

You can put the heavy computation in a worker script to optimize your application performance. To do so, you need to:

  1. Create a handler in the worker thread that communicates with the frontend while handling the requests.
  2. Create a Worker Engine in your main application, which under the hood sends messages to the handler in the worker thread.

For detailed implementations of different kinds of Workers, check the following sections.

Dedicated Web Worker

WebLLM comes with API support for WebWorker so you can hook the generation process into a separate worker thread so that the computing in the worker thread won't disrupt the UI.

We create a handler in the worker thread that communicates with the frontend while handling the requests.

// worker.ts
import { WebWorkerMLCEngineHandler } from "@mlc-ai/web-llm";

// A handler that resides in the worker thread
const handler = new WebWorkerMLCEngineHandler();
self.onmessage = (msg: MessageEvent) => {
  handler.onmessage(msg);
};

In the main logic, we create a WebWorkerMLCEngine that implements the same MLCEngineInterface. The rest of the logic remains the same.

// main.ts
import { CreateWebWorkerMLCEngine } from "@mlc-ai/web-llm";

async function main() {
  // Use a WebWorkerMLCEngine instead of MLCEngine here
  const engine = await CreateWebWorkerMLCEngine(
    new Worker(new URL("./worker.ts", import.meta.url), {
      type: "module",
    }),
    selectedModel,
    { initProgressCallback }, // engineConfig
  );

  // everything else remains the same
}

Use Service Worker

WebLLM comes with API support for ServiceWorker so you can hook the generation process into a service worker to avoid reloading the model in every page visit and optimize your application's offline experience.

(Note, Service Worker's life cycle is managed by the browser and can be killed any time without notifying the webapp. ServiceWorkerMLCEngine will try to keep the service worker thread alive by periodically sending heartbeat events, but your application should also include proper error handling. Check keepAliveMs and missedHeatbeat in ServiceWorkerMLCEngine for more details.)

We create a handler in the worker thread that communicates with the frontend while handling the requests. Instantiate the handler at the top level of the worker script so its message listener is registered during initial script evaluation. Do not instantiate it from an activate or message listener: the browser can restart an already-active worker without dispatching another activate event.

// sw.ts
import { ServiceWorkerMLCEngineHandler } from "@mlc-ai/web-llm";

new ServiceWorkerMLCEngineHandler();
console.log("Service Worker is ready");

Then in the main logic, we register the service worker and create the engine using CreateServiceWorkerMLCEngine function. The rest of the logic remains the same.

// main.ts
import {
  MLCEngineInterface,
  CreateServiceWorkerMLCEngine,
} from "@mlc-ai/web-llm";

if ("serviceWorker" in navigator) {
  navigator.serviceWorker.register(
    new URL("sw.ts", import.meta.url), // worker script
    { type: "module" },
  );
}

const engine: MLCEngineInterface = await CreateServiceWorkerMLCEngine(
  selectedModel,
  { initProgressCallback }, // engineConfig
);

You can find a complete example on how to run WebLLM in service worker in examples/service-worker.

Chrome Extension

You can also find examples of building Chrome extension with WebLLM in examples/chrome-extension and examples/chrome-extension-webgpu-service-worker. The latter one leverages service worker, so the extension is persistent in the background. Additionally, you can explore another full project of a Chrome extension, WebLLM Assistant, which leverages WebLLM here.

Full OpenAI Compatibility

WebLLM is designed to be fully compatible with OpenAI API. Thus, besides building a simple chatbot, you can also have the following functionalities with WebLLM:

  • streaming: return output as chunks in real-time in the form of an AsyncGenerator
  • json-mode: efficiently ensure output is in JSON format, see OpenAI Reference for more.
  • seed-to-reproduce: use seeding to ensure a reproducible output with fields seed.
  • function-calling (WIP): function calling with fields tools and tool_choice (with preliminary support); or manual function calling without tools or tool_choice (keeps the most flexibility).

Integrity Verification

WebLLM supports optional integrity verification for model artifacts using SRI (Subresource Integrity) hashes. When the integrity field is set on a ModelRecord, WebLLM will verify the downloaded config, WASM, and tokenizer files against the provided hashes before loading.

import { CreateMLCEngine } from "@mlc-ai/web-llm";

const appConfig = {
  model_list: [
    {
      model: "https://huggingface.co/mlc-ai/Llama-3.2-1B-Instruct-q4f16_1-MLC",
      model_id: "Llama-3.2-1B-Instruct-q4f16_1-MLC",
      model_lib:
        "https://raw.githubusercontent.com/user/model-libs/main/model.wasm",
      integrity: {
        config: "sha256-<base64-hash-of-mlc-chat-config.json>",
        model_lib: "sha256-<base64-hash-of-wasm-file>",
        tokenizer: {
          "tokenizer.json": "sha256-<base64-hash-of-tokenizer.json>",
        },
        onFailure: "error", // "error" (default) throws IntegrityError, "warn" logs and continues
      },
    },
  ],
};

const engine = await CreateMLCEngine("Llama-3.2-1B-Instruct-q4f16_1-MLC", {
  appConfig,
});

You can generate SRI hashes for model files with:

# SHA-256
openssl dgst -sha256 -binary <file> | openssl base64 -A | sed 's/^/sha256-/'
# SHA-384
openssl dgst -sha384 -binary <file> | openssl base64 -A | sed 's/^/sha384-/'
# SHA-512
openssl dgst -sha512 -binary <file> | openssl base64 -A | sed 's/^/sha512-/'

The openssl commands require a Unix-like shell (macOS/Linux). On Windows, run openssl via Git Bash or WSL.

If a hash does not match, an IntegrityError is thrown (or a warning is logged when onFailure: "warn"). All fields in integrity are optional — only specified artifacts will be verified. When the integrity field is omitted entirely, WebLLM behaves exactly as before (no verification).

See the integrity-verification example for a complete working demo.

Custom Models

WebLLM works as a companion project of MLC LLM and it supports custom models in MLC format. It reuses the model artifact and builds the flow of MLC LLM. To compile and use your own models with WebLLM, please check out MLC LLM document on how to compile and deploy new model weights and libraries to WebLLM.

Here, we go over the high-level idea. There are two elements of the WebLLM package that enable new models and weight variants.

  • model: Contains a URL to model artifacts, such as weights and meta-data.
  • model_lib: A URL to the web assembly library (i.e. wasm file) that contains the executables to accelerate the model computations.

Both are customizable in the WebLLM.

import { CreateMLCEngine } from "@mlc-ai/web-llm";

async main() {
  const appConfig = {
    "model_list": [
      {
        "model": "/url/to/my/llama",
        "model_id": "MyLlama-3b-v1-q4f32_0",
        "model_lib": "/url/to/myllama3b.wasm",
      }
    ],
  };
  // override default
  const chatOpts = {
    "repetition_penalty": 1.01
  };

  // load a prebuilt model
  // with a chat option override and app config
  // under the hood, it will load the model from myLlamaUrl
  // and cache it in the browser cache
  // The chat will also load the model library from "/url/to/myllama3b.wasm",
  // assuming that it is compatible to the model in myLlamaUrl.
  const engine = await CreateMLCEngine(
    "MyLlama-3b-v1-q4f32_0",
    { appConfig }, // engineConfig
    chatOpts,
  );
}

In many cases, we only want to supply the model weight variant, but not necessarily a new model (e.g. NeuralHermes-Mistral can reuse Mistral's model library). For examples of how a model library can be shared by different model variants, see webllm.prebuiltAppConfig.

Build WebLLM Package From Source

NOTE: you don't need to build from source unless you would like to modify the WebLLM package. To use the npm, simply follow Get Started or any of the examples instead.

To build from source, simply run:

npm install
npm run build

Then, to test the effects of your code change in an example, inside examples/get-started/package.json, change from "@mlc-ai/web-llm": "^0.2.84" to "@mlc-ai/web-llm": ../...

Then run:

cd examples/get-started
npm install
npm start

Note that sometimes you would need to switch between file:../.. and ../.. to trigger npm to recognize new changes. In the worst case, you can run:

cd examples/get-started
rm -rf node_modules dist package-lock.json .parcel-cache
npm install
npm start

In case you need to build TVMjs from source

WebLLM's runtime largely depends on TVMjs: https://github.com/apache/tvm/tree/main/web

While it is also available as an npm package: https://www.npmjs.com/package/@mlc-ai/web-runtime, you can build it from source if needed by following the steps below.

  1. Install emscripten. It is an LLVM-based compiler that compiles C/C++ source code to WebAssembly.

    • Follow the installation instruction to install the latest emsdk.
    • Source emsdk_env.sh by source path/to/emsdk_env.sh, so that emcc is reachable from PATH and the command emcc works.

    We can verify the successful installation by trying out emcc terminal.

    Note: We recently found that using the latest emcc version may run into issues during runtime. Use ./emsdk install 3.1.56 instead of ./emsdk install latest for now as a workaround. The error may look like

    Init error, LinkError: WebAssembly.instantiate(): Import #6 module="wasi_snapshot_preview1"
    function="proc_exit": function import requires a callable
    
  2. In ./package.json, change from "@mlc-ai/web-runtime": "0.18.0-dev2", to "@mlc-ai/web-runtime": "file:./tvm_home/web",.

  3. Setup necessary environment

    Prepare all the necessary dependencies for web build:

    ./scripts/prep_deps.sh
    

    In this step, if $TVM_SOURCE_DIR is not defined in the environment, we will execute the following line to build tvmjs dependency:

    git clone https://github.com/mlc-ai/relax 3rdparty/tvm-unity --recursive
    

    This clones the current HEAD of mlc-ai/relax. However, it may not always be the correct branch or commit to clone. To build a specific npm version from source, refer to the version bump PR, which states which branch (i.e. mlc-ai/relax or apache/tvm) and which commit the current WebLLM version depends on. For instance, version 0.2.52, according to its version bump PR #521, is built by checking out the following commit https://github.com/apache/tvm/commit/e6476847753c80e054719ac47bc2091c888418b6 in apache/tvm, rather than the HEAD of mlc-ai/relax.

    Besides, --recursive is necessary and important. Otherwise, you may encounter errors like fatal error: 'dlpack/dlpack.h' file not found.

  4. Build WebLLM Package

    npm run build
    
  5. Validate some of the sub-packages

    You can then go to the subfolders in examples to validate some of the sub-packages. We use Parcelv2 for bundling. Although Parcel is not very good at tracking parent directory changes sometimes. When you make a change in the WebLLM package, try to edit the package.json of the subfolder and save it, which will trigger Parcel to rebuild.

Links

Acknowledgement

This project is initiated by members from CMU Catalyst, UW SAMPL, SJTU, OctoML, and the MLC community. We would love to continue developing and supporting the open-source ML community.

This project is only possible thanks to the shoulders open-source ecosystems that we stand on. We want to thank the Apache TVM community and developers of the TVM Unity effort. The open-source ML community members made these models publicly available. PyTorch and Hugging Face communities make these models accessible. We would like to thank the teams behind Vicuna, SentencePiece, LLaMA, and Alpaca. We also would like to thank the WebAssembly, Emscripten, and WebGPU communities. Finally, thanks to Dawn and WebGPU developers.

Citation

If you find this project to be useful, please cite:

@misc{ruan2026webllmhighperformanceinbrowserllm,
      title={WebLLM: A High-Performance In-Browser LLM Inference Engine},
      author={Charlie F. Ruan and Yucheng Qin and Akaash R. Parthasarathy and Xun Zhou and Ruihang Lai and Hongyi Jin and Yixin Dong and Bohan Hou and Meng-Shiun Yu and Yiyan Zhai and Sudeep Agarwal and Hangrui Cao and Siyuan Feng and Tianqi Chen},
      year={2026},
      eprint={2412.15803},
      archivePrefix={arXiv},
      primaryClass={cs.LG},
      url={https://arxiv.org/abs/2412.15803},
}

Contributors

contributors

The Daily Front Page 22 of 26
Wednesday, September 2, 2026 The Daily Front No. #260902 — Worlds via Code
repository

Fable 5.1 World Modeling

by surreal_·▲ 178 points·56 comments·github.com ↗
★ 169⑂ 7 forks TypeScript

worlds via code, from fable 5.1

Worlds via code. Explorable, browser-native reconstructions of real places — researched, modelled, and quality-checked end to end by autonomous Claude Fable 5.1 agent swarms, then shipped as plain Three.js apps you can run with npm run dev.

No game engine. No proprietary 3D tiles. Every building, storefront, sign, tree and traffic light is generated from open data and public reference imagery by code that lives in this repo.


Worlds

🌉 Union Square, San Francisco

Union Square walkthrough: aerial sweep, Dewey Monument, Nintendo SAN FRANCISCO, Apple Union Square

Watch the full 59-second walkthrough · 1920×1080 · aerial, plaza, Nintendo, lower level, Apple

The square and its surrounding blocks — Powell, Geary, Post and Stockton — on real terrain and a real street grid, with 129 identified storefronts, working traffic lights and cable cars, day/sunset/night, and two explorable interiors: Apple Union Square (300 Post St) and Nintendo SAN FRANCISCO (331 Powell St).

Run it cd union-square-sf && npm install && npm run dev Buildings 453 OSM footprints · 75 hand-authored façades · 129 named storefronts Life 220 pedestrians on a 1,398-node nav graph · 109 vehicles incl. Powell St cable cars Interiors Apple + Nintendo, 23 interactive objects Validation 34 camera-matched viewpoints vs. real photographs · 147 comparison sheets · 9 independent reviewer reports

More worlds coming.


How these are made

Each world follows the same pipeline, and every stage is in the repo so you can re-run it:

  1. Reconnaissance — parallel research agents pull OpenStreetMap geometry, USGS elevation, transit and street specs, and a storefront census with per-fact sources and confidence levels.
  2. Offline asset generation — Blender-as-a-library (bpy) scripts emit optimised GLB kits: façade modules, street furniture, vehicles, vegetation, retail fixtures, pedestrian body parts.
  3. Runtime — a pure Three.js app assembles terrain, streets, façades, props, crowds and traffic from JSON specs.
  4. Camera-match QA — Playwright drives the real app, screenshots fixed viewpoints, and diffs them against free-licensed photographs taken from the same spot; independent reviewer agents (architect, geographer, technical artist, interaction) file reports that drive the next fix cycle.

License

Code and generated assets: MIT. Geometry is derived from OpenStreetMap (ODbL) and USGS 3DEP (public domain). Reference photographs are not redistributed here — their provenance is recorded per sector in each world's refs/*/SOURCES.md. Brand names and logos identify the real businesses at their real locations and belong to their owners.

The Daily Front Page 23 of 26
Wednesday, September 2, 2026 The Daily Front No. #260902 — Worlds via Code
article

Can I opt out of my input or output data being used for training?

by teekert·▲ 403 points·171 comments·help.mistral.ai ↗

In certain cases, your input and output data (such as conversations, documents, and other user-provided content) may be included in Mistral’s model training programs.

🔑 You retain full control over this processing and have the right to opt out of these programs at any time.

The opt-out process depends on the service or platform used, as described below.

Opt out of Vibe data training (via the Admin panel)

🔑 Vibe: users are not opted out by default and can opt out at any time in their settings. Vibe (Enterprise): customers are opted out of training by default — the opt-in toggle is managed at the admin level.

You can opt out of training through the Admin panel by following the procedure below:

  1. Select Vibe under the Manage section.
  2. Under the Privacy section, disable the toggle labelled Allow your interactions to be used to train our models.

📌 Documents attached or uploaded within Vibe are considered as input data. Therefore, you may wish to opt out to prevent such documents from being used to improve Mistral’s models.

🔑 Once the opt-out is confirmed, Mistral no longer uses your input or output data for the purpose of training its models.

Opt out of Vibe data training on the mobile application (iOS and Android)

On both iOS and Android, the opt-out procedure is as follows:

  1. Open the Settings page of the application.
  2. Select Data & Account Controls under the Account section.
  3. In the Data & Account Controls panel, deselect the Enable data sharing checkbox to opt out of Mistral’s training program.

Opt out of Mistral Studio and API data training (via the Admin panel)

🔑 Customers retain full control over this processing and have the right to opt out at any time.

You may opt out of data training for Mistral Studio and related API services by following the steps below:

  1. In the Admin panel, open the Privacy menu in the left-hand navigation bar.
  2. Under the Anonymous improvement data section, disable the toggle to prevent API calls and related data from being used to improve Mistral’s services.

🔑 Vibe and API opt-out toggles are separate. Opting out of one does not opt you out of the other — you must configure each toggle individually.

The Daily Front Page 24 of 26
Wednesday, September 2, 2026 The Daily Front No. #260902 — Also on the Front Page
The Daily Front Page 25 of 26
Wednesday, September 2, 2026 The Daily Front No. #260902 — Colophon

That's the Front for Today

Issue No. #260902 — Wednesday, September 2, 2026 — went to press 2026-09-03 at 05:39 UTC.

About This Magazine

The Daily Front is a daily digital magazine assembled from the stories that reached the front page of Hacker News on Wednesday, September 2, 2026. Headlines, points, and comment counts are recorded as they stood at press time. All articles remain the property of their original authors — every piece links back to its source and its discussion thread.

How It Was Made

Fetched, cleaned, and typeset by an automated pipeline. An editor model laid out the pages and chose the highlights; a second read a handful of the day's stories and briefed the cover illustrator — 29 model calls and 233k tokens in total. Set in Jacquard 12, Playfair Display, Source Serif 4, and IBM Plex Mono, all served via Google Fonts under the SIL Open Font License.

The Cover

The cover illustration was commissioned with this prompt:

In a dim identity-verification warehouse, an older woman stands beside a conveyor belt carrying thousands of drivers’ licenses toward a humming server cabinet. She clutches a ring of keys and points uncertainly at three identical trays: one holds a family photograph, another a houseplant, and another a roadside scene, as if all belong to the same remembered moment. Above the machinery, a faceless digital agent races along an endless loop of cables, repeatedly scanning, sorting, and releasing the documents into darkness.

Render the cover as a data-visualization abstraction on a warm ivory paper ground, using only deep indigo and oxidized orange ink: proportional bars form the conveyor and its dense stream of licenses into a server cabinet; a dominant older-woman glyph stands beside it, clutching a circular key cluster and pointing toward three equal tray modules containing distinct minimal symbols for family, plant, and roadside memory; above, a faceless agent-node races along an endless cable loop, with repeated scan arcs, sorting bars, and released document marks disappearing into a dark terminal field. Preserve this hierarchy and action through clean geometry, measured spacing, and restrained statistical scale.

Absolutely no text, letters, numbers, readable symbols, or logos anywhere in the image.

Production Ledger

StageModelCallsTokens InTokens Out
extractgpt-5.6-luna 25 141,262 61,381
layoutgpt-5.6-terra 1 18,965 3,146
covergpt-5.6-luna 2 1,583 434
covergpt-image-2 1 254 5,488

The Publisher

Published by Johnny.

Support the Press

If The Daily Front brightens your morning, consider supporting its publisher.

Credits & Contact

All content — articles, posts, comments, and the images within them — belongs to its original authors and is reproduced here to point readers back to the source. Full credit goes to those creators; every item links to its original and its Hacker News discussion.

If you are an author and would like your content removed from an issue, write to hi@johnnys.page and it will be taken down.

Feedback is always welcome at the same address: hi@johnnys.page.

Credit where credit is due.

Every page of this issue began as someone else's work — these are the original sources, linked in full.

  1. Gemini 3.8 Flash and 3.8 Flash Cyber by bratao — blog.google·HN discussion ↗
  2. Three sites made 215,128 “best software” pages for AI. Perplexity cites them by jakobgreenfeld — trellner.com·HN discussion ↗
  3. FBI Probes Service Selling 153M+ Drivers Licenses by tatersolid — krebsonsecurity.com·HN discussion ↗
  4. Hang on to Your Firefox by speckx — newsonaut.com·HN discussion ↗
  5. A note on subscription prices from LWN by rwky — lwn.net·HN discussion ↗
  6. Making the Internet Boring by zdw — cemrehancavdar.com·HN discussion ↗
  7. Commodore 64 released September 1, 1982 by giuliomagnifico — dfarq.homeip.net·HN discussion ↗
  8. The Emergent Symbolic Structure of Artificial Neural Networks by schmuhblaster — arxiv.org·HN discussion ↗
  9. Aging brains blend memories together instead of just forgetting them by mdp2021 — studyfinds.com·HN discussion ↗
  10. Sonic Pi by Bluestein — sonic-pi.net·HN discussion ↗
  11. Building an interactive instrument for a one-of-a-kind festival by tjwds — benholmen.com·HN discussion ↗
  12. Exit the Cave by akkartik — turtlespace.blog·HN discussion ↗
  13. I wanna live an NPC life by conferza — signalundefied.bearblog.dev·HN discussion ↗
  14. A Selection of Los Alamos Rolodex Business Cards by 1970-01-01 — clui.org·HN discussion ↗
  15. True Rate of Unemployment by ptrhvns — lisep.org·HN discussion ↗
  16. Poisson Disk Sampling by vismit2000 — stripeacross.com·HN discussion ↗
  17. Fine, I'll build my own text editor by Alephinitesimal — dbushell.com·HN discussion ↗
  18. Reverse Engineering Unknown File Formats with ImHex by carlos-menezes — werwolv.net·HN discussion ↗
  19. Embedded Rust RTOS vs. C RTOS by kooi — tweedegolf.nl·HN discussion ↗
  20. We could save petabytes of cache storage with Zstandard and Pingora by torutofu — blog.cloudflare.com·HN discussion ↗
  21. The efficient frontier of LLM inference by philipkiely — baseten.co·HN discussion ↗
  22. WebLLM: high-performance in-browser LLM inference engine by saikatsg — github.com·HN discussion ↗
  23. Fable 5.1 World Modeling by surreal_ — github.com·HN discussion ↗
  24. Can I opt out of my input or output data being used for training? by teekert — help.mistral.ai·HN discussion ↗
  25. Biggest dark matter detector spots a single weird particle by randycupertino — science.org·HN discussion ↗
  26. Muse Spark 1.3 by bvaldivielso — developer.meta.com·HN discussion ↗
  27. Google avoids a breakup of its ad tech business by donohoe — nytimes.com·HN discussion ↗
  28. Wendell Berry has died by Curiositry — nytimes.com·HN discussion ↗
  29. Qantas Airbus A380 engine failure in 2010 (2023) by gumby — admiralcloudberg.medium.com·HN discussion ↗
  30. WebFPGA (2019) by gurjeet — webfpga.io·HN discussion ↗

Browse all issues in the archive →