Cover illustration

TheDaily Front

Issue No. #260818 Tuesday, August 18 2026 #260818 — TUESDAY, AUGUST 18, 2026
The machines are cheaper, the memory dearer, and the search results sponsored.
Tuesday, August 18, 2026 The Daily Front No. #260818 — Contents
30stories
9,642points
5,595comments
298kllm tokens
Assembled with 30 model calls — 205,858 tokens read, 92,271 written.

Highlights

The Amazon tax

A blistering account of how paid placement has turned product discovery into a toll road for merchants, publishers, and shoppers alike.

Linux 7.3 improves performance when running out of vRAM

Linux 7.3 brings upstream work intended to keep games steadier when their appetite for graphics memory exceeds the card's supply.

Fixing a bricked Framework laptop

One owner recounts reviving a bricked repairable laptop with inexpensive tools after a firmware update went wrong.

Using the railway network as a flatbed scanner

An industrial line-scan camera turns journeys by train and ferry into immense, uncanny horizontal photographs.

Being ambitious and being a dad

A founder considers the changing arithmetic of drive, work, and being present for one's children.

From the Editor

Today’s paper finds progress wearing a rather expensive coat: cheaper model calls, dearer memory, hotter neighborhoods, and ever more tollgates between buyer and seller. Still, the repair bench, the kernel patch, and the homemade scanner offer the old counterargument—someone, somewhere, is determined to understand the machinery.

  1. The Amazon tax3
  2. GPT-5.6 Sol Pricing Cut by 50% on OpenRouter4
  3. Linux 7.3 improves performance when running out of vRAM5
  4. Using the railway network as a flatbed scanner6
  5. Fairphone 6 and PostmarketOS working main camera7
  6. Fixing a bricked Framework laptop8
  7. Fairphone is now officially available in the United States9
  8. Memory prices climb 500% in 12 months10
  9. Teaching my kid to code with a modern MUD11
  10. Babies born under sugar rationing grew into adults with lower cancer risk12
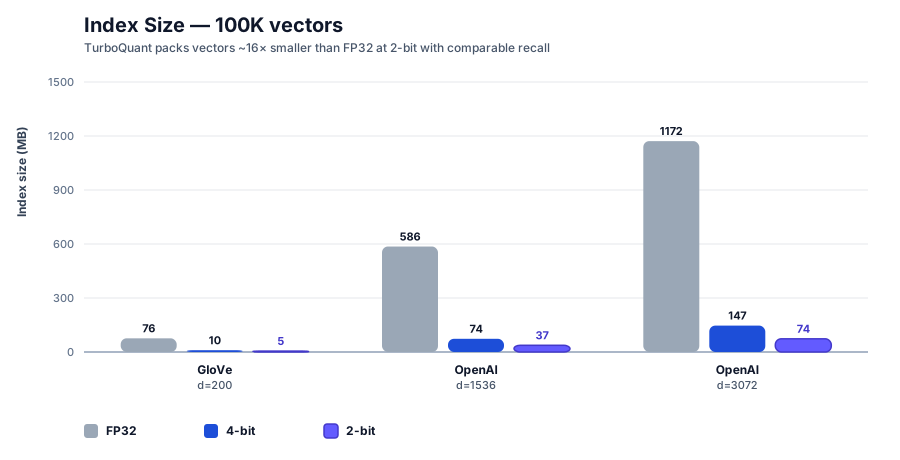
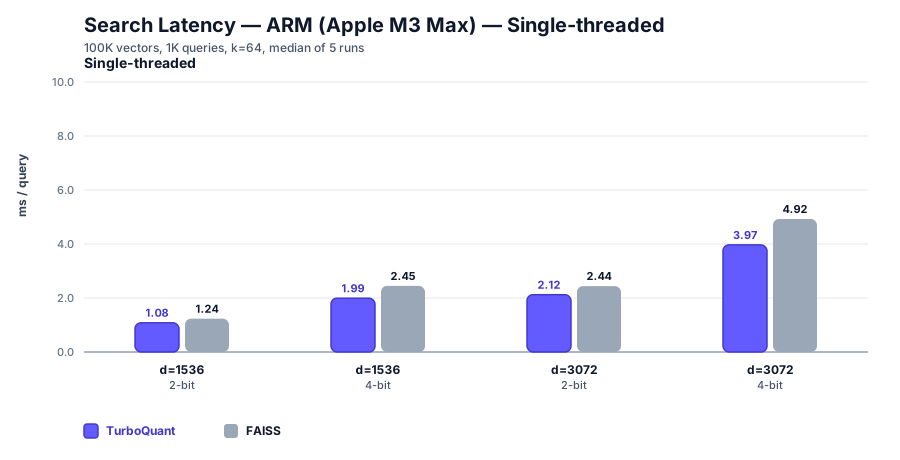
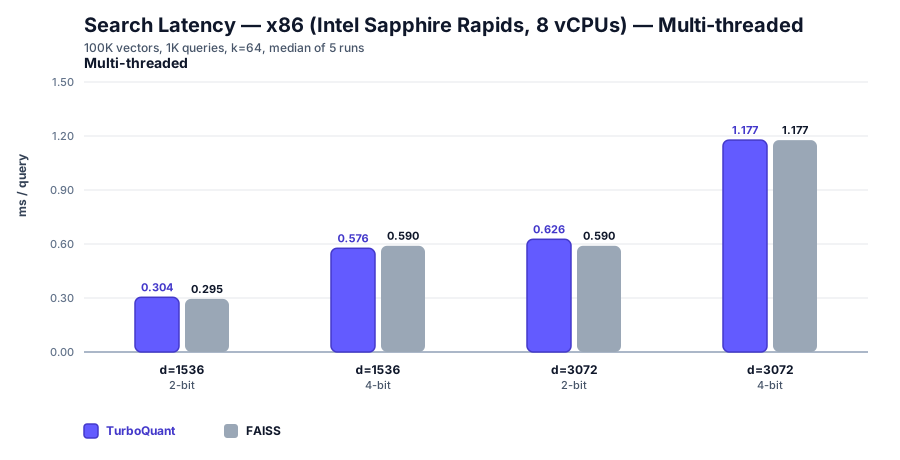
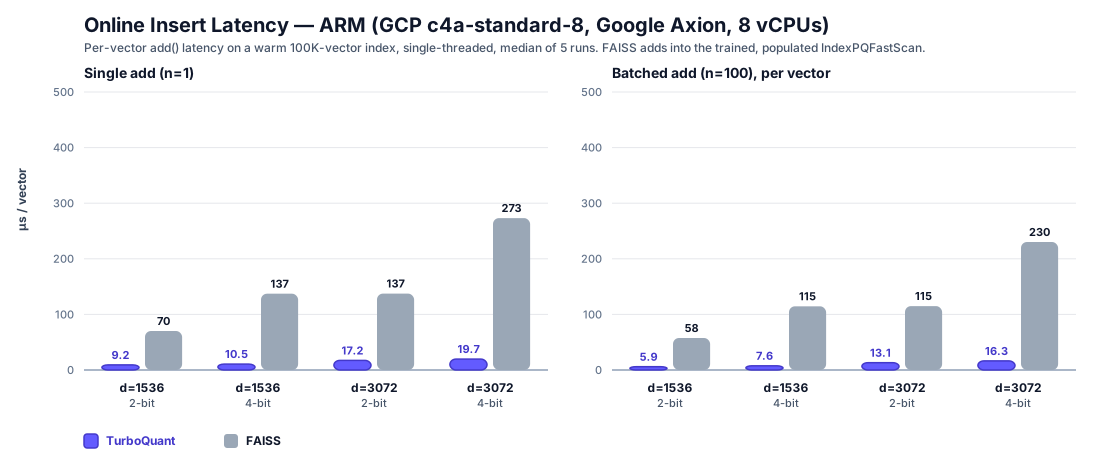
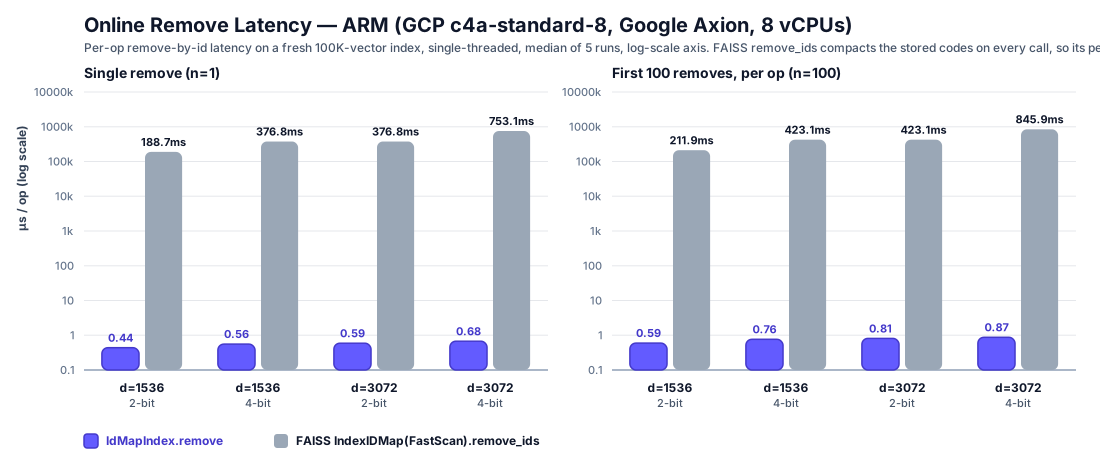
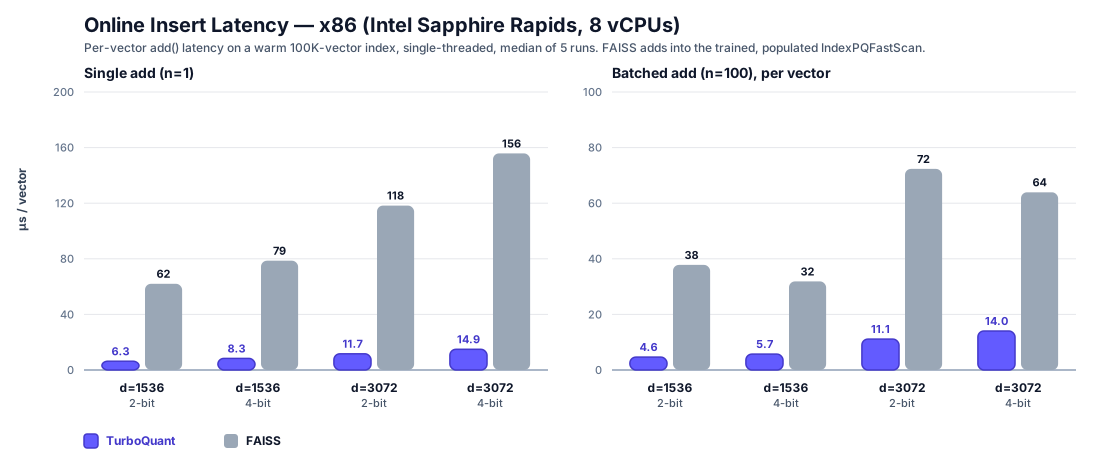
  11. Turbovec – Google's TurboQuant for vector search in Rust13
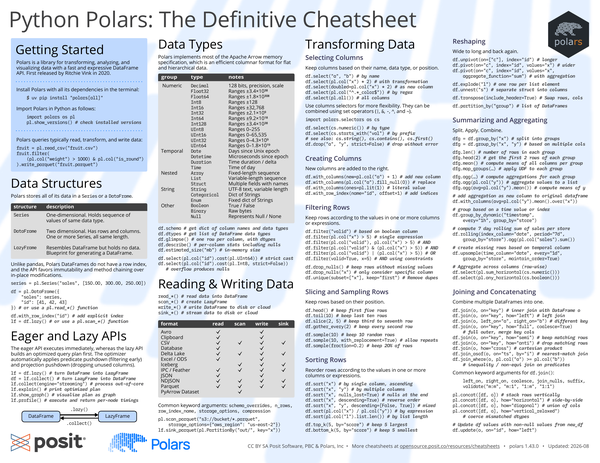
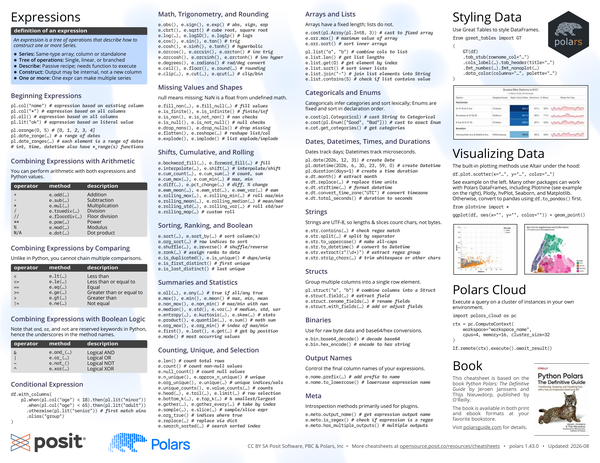
  12. Python Polars Cheatsheet (based on our O'Reilly book)14
  13. Launch HN: machine0 (YC S26) – Persistent CPU and GPU VMs from the CLI15
  14. Being ambitious and being a dad16
  15. The Benchmarkpocalypse17
  16. Norway should buy OpenAI18
  17. California's new tire efficiency rules could save drivers $1B a year19
  18. A 3D fruit fly on macOS desktop powered by the real FlyWire connectome20
  19. Cursor launches Origin, GitHub alternative21
  20. Google has acquired the data of failed US airline Spirit22
  21. Meta Files Patent for Facial Recognition, Automatic Recording of People23
  22. Beware Management Consultants24
  23. How does IKEA come up with names for its products?25
  24. How do functions like alloca allocate memory from the stack?26
  25. And then the men with guns tell you to do it anyway26
  26. Repair Cafe – Fix Your Broken Items27
  27. The Road to MS-DOS 2.027
  28. Rethinking Database Programming27
  29. Field measurements of neighborhood-scale air temperature impacts of data centers27
  30. Shattered skeleton is first confirmed death from trebuchet27
The Daily Front Page 2 of 28
Tuesday, August 18, 2026 The Daily Front No. #260818 — The Tollbooth Marketplace
article

The Amazon tax

by herbertl·▲ 1,072 points·606 comments·seths.blog ↗
This is simply legal theft.

The Amazon tax

It’s not technically a tax. Taxes produce valuable public benefits, like medical research and parks. This is simply legal theft.

Amazon makes nearly a billion dollars in profit from search ads. Every week. Each week, they sell merchants and publishers enough search-distorting ads to capture a billion dollars in revenue. Amazon makes enough in search ad revenue to give every single one of their employees a $35,000 cash bonus and still have change left over.

My publisher is terrific, and they’re working hard to introduce people to my new book. Last week, they began buying search ads on Amazon.

At first glance, this is compelling. Someone who isn’t sure what they’re looking for, who is looking for a book or a kitchen appliance, might find one if the right ad showed up at the right time.

But of course, that’s not what yields, or what most of the ads you see on Amazon do.

If you’re searching for an air fryer, Amazon already knows quite a bit. They know the best-reviewed, least-returned, best-priced model. The only purpose of the ads is to get you to pick an air fryer that isn’t that one (or for the best air fryer, to keep you on track to buy the one you wanted in the first place). The ads make the search worse. [Cory wrote about this three years ago, and the scale has already doubled.]

When there are plenty of ads, the maker of the best air fryer now has to bid on ads as well, if only to protect the sales they were entitled to in the first place. Businesses continue to buy the ads—not because they’re dumb, but because the system has created a situation with few options. Folklore implies that buying the ads somehow shifts how search responds in the long run, even after the ads stop running, but there’s little data to confirm this.

Traditional ads increase demand. We see something that’s clearly an ad, it might spark desire, and sales go up. But zero-sum search ads aren’t like that–the total sales in the category stay the same, and merchants are merely competing for a share of a static pie. This study argues that an ecommerce site with search ads actually sells fewer items than the same site without ads.

The highest-yielding ad my publisher has tested so far is the search “Seth Godin The Knot“. It costs about a dollar per click. My publisher is paying Amazon a dollar to show you an ad for the book you went to buy in the first place.

Who ends up paying the more than $50 billion a year spent on these ads? It’s not the sellers. Sellers can’t make heartfelt donations for long. It’s you. By making the marketing of products significantly less efficient, Amazon’s theft makes products more expensive or sucks the energy out of the development of new products.

It leads to two perverse side effects. First, producers realize that if brand reputation matters less than a budget for clicks, they will shift to shoddy and cheap versions of their products so they have a bigger budget for clicks. And second, Amazon (and Google before it) have an incentive to make their organic search results worse–giving producers more incentive to buy more ads.

For decades, Amazon created value for consumers by lowering the price of just about everything. And they opened the doors to merchants who didn’t have sufficient distribution. They claimed to be customer-centric, and they were.

I don’t think they can claim this any longer. The ad system they built isn’t illegal, but it’s pretty clear who it’s for.

Amazon is stealing from the customers they said they were here to serve.

The Daily Front Page 3 of 28
Tuesday, August 18, 2026 The Daily Front No. #260818 — The Model Price War
article

GPT-5.6 Sol Pricing Cut by 50% on OpenRouter

by Topfi·▲ 619 points·444 comments·openrouter.ai ↗
Different companies host the same model.

GPT-5.6 Sol is the flagship model in OpenAI's GPT-5.6 series. It is suited for complex reasoning, coding, and agentic workflows, and is particularly strong at command-line and multi-step coding tasks and long-horizon problem solving.

Providers

Different companies host the same model. OpenRouter routes your request to one of them based on the routing mode you pick — Balanced (price + speed), Nitro (fastest), or Exacto (highest tool-calling accuracy).

Pricing

The average price customers actually pay for this model, next to the prices providers post. Caching and discounts mean the price actually paid is often well below the listed one.

Performance

Throughput is how fast the model writes (tokens per second — higher is better). Latency is total round-trip time (lower is better). TTFT is time-to-first-token — how long before you see anything appear (lower is better).

Uptime

Uptime is the percentage of the past 3 days that at least one provider was responding to requests. Availability is the percentage of time that inference was successfully served. OpenRouter continuously monitors and uses the next-best provider when one returns an error.

Benchmarks

Scores on standardized evaluations. Higher percentages are better — and rank percentile shows where this model lands among all models on OpenRouter.

Apps

Public apps that send the most traffic to this model. Good signal for what real production workloads look like — and a hint at which use cases this model is best suited for.

Activity

Token volume and request traffic to this model over time.

Quick Start

Drop-in code to call this model. OpenRouter's API is OpenAI-compatible — most SDKs work by just swapping the base URL. The only thing that changes between models is the model slug below.

About OpenAI: GPT-5.6 Sol

OpenRouter makes OpenAI: GPT-5.6 Sol available through a unified, OpenAI-compatible API using the model ID openai/gpt-5.6-sol. Requests can be routed across 3 providers, including OpenAI, Azure (EU) and Amazon Bedrock (US), with automatic failover when an endpoint is unavailable.

OpenAI: GPT-5.6 Sol accepts files such as PDFs, images and text and returns text. It has a 1,050,000-token context window and a maximum output of 128,000 tokens.

On OpenRouter, OpenAI: GPT-5.6 Sol costs $2.50/M input tokens and $15.00/M output tokens, with separate rates for Cache Read at $0.25/M tokens, Cache Write at $3.125/M tokens and Web Search at $10.00/1K calls. Effective pricing can be lower when prompt caching applies. It was released on July 9, 2026; its knowledge cutoff is February 16, 2026.

Frequently asked questions

What is GPT-5.6 Sol?

GPT-5.6 Sol is the flagship model in OpenAI's GPT-5.6 series. It is suited for complex reasoning, coding, and agentic workflows, and is particularly strong at command-line and multi-step coding tasks and long-horizon problem solving.

How much does GPT-5.6 Sol cost?

GPT-5.6 Sol costs $2.50/M input tokens and $15.00/M output tokens, with separate rates for Cache Read at $0.25/M tokens, Cache Write at $3.125/M tokens and Web Search at $10.00/1K calls.

What is the context length of GPT-5.6 Sol?

GPT-5.6 Sol has a 1,050,000 token context window. It supports up to 128,000 completion tokens.

Does GPT-5.6 Sol support tool calling and structured outputs?

Yes. GPT-5.6 Sol accepts tools and tool_choice for function calling. It also supports structured outputs via a JSON schema in response_format.

What inputs and outputs does GPT-5.6 Sol support?

GPT-5.6 Sol accepts files such as PDFs, images and text as input and returns text.

Which providers serve GPT-5.6 Sol?

GPT-5.6 Sol is served by 3 providers on OpenRouter: OpenAI, Azure (EU) and Amazon Bedrock (US). Requests are routed to the best available provider, with automatic failover to the others, and you can pin or exclude providers with provider routing.

When was GPT-5.6 Sol released?

GPT-5.6 Sol was released on July 9, 2026. Its knowledge cutoff is February 16, 2026.

The Daily Front Page 4 of 28
Tuesday, August 18, 2026 The Daily Front No. #260818 — Beyond the VRAM Wall
article

Linux 7.3 improves performance when running out of vRAM

by flaburgan·▲ 517 points·284 comments·pixelcluster.dev ↗
What if they do, in fact, use more VRAM than you actually have?

Earlier this year, I blogged about work I did to improve VRAM management for games. Now, after many months of floating around in mailing lists, the kernel patches are finally merged upstream and queued for Linux 7.3! Hooray!

To celebrate, let’s look a bit deeper at one sentence I wrote in my previous post:

[Games] should perform much more stable - as long as the game itself doesn’t use more VRAM than you actually have.

So, one may ask: What if they do, in fact, use more VRAM than you actually have?

Typical expectations for this seem to be that once this happens you’re pretty much screwed. Games will start crashing left and right, performance plummets to unplayable levels, a good gaming experience becomes impossible.

But is that really just an unavoidable fact of life? What really makes running out of VRAM suck so hard? And, most importantly: How can we make it suck as little as possible?

Setting expectations

In theory, running out of VRAM should exclusively be a performance issue, not a stability one. Support for overcommitting VRAM has existed for as long as GPU drivers have: If the driver overcommits VRAM, you are generally allowed to request as much VRAM as you’d like, and you’ll get as much as the kernel driver decides it can fit into the physical memory that exists on GPU.

On the performance side, the big-picture reason for bad performance when you run out of VRAM is fairly simple. As soon as the game requests more VRAM than is physically present, some of the game’s memory will have to be moved/evicted to CPU RAM instead. For the GPU, accessing CPU RAM is much slower than VRAM: Not only is CPU RAM slower than a dedicated GPU’s VRAM in general, all memory accesses also have to go over the PCI bus. The PCI bus adds latency and is typically also the limiting factor in bandwidth when fetching from CPU memory.

Due to PCI speed limitations, there are some truly unavoidable performance constraints when overcommitting VRAM. Assuming the GPU is hooked up via a PCIe 4.0x16 connection, you get a little less than 32GiB/s of bandwidth. Each millisecond, that PCIe bus can transfer ~32.2MiB of data. For a minimum framerate of 30 frames per second (33.3ms per frame), the absolute maximum amount of data the GPU is able to access is ~1,075.5MiB, a tiny bit over 1GiB of data. In other words, if so much memory gets evicted that the GPU needs to fetch more than 1GiB from evicted memory in one single frame, it is simply impossible to still hit 30 FPS.

Not all memory is equal

At the same time, just reading a little bit of CPU memory on the GPU is not immediately a death sentence for performance. In fact, GPU drivers sometimes decide to let things like command buffer data and related allocations live in CPU RAM even when there’s plenty of VRAM available! Whenever the GPU executes these commands, it has to access CPU memory, and yet in these cases everything runs completely fine. So what makes these accesses different - why are they fine and yet running out of VRAM seems catastrophic?1

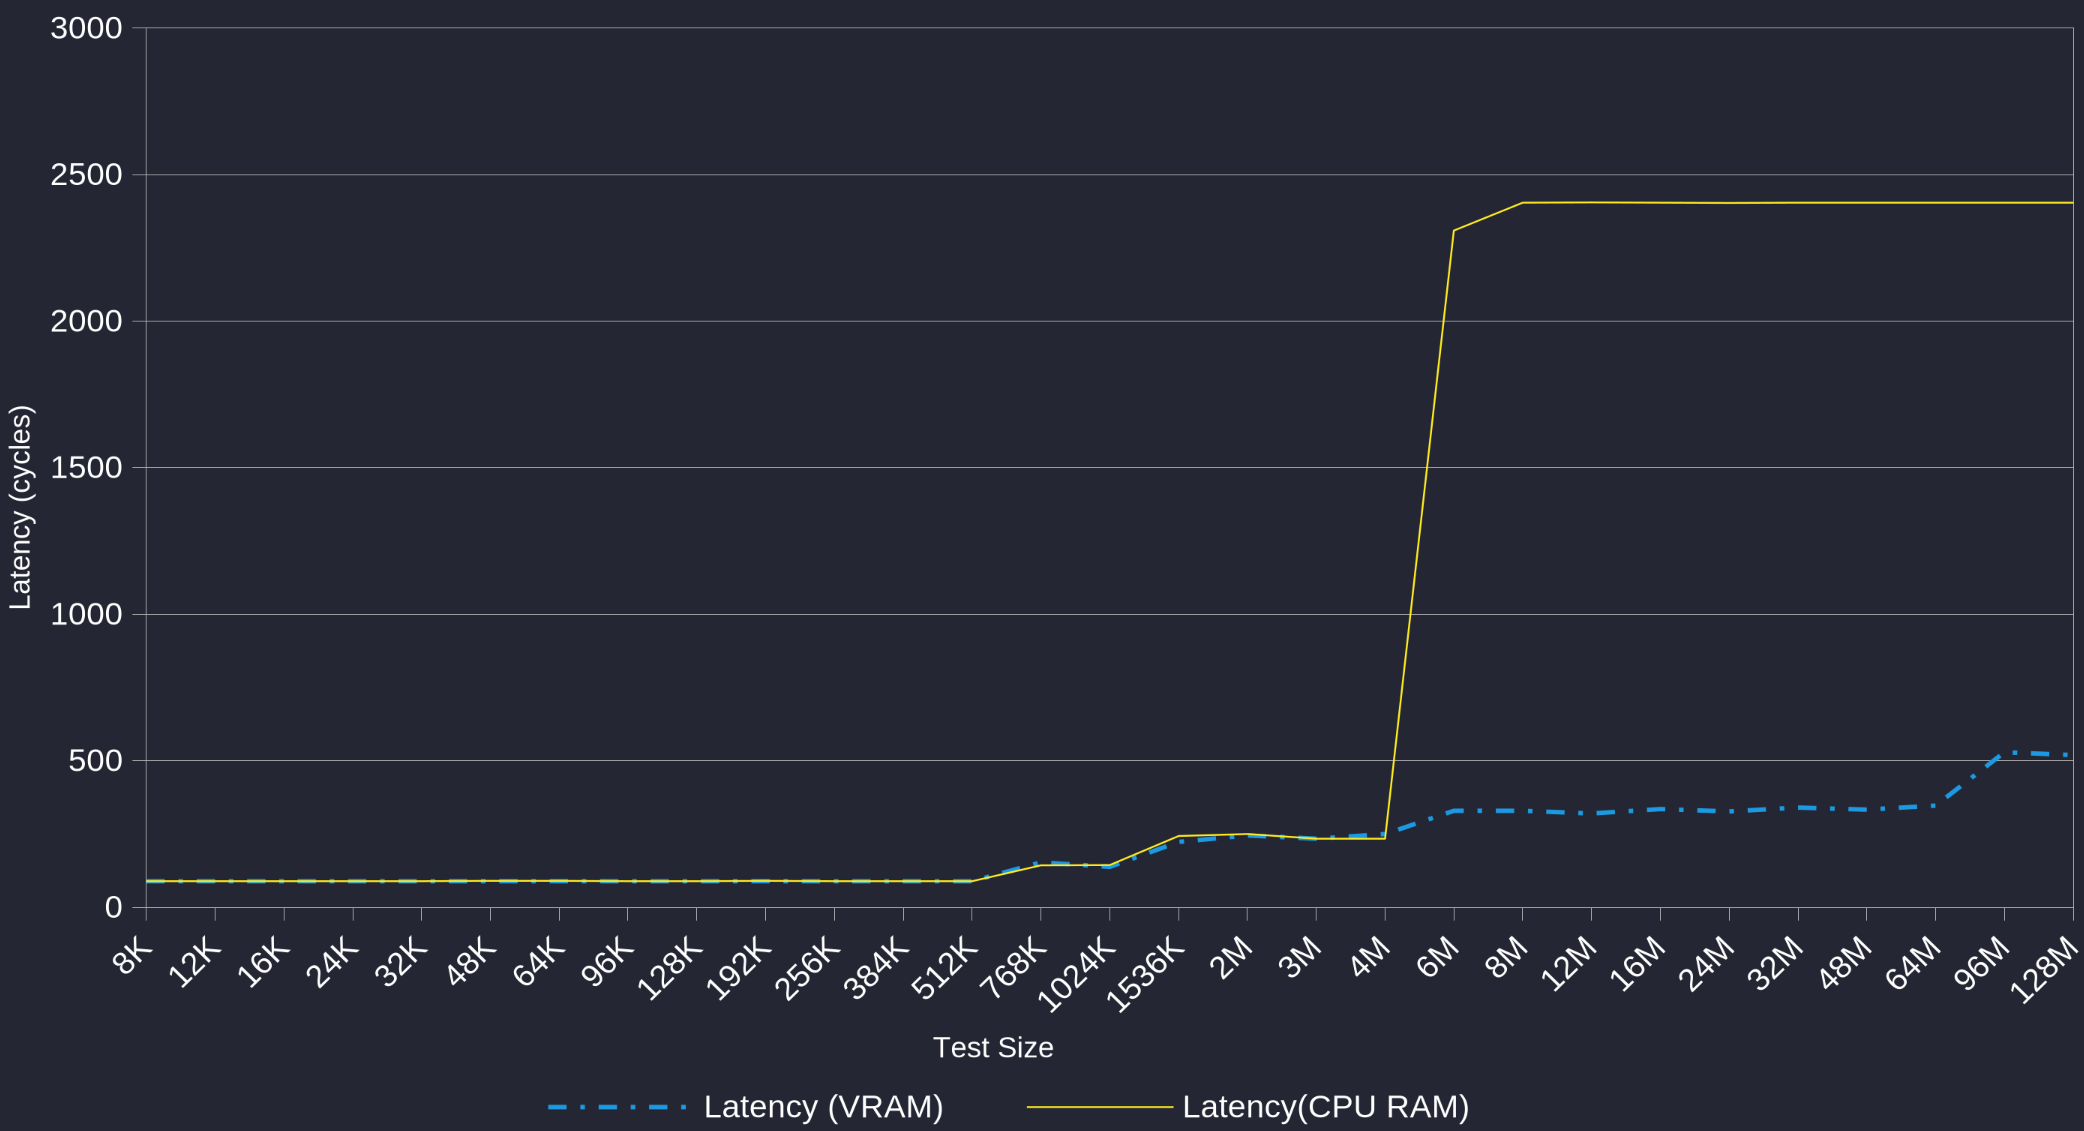
One thing that influences the calculus significantly is caching. Since the access latency in case of a cache hit is the same regardless of whether the cached memory lives on CPU or GPU, the high initial cost of fetching over the PCI bus can be amortized by cache hits (to some extent). We can estimate latency differences between fetching CPU RAM and VRAM by writing microbenchmarks that measure access latency for different buffer sizes (using an adversarial access pattern to minimize cache hitrates as far as possible). The result you get may look something like this (captured on RDNA3):

Cache microbenchmark for an RDNA3 GPU.

As expected, if the buffer fits into L2 (or any higher-level cache), access latencies are exactly the same for memory backed by CPU RAM and memory backed by VRAM, because the data gets fetched directly from cache in either case. At a size of 6MB (the L2 cache size on RDNA3), CPU memory latencies go up to about 2400 cycles per access, while device memory latencies stay within the same rough ballpark. Note that VRAM accesses also go through the Infinity Cache, but CPU memory accesses do not (they hit PCIe directly on an L2 miss). I suspect this is because the Infinity Cache sits directly on top of VRAM, so any access that doesn’t hit VRAM also doesn’t reach the Infinity Cache.

Obviously, memory doesn’t start off with being cached anywhere, so the first access will still have considerably higher latency. Also, losing the Infinity Cache definitely hurts as well: PCIe fetches seem to have somewhere around 7.3x as much latency than an Infinity Cache hit, and around 4.6x as much latency as a fetch from VRAM. This increased latency needs really high cache hitrates to fully amortize the cost of going over PCIe. That means there is only a small set of use cases where using CPU memory has such minuscule slowdowns that you’d actively decide to use it in favor of VRAM when you have the choice. When you’re evicting memory from VRAM, there will almost unavoidably be at least some degree of slower performance.

Still, even though slowdown is unavoidable, there is going to be memory where eviction matters more and memory where eviction has a lesser effect on overall perf. Memory that is accessed in very cache-friendly ways is not affected by the slowdown of CPU RAM as much. If the access patterns aren’t cache-friendly but the memory isn’t accessed very often, things may also still be fine since the GPU only rarely needs to actually fetch data from CPU RAM. There might be many memory allocations where the GPU will only access a small part of the total allocation size, and never even read the rest. If these allocations were to be evicted, you might evict multiple GiBs of data, but still remain well below the 1GiB hard limit of data that is actually accessed per frame.

All of these variables make it surprisingly hard to predict how performance actually pans out in practice when memory is being evicted. But in short: Depending on how much the evicted memory gets accessed and how well these accesses cache, you might just be able to run out of VRAM without (completely) ruining performance!

Confronting reality

We’ve theorycrafted ourselves all the way towards having performant VRAM overcommitment now. Great! Let’s just boot up SteamOS, start some game and crank up the setti-
radv/amdgpu: Not enough memory for command submission.

oh.

As it turns out, running out of VRAM in practice does carry plenty of stability issues with it.

This error isn’t quite like a regular “couldn’t allocate, out of memory” error, though. Note that the message specifically complains about command submission: RADV prints this message when the kernel returns -ENOMEM when trying to submit commands2, but merely submitting commands does not allocate any new resources! All the command buffers were allocated in advance, and clearly their allocation succeeded. Even though all memory was successfully allocated, using it in a GPU submission suddenly results in “out of memory” errors being thrown.

It’s time for another kernel adventure! Surely getting the kernel to accept the submission can’t be that hard - after all, the kernel already accepted all the allocations3!

The horrors of kernel locking

One thing the amdgpu driver has to do on every submission, before it can direct the GPU to start executing commands, is to make sure that all memory that may potentially be referenced by the GPU commands is accessible. With more modern bindless graphics APIs, you have to assume all allocated memory may at some point get referenced. Therefore, amdgpu will try to make sure all allocated memory is also accessible.

Each memory allocation carries information about which type of memory (for our purposes here, system RAM or GPU VRAM) it can be properly accessed from. Most allocations can be accessed from either CPU RAM or VRAM, and amdgpu will be happy with the memory allocation being in either of these memory types. Some allocations, however, have to be placed in VRAM and VRAM only. If these memory allocations have been evicted to system RAM because some other application allocated VRAM in the meantime, amdgpu will have to move them back into VRAM. Because there is no free VRAM available at all, moving the allocation back requires evicting something else. For some reason, that failed and the kernel reported an out-of-memory condition.

In order to explain why evicting something randomly fails, we’ll have to take a small detour to look at how the kernel handles (CPU-side) locking for GPU allocations. In order to evict a memory allocation, you have to acquire a lock associated with that allocation. However, during a submission, you also have to lock every allocation that’s referenced in a submission, to prevent some other application from moving the allocation somewhere else while you’re busy preparing GPU work. But if another GPU submission is doing the same thing concurrently, you can end up in a situation like this:

Deadlock condition when concurrent submits evict

If one submit wants to evict an allocation that another submit has already locked, but that other submit also needs to lock an allocation from the first one to make progress, we have a textbook ABBA deadlock condition.

But fear not, the kernel knows how to detect and resolve deadlocks! The details about how deadlock detection works are explained in this kernel documentation page, but in very broad strokes, the kernel associates locking operations with a “transaction” (which basically just keeps track of which locks were acquired). If two transactions would deadlock, one of the transactions is marked as “wounded”, and the next time it tries to acquire a lock, the -EDEADLCK error is returned. This error requests the transaction to be aborted: All locks acquired during the transaction should be released, and the transaction is restarted from scratch. In the context of command submission, this just means the driver will restart the process of going over all memory allocations and making sure they’re accessible.

So where’s the catch? There isn’t one. This approach is rock solid and works really well.

At least as long as it’s actually implemented everywhere.

In the graphics subsystem, the gritty internals of the wound-abort-retry loop are abstracted using a small helper library called drm_exec. Instead of having to manually track which allocations are locked, and release the locks once you run into -EDEADLCK, you simply use the drm_exec_lock_obj helper. If you study the locking code in TTM, the shared Linux GPU memory management layer, you will notice a profound lack of usage of drm_exec.

Instead, there even is a comment noting that -EDEADLCK will cause eviction to fail. There we go, we found our issue! As soon as this deadlock condition is encountered because of intense memory pressure during command submission, the kernel bails out and rejects the submission instead of retrying.

There already are some patchsets to hook up the drm_exec helper in TTM, sent all the way back in 2024, but those never made it in for a few reasons, among which were some remaining bugs that hadn’t been figured out. My work had been cut out for me here: Rebase the patchset on top of my kernel version and figure out what those remaining bugs are.

Rebasing the patchset wasn’t too much of a hassle, and figuring out the bugs only took one single week of intense suffering with games randomly hanging 3 minutes into heavy VRAM contention. Not the worst!

I tried resending the patchset with fixes for all bugs I found in the hopes it would get in this time, but there’s going to be more work needing to be done with it before it can be merged.

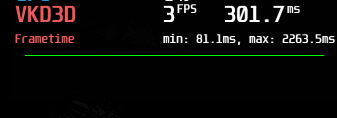
Now that running out of VRAM at least won’t crash your apps at random, we can at least properly crank up the settings and look at perf. The initial result gave me an absolutely glorious performance graph like this:

Horrible perf graph

Hold On Where Did All The Perf Go

Figuring out why performance is so garbage requires figuring out what the system is actually doing that’s this slow. For broad “what’s the kernel driver doing??” questions like that, I like using gpuvis. gpuvis uses kernel tracepoints to build a timeline of things that happened (including “GPU work submission started/stopped”, from which the time taken for each submission can be inferred).

Booting up gpuvis with a trace taken while the system is running out of VRAM, the timeline shows a situation like this:

Horrible perf with SDMA being busy most of the time

Turns out, most of that time isn’t actually spent on handling the submission (that’s the gfx_0.0.0 activity), but instead moving around memory in preparation for that submission (sdma0 activity)!

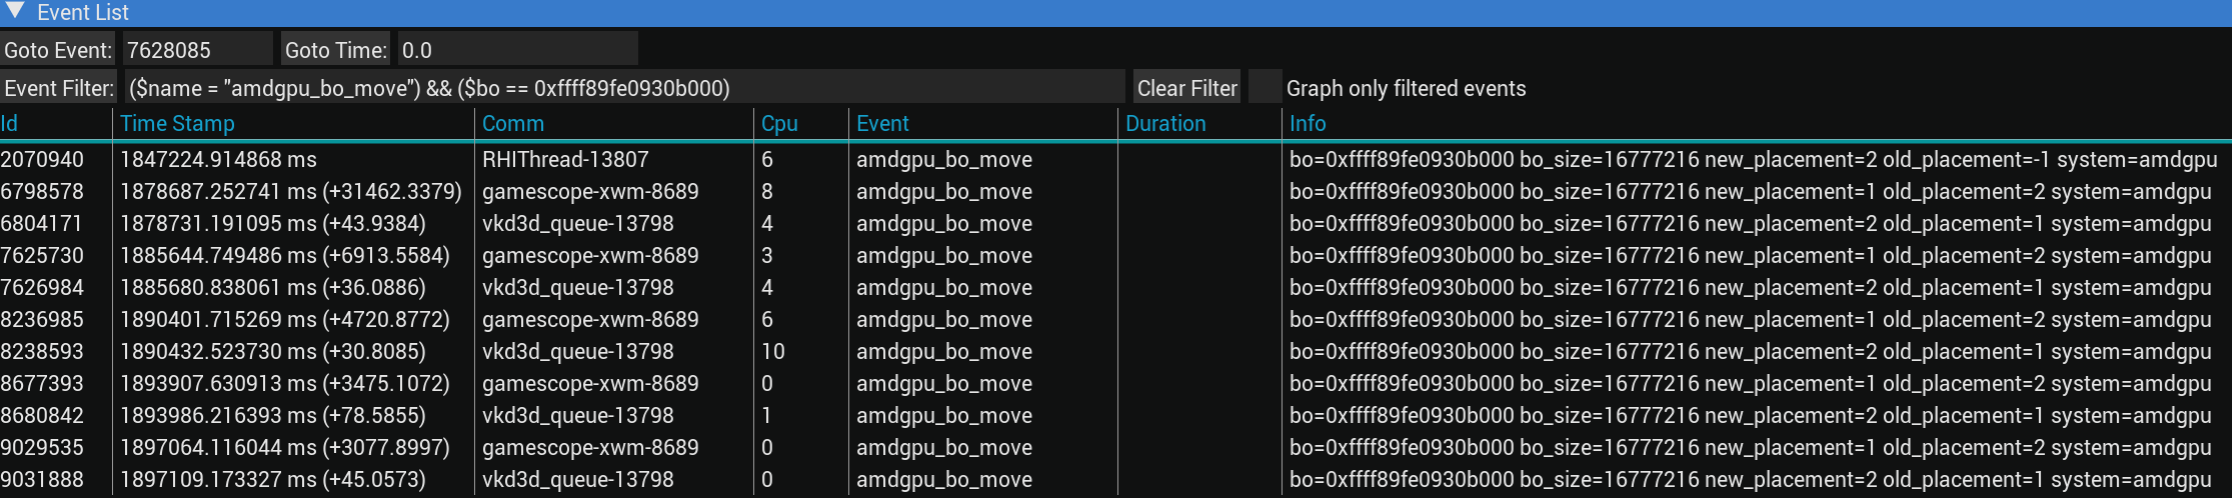
The reason why there are so many buffer moves all the time becomes more obvious if you use gpuvis’s event list, together with a filter to show only captured move events for a particular buffer object (I chose one at random here, most buffer objects have a similar pattern):

gpuvis event filter showing buffer go ping pong ping pong ping pong

The list shows quite clearly that contending processes (in this case, gamescope and the game itself) will constantly take turns evicting and moving back the same piece of memory, over and over. That’s really bad! And it’s very reminiscent of something I wrote in my first blogpost:

Generally, two competing applications can be expected to roughly take turns executing GPU work - first one application submits work, then the other, then the first again, and so on. With that approach, memory would keep being moved back and forth after every single submission. One application gets kicked out and immediately moved back in, kicking the other out (which moves memory back in the next step). All this moving ended up with worse performance than if the memory had never been moved in the first place.

This described an old issue where overly aggressive VRAM allocation would lead to ping-pong-like moves happening constantly. But that issue had since been fixed by simply not trying to claim VRAM when there isn’t any free VRAM left, and the kernel only started being somewhat aggressive when I implemented VRAM protection with dmem cgroups. Obviously, this must have reintroduced the ping-ponging somehow.

Conceptually, the design of the dmem cgroup VRAM protection should never result in ping-pong moves, because the kernel is only supposed to evict memory that does not have any cgroup VRAM protection associated with it. Without any VRAM protection, you should typically not be allowed to evict protected VRAM.

The single exception to this rule is memory that absolutely has to live in VRAM for things to work properly. These kinds of memory allocations are always allowed to be moved to VRAM to ensure system stability. Typically, almost nothing coming from an application is really required to live in VRAM for correct operation, but there is one buffer object coming from an application that does: The buffer containing image data to be scanned out to the display4.

Display hardware is funky

Not only does the display hardware like scanned-out images to be in VRAM, it also completely skips past the GPU’s virtual memory architecture and works with physical addresses exclusively. In consequence, scanned-out images also have to be contiguous in physical memory.

With virtual memory and the power of page tables, typical application buffers are only contiguous in virtual memory, and may be scattered around all over physical memory5. The first page of a buffer at virtual address 0x5000 may be mapped in the page tables to point to physical address 0x1234000, but the second page at virtual address 0x6000 might point to physical address 0x4321000, somewhere completely different!

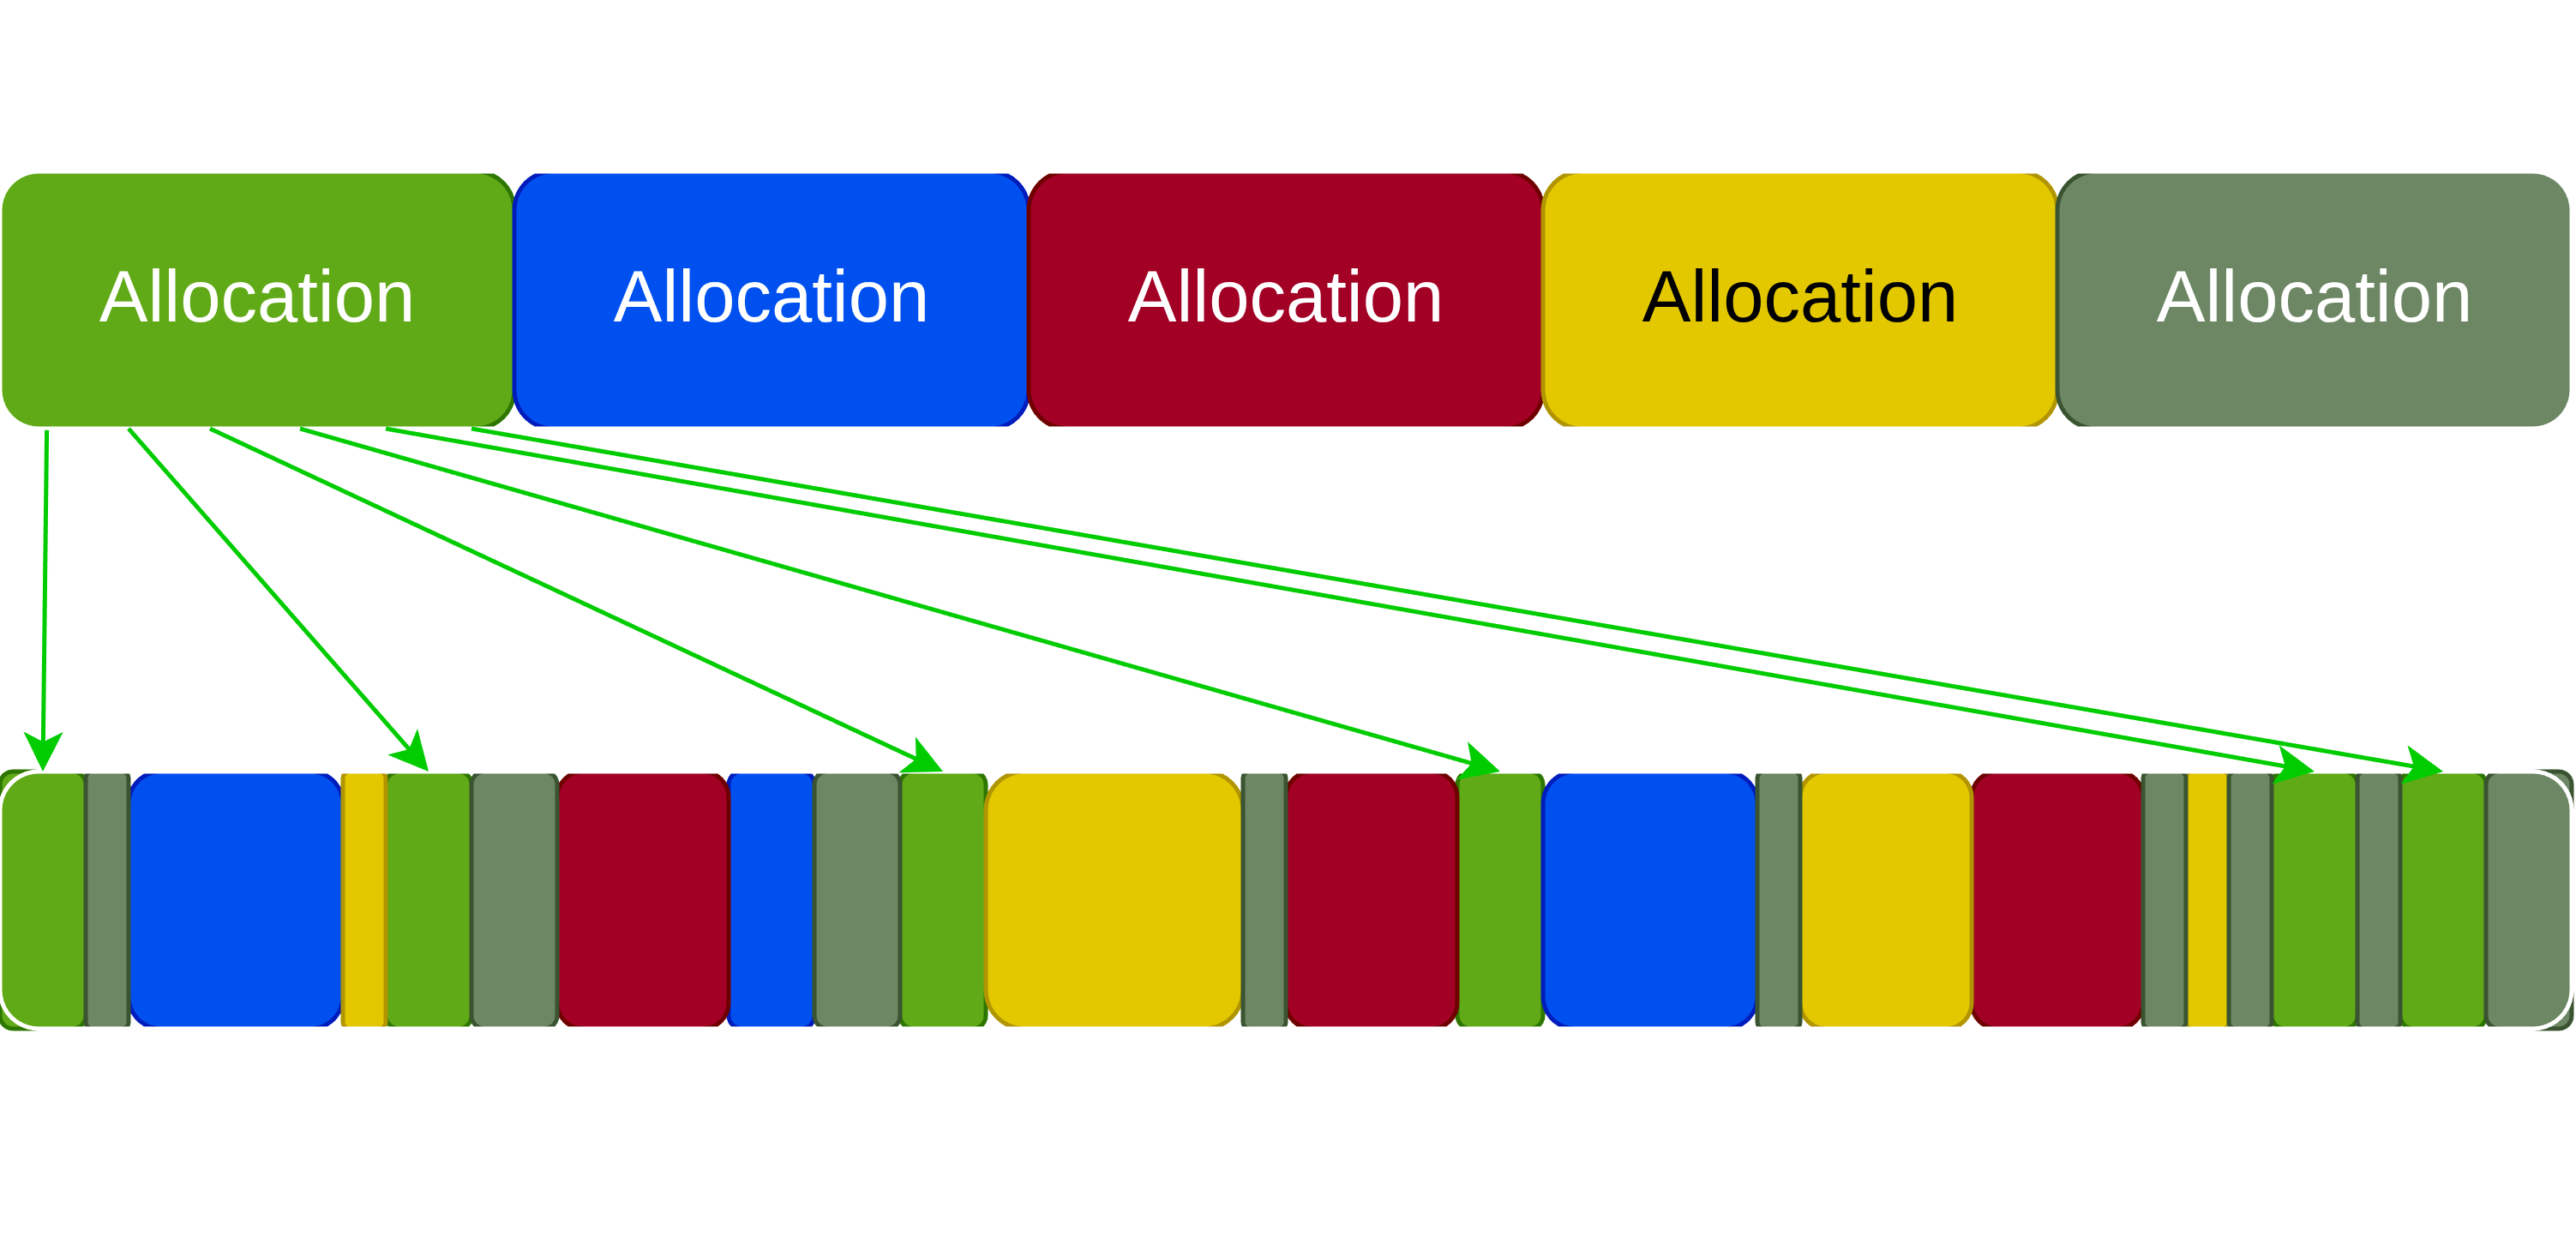
Here is a diagram visualizing the mapping of virtual allocations to physical ones in case where there is a lot of fragmentation (which typically is the case when you’re very low on VRAM):

Contiguous virtual memory mapping to fragmented physical memory.

The arrows show page table mappings to physical memory segments for the different segments of the first allocation. They’re left out for all other allocations for readability.

If you’re allocating display scanout data, this fragmentation is not an option as the physical memory has to be contiguous. This has very, very unfortunate interactions with eviction of other data specifically. Let’s assume the scanout data has already been evicted, but now it’s time for that data to be scanned out, so it has to be moved back into VRAM.

Simply evicting one buffer won’t be sufficient, even if that buffer is the same size as the display scanout data, because evicting it does not result in enough contiguous physical space to place the scanout data in! To make matters worse, the eviction algorithm does not take into account physical memory constraints at all. It is a very simplistic loop along the lines of

while (true) {
   evict(getLeastRecentlyUsedBuffer())
   if (tryAllocate(newBuffer) == SUCCESS)
      break;
}

Using this algorithm (assuming the allocations are arranged in LRU order), even if you evict the first 3 allocations (green, blue, and red), there won’t be a large enough space to hold the scanout buffer! Even the largest possible free space is ever so slightly too small, as is visible in this updated diagram:

Still no space for the scanout buffer.

To find a large enough physically contiguous memory region in our example, every single allocation in VRAM would end up being evicted! In real-world scenarios, I observed up to 4GiB of VRAM being nuked just to make space for scanout images (which are ~32MiB of pixel data per image for a R11G11B10 pixel format). That’s going to hurt real hard! Simply the act of moving all that data out from VRAM would already cost at least ~130ms, according to the PCIe transfer rate estimated earlier.

welp.

Throwing heuristics at the problem

While scanout is definitely the most egregious failure case here, this issue is more general: There are always going to be certain memory allocations that will be moved to VRAM over and over, potentially kicking out some memory that an application might prefer to stay in VRAM. Resisting this and trying to move the evicted memory back in will most likely backfire.

Even though dmem cgroup protection is not a complete solution to this problem, it does reduce the problem scope by a lot. With cgroup protection, you can be sure that any random app won’t try to kick out important game resources willy-nilly. Any memory that does get moved back into VRAM by force probably has a good reason to be in VRAM. Therefore, even with dmem cgroup protection, we should be careful and not try to reclaim evicted memory back by force.

With some iterative testing, I think I’ve arrived at a set of heuristics that work reasonably well for most cases a game would encounter in the wild (not being too aggressive when stuff gets evicted by important system allocations is one thing, but it also needs to be reasonably quick at reclaiming evicted memory if e.g. the game is paused and the Steam menu runs instead, evicting lots of game memory, and then the game is resumed).

The heuristics work something like this:

  1. When the kernel detects an application’s memory is being evicted, it enters a “hard throttle” phase for a few milliseconds. During this phase, it does not try moving any memory for that app back into VRAM whatsoever (as long as all memory can be properly accessed, of course).
  2. After this period, it switches a “soft throttle” phase, during which it may reclaim free space by moving things back into VRAM, but does not try evicting any memory that other apps have allocated. This period may last up to a few seconds, to make extra sure everything reached a stable state.
  3. If the “soft throttle” phase has completed without any further memory being evicted again, the system is assumed to have reached a fairly stable state and restrictions on evicting other applications’ memory are removed.

IME, this achieves an acceptable balance between not shooting oneself in the foot with overaggressive eviction of other apps, while still recovering reasonably fast when lots of your memory was suddenly evicted, for example because the game was paused and the user browsed around on Steam instead of playing.

Getting somewhere

With those heuristics in place, let’s finally try cranking up the settings for real this time.

I ended up going with Indiana Jones: The Great Circle, since it conveniently exposes a setting for streaming pool sizes that you can mess with to modify VRAM consumption pretty much directly.

Lo and behold, even if the settings are turned up to a somewhat ridiculous point, where the game requests 9GiB of 8GiB VRAM (aka. a whole 1GiB of overcommitted game resources living in CPU memory), performance isn’t cratering into oblivion anymore! A 19.6ms per frame average is what I’d still call perfectly playable.

Indiana Jones: TGC overcommit to 9GiB/8GiB

I can also bump the settings to even more ridiculous levels and double the amount of overcommitted memory, with the game requesting 10GiB of VRAM on this 8GiB system (and thus 2GiB of resources being overcommitted). Frametime variance goes up quite a lot at this point, with spikes reaching above 33.3ms happening frequently. The overall average is around 29.8ms which isn’t the worst, but especially paired with the variance, this would start being noticeable in gameplay.

While this is already a huge step forward, we aren’t quite there yet. The experience under VRAM overcommit can sometimes still be a bit hit-or-miss, and frametimes may noticeably vary depending on which objects in the game you’re looking at.

Remember that for actually good eviction performance, it matters a lot how the evicted memory is used by the GPU. Right now, this isn’t taken into account at all! If we were able to base our eviction decisions more on how well the application’s accesses work with CPU memory, a lot of this variance might simply disappear.

Handing over the controls

The complicated thing about the application’s memory access patterns is that they are only really known to the application. Therefore, the driver isn’t really able to take them into account as-is. Ideally there would be some API where the application can supply hints to the driver about how well a particular memory allocation is suited to being evicted.

Something exactly like vkSetDeviceMemoryPriorityEXT! The VK_EXT_pageable_device_local_memory extension provides precisely what we need here, by allowing applications to communicate any priority they want for any piece of device memory they want. As long as applications provide reasonable hints through this extension, implementing prioritization in the kernel and then utilizing app-provided priorities has the potential to stabilize things by a lot!

Hooking up priorities in the kernel turns out to be a lot less of an issue than you might expect. The kernel already maintains a Least-Recently-Used list of memory allocations that, on eviction, are traversed in order. For each entry on that LRU list, eviction is attempted until there is enough free space for whatever the eviction was for.

This LRU list provides a good heuristic for which application’s memory should be evicted first. Applications that haven’t submitted anything in a long while are unlikely to need the memory soon, and since their memory is Not Recently Used, it will appear early in the LRU list and be evicted first.

When an application uses a set of buffers, that set of buffers is moved to the very end of the LRU list in one bulk. However, the order of allocations within that bulk is not explicitly controlled at all. That means once the kernel closes in on some application to evict its memory, which specific pieces of memory get evicted is more or less undefined6. A simplified visualization could look something like this:

Unsorted LRU list visualization

If the kernel walks the LRU list like this, it would evict the buffer with a priority value of 2 first, even though there are much lower-priority buffers elsewhere in the LRU list. If only the first buffer of priority 2 gets evicted, things might be okay, but if the highly important buffer with priority 4 ends up evicted as well, there are likely going to be problems.

Given that we already know specific priorities for the individual allocations, this LRU list is a very simple place to integrate them. It’s as simple as ordering the list entries within a single application by their priority7:

Sorted LRU list visualization

Now, when the kernel goes over the LRU list to find something to evict, the very first thing it will find and try to evict are the lowest-priority buffers. The highest-priority buffers are last in the list, and thus only get evicted when evicting all the lower-priority buffers was not enough.

Memory priority adoption in apps

Unfortunately, not all applications actually set priorities via VK_EXT_pageable_device_local_memory. As for native Vulkan applications, I haven’t observed any idTech game using the extension directly, at least :/

The D3D side looks a lot better, because vkd3d-proton already uses VK_EXT_pageable_device_local_memory when available, and translates both the ID3D12Device::MakeResident/ID3D12Device::Evict API calls as well as priorities set via ID3D12Device1::SetResidencyPriority to priority values set using the Vulkan vkSetDeviceMemoryPriority command. Lots of D3D12 games utilize at least one of these APIs, so the hints these games provide will now be utilized.

I don’t have super solid numbers for how much memory exactly is overcommitted by most D3D12 apps, as they don’t typically expose the total amount of VRAM they request in an easy-to-access way like idTech’s performance overlay does. However, properly honoring memory priorities generally seems to have a good chance to improve the experience. Performance generally appears more stable over time (because you’re not relying on luck with which buffers the kernel evicts as much). In some spots I had a good comparison point at, I suspect it increased performance compared to the kernel evicting random things by up to 30% in the very best case - but again, take this number with a mountain of salt as it depends almost entirely on luck with regards to eviction.

Conclusion

When all is said and done, how well does running out of VRAM hold up?

I’d say it’s quite alright! In many cases, you may be surprised how much performance you can retain even when evicting a gigabyte or more of memory! Then again, that’s of course a rather optimistic case, and the wrong thing ending up in CPU RAM can very quickly cause very significant slowdowns. Eviction is tricky to get just right, and to an extent, performance will always be dragged down. If a game is struggling to hit 30fps even with everything in VRAM, needing to evict something on top of all that could sometimes just unavoidably result in that 30fps target being missed.

Regardless, what I hope this blogpost can demonstrate is that even if you end up with some memory evicted to system RAM, the slowdown can be manageable. There’s measures that drivers (particularly, the kernel driver) can take to make overcommit work as fast as possible, and even applications can do their part in coordinating with the driver stack to mitigate the effects of their memory being evicted. With everything in place, VRAM overcommit isn’t really as big of a deal as one may think it is at first sight.

All the work I described here has already been released in SteamOS for some time now (it’s both in Stable and Preview. As long as your system is up-to-date, it’s good to go!).

A note on upstreaming

Of course, I’m already working on upstreaming all this work so it’s available to everyone! However, there’s a lot of moving parts and a lot of deep refactors of some pretty core concepts at play here, so it will likely need time to cook before everything is merged upstream.

At the same time, I don’t want to put up a blogpost talking about lots of cool code just to finish it with “actually you can’t see for yourself, go wait until it’s all upstream lol”, either.

As a middle ground, I have rebased the kernel work onto a recent upstream version of the kernel and published a git branch here. While it should theoretically yield similar effects, it did not go through as rigorous testing the SteamOS kernel did. There will likely be bugs and instabilities that weren’t there in the SteamOS version. Use at your own risk, basically. I don’t expect to be maintaining this branch in any significant capacity, as I’d rather focus on getting the patches into upstream properly.

In order to pass through application priority hints to the kernel, you will also need a custom Mesa branch I pushed here. Similar considerations as the kernel branch apply here, as well.

Questions of my own

While I would claim to have a fairly good overview of the driver side of memory management at this point, I am not very familiar with how applications decide on supplying memory management heuristics internally, at all. I would suspect optimizing cases where you’ve already run out of VRAM isn’t exactly the top item on developer TODOs (who knows, maybe the memory scarcity is changing that? :P), so maybe there’s some unexplored room for performance improvements there?

If you, dear reader, happen to know about VRAM management for larger games/engines (especially when running out), I’d love to chat! I have a hunch that there’s still perf to be gained by making apps and drivers coordinate better, but I’m also plainly interested in how things look from an application developer’s point of view.

Footnotes

  1. One reason is simply that command buffers specifically are very small, which is not a consideration for evicted VRAM (you don’t have a choice on how much to evict). That’s not the only reason though: Caching/access pattern considerations apply to command buffers and evicted VRAM alike. 
  2. See the RADV source here
  3. It’s possible for all allocations to succeed even though it is impossible to actually use that memory in a submission, if you exhaust both CPU RAM and VRAM. This is normal, and would result in the same error being printed, but it’s not what happened here - in my case, there really was enough memory available. 
  4. Technically, the display hardware can handle scanning out from system RAM! But there are ugly tradeoffs associated with moving between VRAM and system RAM, so let’s ignore that for simplicity. 
  5. It’s better for performance if buffers are physically contiguous, but contiguity is not a strict requirement. 
  6. In practice, the buffers that were allocated first are probably among the first ones to be evicted, and the most recently allocated buffers are last. 
  7. Sorting is only really feasible with the priority values of one single application, because priorities are only really meaningful in relation to other priorities in the same context. Different applications most likely have different interpretations/scales of what exactly some specific absolute priority value means. 
The Daily Front Page 5 of 28
Tuesday, August 18, 2026 The Daily Front No. #260818 — The Moving Panorama
article

Using the railway network as a flatbed scanner

by otherayden·▲ 421 points·69 comments·philo.gay ↗
Using an industrial linear scanning camera to take very wide photos out of trains and ferries.

Over the past few months, I've been working on using an industrial linear scanning camera to take very wide photos out of trains and ferries. Getting it working has been quite the challenge, but I think the results speak for themselves.

taken on the San Francisco to Oakland ferry in February 2026 (56,894x2,048 pixel grayscale image); scroll to zoom in and click and drag to move

More pictures are on display in the gallery.

I presented a talk on this project at EMFcamp 2026, which you can watch below or read on for the same story in more detail:


What am I even looking at?


The process of capturing an image like the one of the container port above.

The camera is pointed out of a moving vehicle and is constantly capturing a single vertical line kinda like these grayscale ones in the diagram, but a lot thinner. As the camera moves, what exactly it sees is changing. If I capture the lines from the camera quickly enough and stitch them together, I can produce a complete-looking image. It's a bit more complicated than that and getting the results looking good was rather tricky, but that's the main idea behind it.

Background and Prior Art

Back in the 1990s, digital camera sensor technology hadn't caught up to the size and effective resolution of medium and large format film, so digital scanning backs were developed. They capture a high-resolution image without needing a giant grid of pixels by moving a single line of pixels (or three lines for color) across the frame. In the intervening years, image sensors have gotten pretty big (there's even one that covers 4x5" large format nowadays), but this approach is still cheaper to build for large formats than a giant sensor.

I'd been thinking about building my own digital scanning back for my large format camera for a while, but I've never quite gotten around to it because building something to mount properly on my camera seemed too daunting. (Buying one could have been an option, but ones from the 1990s still go for thousands of dollars on ebay and require reconstructing a computing environment of a similar vintage to use.) Late last year, I was watching a video on Gigawipf's medium format scanning camera build and suddenly thought: "what if the entire camera moved and the subject didn't?" and decided to give it a shot.


Loading film into my large format camera on top of a mountain in Vermont because I'm allergic to doing photography in a normal way. (The resulting pictures from that trip are here.)

I found some previous photos in the same vein (the Scannoramic project, John Hikerbiker's experiment, Daniel Lawrence Lu's reversal of his stationary camera, and Martin Liebscher's very interesting film shots), but the results seemed like they could be improved upon. Surely taking the speed of motion into account and getting cleaner results wouldn't be too hard, right?

Slit Scanning My Sofa

On the night I thought up this "big scanner" concept, I had to give it a shot. It was a bit late to go out and catch a train, so I scanned my sofa instead.

I set my phone on my office chair and slowly pushed it along as it captured a video. I then wrote some really slapdash code (which I am choosing not to share here to protect my readers) to grab the leftmost column (a "slit") of each frame and combine them into an image.

My comments included lyrics from "Future Me Hates Me" by The Beths, which became something of a self-fulfilling prophecy when I started writing a postprocessor for the next version of the camera loosely based on that code and cursed my decisions.


It looks vaguely like my sofa, but it's rather squished and the art on the wall is unintelligible. Surely I can do better.


I messed around with the postprocessing and doubled every column, which makes it look less squished, but it's still a mess because I wasn't pushing the chair at a particularly consistent speed.

I knew from the start that I'd need to measure the speed somehow, but I was naïvely hoping that I wouldn't need to measure it that well and could simply fudge it. This image, however, shows that even small variations of speed matter. This was my first glimpse into how much of a pain dealing with speed would turn out to be.

For my next trick, I took a ride on the MBTA orange line. I taped my old phone to the seat to use its accelerometer and held my current phone to the window, making sure to turn the frame rate up all the way to 60 fps.

The accelerometer data wasn't very useful and was even less so when I took an integral to get velocity.
If I remember correctly, y was the axis of the train's movement, but the data is so noisy that the train was apparently moving backwards at the end.

The result looks interesting, though, but I definitely need more lines if I want a properly intelligible image.

While I was getting ready for EMFcamp, I noticed another talk on the schedule by Tim Jacobs (better known online as mitxela) that was also about slit scan cameras and started to worry we'd both done the same thing. (He ran up to me after my talk to tell me he'd also worried this.) His talk started in the same way, with taking a slit from a video, but he ended up making really cool and trippy animations by going through every possible slit position for a given video.

Industrial Linear Camera

My source for more lines per second ended up being the Basler ruL2048-19gm, designed to be pointed at fast-moving conveyor belts. The oddly-capitalized name comes from its ability to read out its 1x2048 pixel image sensor just shy of 19,000 times per second.

These capabilities come at a price, however; brand new, the manufacturer's lowest-spec current models go for around US$700. Thankfully for my wallet, I found mine on ebay for a tenth of that.

The price is also measured in light. since it's capturing so quickly (the slowest exposure time is 1/100s), it needs a lot of light. I can only shoot in the daytime, and all but the brightest stations and tunnels are off limits to me.

To my surprise, having dealt with vendorware before, Basler just let me download the SDK without a support contract or proof of purchase. The most recent version also still supports this camera from 2013, which is less surprising but is still convenient.

The camera communicates with the computer over a gigabit ethernet link and the software finds it automatically as long as the relevant interface is set up for APIPA addresses (169.254.0.0/16). I could set static addresses for both ends, but I'm only using one camera at a time, so I haven't been bothered to change it.

With surprisingly little swearing at the SDK, apart from some complaints about their use of shutter time rather than shutter speed and what a "frame" is on this camera, I put together a program that grabbed buffers of pixels and wrote them to disk.


This was my first image out of the camera using my own code, and I think it looks pretty good for just moving it freehand.

The setup and mechanical design

In order to take it on a train without needing to have three hands to hold it, I needed a way to mount it to a tripod. I ended up designing a rather utilitarian case with a heat-set insert in the bottom that my friend Brooke 3D-printed for me. Buying the parts for it gave me an excuse to finally make an order from McMaster-Carr and feel like a real engineer.

My first attempt didn't come out because it turns out there's these things called "manufacturing tolerances" that I completely forgot about.


Oops, that's a bit too small.


In retrospect, I probably should've stuck the sensors on with something other than blue painters' tape, but it's held on pretty well.
Going clockwise around it, the boards are:

The lens on the front is a Vivitar 28mm f/2.8 that I already had for a more normal camera, with an adapter from Pentax K to the C-mount screw on the camera. Since some of the things I'm trying to shoot with it are kinda tall, its field of view worked out pretty well.

The whole thing is powered off a USB-C battery bank and there's also ethernet and USB cables running to my laptop, so it's a bit of a cable spaghetti monster when in action.

With the sensors attached, I could finally give them a try.

Both of these images are the same capture of waving the camera back and forth out my window, but the top one is the raw image and the bottom one is taking accelerometer movement into account. As you can see, using the accelerometer makes everything look a lot closer to normal and less stretched. (I'll explain more of how this works in a bit in the Postprocessing Hell section.)

Boston Attempts

Once I had everything assembled, it was time to take it on a train.


I started off on the MBTA Orange Line, since it's the closest to me, but as you can see, the results weren't that good. Previewing what was coming out of the camera was a pain, so I kinda had to guess on the exposure, and I definitely guessed wrong. The postprocessing code I wrote didn't work very well and everything was stretched and compressed a bit weirdly.


I went out again on a day with nicer weather and had some better luck with the exposure, although I think I messed up the focus a bit. Unlike the attempt with my phone camera, the text on station signs is pretty legible, so I'm definitely getting enough lines.


I'm particularly happy with how this one of the Longfellow Bridge from Boston to Cambridge came out. This one is in the gallery if you'd like to take a closer look.

Capture (in far too much detail)


When I was taking these early pictures in Boston, I was using a tool from the camera vendor called Pylon to preview. The black horizontal section was all I could see of the image at any one time, and it's rotated 90° from how I'd like to see it. Dialing in the exposure in it, releasing its grip on the camera, and then starting my own code back up before the train started moving again was a right pain that I had to do something about.

My first attempt at a GUI of my own used OpenCV highgui, which didn't really work for this. It requires a 1 ms delay after each frame, which is fine for slower cameras, but would cause me to miss 4 entire lines (250 μs each at the shutter speeds I'm usually using) every display frame (256 lines).

I ended up using Dear ImGUI instead, which worked nicely with the frame acquisition loop I already had. Out of the approximately two dozen backends the library supports, I picked GLFW ("girl love for workgroups", to quote a message from a friend at the time) and OpenGL3, probably because of the "girl love" quip, although I'm not certain.


I wrote most of the GUI in a single sleepless night in Toronto where rotating the image felt like the single hardest problem in computer science. (There's definitely a few things I can do to improve the implementation I settled on, but it runs well enough for the time being.) Unfortunately, the pictures I took in Toronto didn't really come out, but at least they were exposed correctly.


I encountered some strange bugs while adding a histogram for the image.

Getting the accelerometer data proved to be something of a pain. my first version sent readings as text over serial, which turned out to be very computationally intensive on the microcontroller. (Converting floating point numbers to strings and then assembling strings is very expensive, even on a relatively powerful SAMD21 microcontroller that has thirty-two entire bits.) I decided to move the conversions over to my laptop, which has the processing power to handle them with ease, but this came with problems of its own.


A very frustrating debugging session.

The accelerometer measurements were sent as raw floating point numbers, but GPS data was still in NMEA sentences and switching between them required sending fixed byte sequences and hoping that nothing got misinterpreted as those sequences. (Nothing in a NMEA sentence should come across as 0x11 0x11 0x11 0x11, my accelerometer data start sequence, but it's not completely impossible for accelerometer data to contain 0x22 0x22 0x22 0x22, my NMEA string start sequence.)

I also ran into issues where not flushing the serial port at the right time ruined an entire day's shots. Thankfully, I was capturing on the Mattapan Line in Boston, and I can pretty easily go back and try again.
That "seam" in the image is where it lost all serial data for around half a second, which is an eternity in line camera time. The software kept waiting for another accelerometer sample that never came because the serial port buffer was full.

See It, Say It, Sorted

The fully assembled camera looks like a suspicious mess, and the witch using it doesn't look much less so.


The camera isn't usually held together with this much tape, but I'd forgotten to bring the tripod mount plate on that trip to Montréal.
Would you trust her to bring strange equipment onto your train?

Despite Boston's history of police overreaction to harmless electronics projects, I worry the least about being arrested on the MBTA. People here tend to mind their own business and have never called the cops on me. The police also don't ride the trains much, preferring to harass people in stations instead.

I'm less used to how things work in other cities, so I only take the camera out when riding with a friend to look out for trouble (and sometimes to listen to dispatch radio).


So far, I've only been seen, not said or sorted. I'm crossing my fingers that this doesn't change as I take the camera more places.

On my trip to Montréal, I was stopped by security in Gare Centrale and informed that tripods weren't allowed and asked, au franglais, whether I was recording or taking a picture. Rather than try to answer that philosophical question in a language I don't speak, I just said "désolé" a few times and put away the tripod, which seemed to be sufficient.

The pictures I took in Montréal are here in the gallery (images 2 and 3) if you'd like to see them.

Postprocessing Hell

Capturing image and accelerometer data turned out to be the easy part compared to postprocessing and making the images actually look good.

The camera captured somewhere around 4,000 lines per second, so I had more lines than I needed in every capture and had to pick which ones actually matter.


What happens if I take too few lines (Autoroute 10 in Brossard, Québec out of the window of the REM A)
Jumping between lines too quickly looks artificial and wrong, like is visible at the waterline in this album cover edit of an early version of the Oakland ferry photo.

To decide which lines to use, I ended up using the speed, as measured by an accelerometer, but this came with several problems.

Firstly, accelerometers don't actually measure speed. They measure acceleration, the rate of change of velocity. By taking an integral, I can get velocity, but that's relative to an initial value. I can usually assume that the starting speed is at a station and is thus zero, but I can't be certain of that. If it isn't zero, I have no good way of knowing the correct value and just have to guess until I find one that smells right.

Secondly, as shown in this diagram, the accelerometer I'm using is only measuring so quickly. The camera is grabbing lines maybe 4 times faster than it, so every few lines have to share a speed value. It also isn't very consistent because my microcontroller code isn't as fast as it could be, so this could cause irregularities in the final image. How many acceleration measurements there are or aren't also changes how accurate the integral is, which creates more problems.

You might remember that I mentioned putting a GPS receiver on the camera earlier, and while I did do that, it wasn't very useful. It didn't get a signal on most of the trains I tried it on, and when it did manage to get one, it only read 10 times a second, which covers 400 entire lines out of the camera. If it worked a bit more consistently, it could be useful for correcting for integration error using a Kálmán filter, but that’s a problem for when I have better GPS data.

Even if my speed measurement is perfect, I still have the problem of parallax, where things closer to the camera appear to move faster than things further away. This is independent of optical focus, which I usually set at infinity.

This problem can be dealt with by changing how much distance each pixel represents. Lower values emphasize things closer to the camera more, while higher ones make the background more visible. You can give this a try by moving the slider!

Each of these images is same size (10,000 pixels wide by 2048 tall, scaled to fit your browser) and each includes everything from the previous by virtue of covering more of the capture. The units are arbitrary and don't measure real distance (I could make it actual meters per pixel, but I don't see a point to that.)

The camera and software have no idea what I want to "focus" on, so I make the artistic decision and manually pick that for each segment of the image and stitch the segments together to get the pictures in the gallery. I tested different values for distance per pixel and starting velocity of each segment and then stuck them together in GNU IMP to produce the final images. The assembled images often became too big for the 65,535x65,535 maximum size of a JPEG file, so I used the good old TIFF format. (The PNG specification allows similarly large images in theory, but the software I had to hand seems to like big TIFFs better than big PNGs.)


Notes on distance per pixel (u) and starting velocity (v) values for each part of a few images

The program that takes the accelerometer data into account for every line of the image is called grindstone, since it grinds multi-gigabyte raw captures down into smaller usable images. My first version was loosely based on my very bad slit scan code from earlier and was extremely slow, taking hours to capture a minutes-long capture. It would often fail to save after running for hours because the resulting image was too big for the JPEG format, and debugging it was an absolute pain.

I ended up nerdsniping my friend Maddie into rewriting grindstone in idiomatic NumPy, to make the mathematical operations that were going on clearer (she insists that all the operations were already in the original, and her changes were along the lines of "transforming it into a magical girl"). Maddie would later split this version into a "perhaps slightly overengineered" pipeline of several different stages, making it easier to experiment, and swap in different operations, output strategies, and the like. Thanks to her help, I've been able to try different combinations of parameters much more easily, and get results I'm much happier with.

Color Hell

In April, my friend Ari and I went for a ride on the Mattapan Line as the leaves were coming in on the trees. The pictures I took didn't come out due to a capture software bug (see Capture) and I haven't gotten around to going back yet, but it left us with the thought that color line cam photos might look cool, especially in autumn.

While browsing ebay late one night, I found a very good deal on a color line camera of the same generation as the monochrome one I already had (the Basler ruL2098-10gc, 3x2098 pixels at around 10,000 lines per second). After a bit of disassembly (it came to me in the housing it was used in on some factory line) and swapping the lens mount over, the camera was ready mechanically.

](https://philo.gay/blogpics_full/color2.jpg)

I ended up putting red, green, and blue stripes on it so I could tell the cameras apart without taking the lens off or squinting at tiny text on the label.

The capture software side wasn't that much harder, although I did have to fix a bunch of assumptions about the size of each line and redo the rotation for the GUI

Progress of getting the color capture working

Thanks to the very modular way that Maddie rewrote grindstone, adding support for color images wasn't too difficult, although we did have to fix some strange-looking bugs.


The train was moving so slowly and inconsistently in this picture that integration error piled up and grindstone calculated that the camera was moving backwards and jumped to various previous points in the capture.

With capturing and processing images mostly working, more problems became apparent. The most visible one is that leaves are all far brighter than they should be.
This happens because the color camera is sensitive to infrared light on all three channels. (If it was only sensitive to it on the red channel, the leaves would look reddish, but the combination of all three channels' IR with the strong visible green leads to the greenish white in this picture.) The monochrome camera is sensitive to IR too, but it doesn't matter because it's just one channel and visible light completely drowns it out.

(Diagram taken from the camera's manual)

I will admit the effect does look pretty good in the right light. This picture taken in Manchester-by-the-Sea, north of Boston, is both grayscale and colorful at once. (Read on to learn what the color fringes in the background are.)


I solved this with an UV and IR cut filter that only passes light between 400 and 700 nm, which is close enough to the human visible spectrum that everything looks right. This is the first big capture I took with it, and I only needed to adjust the colors minimally in post.


I also tried a filter that only passes light longer than 720 nm (I've had quite interesting results with it and IR-sensitive film), and I'm definitely going to try taking more pictures with it in the future.

The next problem is that some things end up with weird red, green, and blue fringes, especially subjects that are further from the camera or moving faster.
They turn out to be inherent to how this camera sensor works. Red, green, and blue are each separate vertical lines (instead of a Bayer filter), and thus can't see exactly the same thing at the same time. The fringes come from when just one line sees something, and it's particularly noticeable with bright subjects. They're diagonal and not perfectly vertical because the camera itself isn't perfectly vertical. (I try to get it close, but there's only so much I can do on a moving train.)


From the camera's manual; the manufacturer provides formulas that can be used with the optical magnification factor of the lens and the exact speed to counteract it, but I don't have (relative) speed estimates for the subject.

I correct for it for a given subject by shifting the red and blue channels to line up with the green channel. Since the lines are evenly spaced, I can shift by the same amount in opposite directions rather than having to measure separate offsets for each channel. In theory, I could decide how far to shift by correlating brightness shifts across channels, but at present, I do it manually.
Separation between channels is visible on the sailboat's masts, and I corrected for it by shifting the red channel 10 pixels right and the blue channel 10 pixels left. Color fringes are still visible in the background because it's much further away than the sailboat and thus has a faster angular velocity; I could shift and correct for it, but the sailboat would look much worse.

Display

Displaying and sharing the pictures I've taken has been a pain throughout the project. Most software on my computer doesn't like how big they are, and the most reliable tool I've found for viewing them has been GNU IMP, which feels a bit overkill. The messaging apps I text my friends on get upset with wide images too and sometimes compress them into tiny garbage. I was worried this pain would continue in the browser, but the OpenSeadragon project had already done the heavy lifting for me and made an easy way to zoom around an image.

I used the vips utility to break my giant TIFFs up into small JPEG tiles to serve up and wrote a bit of javascript of my own to enable deep links into the gallery (mostly to make this very blog post easier). Web dev is not something I'm particularly good at, so I must apologize for how ugly it ended up looking.

Future Work

I have many more ideas for this camera that I'm hoping to work on in the future. The biggest one is to make it not dependent on a laptop to capture images, which will make it less sketchy and easier to bring places. In order to do so, I'll end up fixing some of the problems that have been bothering with accelerometer data collection and the capture UI.

I'm also planning to improve the postprocessing tools. I want to implement something that takes a spreadsheet of line numbers and stitches and assembles from there. If I'm feeling really ambitious, I'm considering a GUI that lets me mark off segments and preview them at different distance-per-pixel values. I'm also tempted to try and actually use the GPS and implement a Kálmán filter, but I expect I'll put that off even further.

Yet another thing I want to try is taking more weird infrared photos, maybe doing ærochrome-style color swapping, like what RYE does.

I also want to characterize the mapping between the gain setting on the camera and ISO, which would allow me to scout out locations using just a light meter. I tried to do this previously, but light conditions outside kept shifting too much to get good results.

Code

The capture-side code is available here and the postprocessor (grindstone) is available here.

Acknowledgments

I would like to extend a huge round of thanks to:

  • Meadow (ferry/train riding, presentation prep, proofreading)
  • Brooke (mechanical design help, 3D printing)
  • Ari (train riding, code, presentation prep, proofreading)
  • nyanotech (ferry/train riding)
  • cat (train riding)
  • Maddie (code, ferry riding, proofreading)
  • kim (proofreading)

Without their help, none of this would have come out anywhere near as well as it did.

Thank you, as well, for reading this!

The Daily Front Page 6 of 28
Tuesday, August 18, 2026 The Daily Front No. #260818 — A Phone Made to Last
article

Fairphone 6 and PostmarketOS working main camera

by pizzaiolo·▲ 278 points·74 comments·catcrafts.net ↗
Today i bring the working main camera!

Today i bring the working main camera!

Building on the work nondescriptpointer did on the wide lens camera i have written the driver for the main camera and now its working alongside auto focus and color correction.

The color correction still a work in progress, but you can already see how much it improved the image.

before:

After:

But the after is still very grainy, plasma camera storing in jpg isn't exactly helping either, ill be working to get rid of the grain.

If we look at the same scene form my android galaxy A16 you see that there still is alot of work to be done:

I'll continue to work on the camera, but i wanted to get something out today (mainly so i could send to nondescriptpointer xd)

I asked him what role he wanted to play in the upstreaming and we agreed he would send it and i would review and assist. So i successfully pulled down another soul into the linux phone kernel rabbit hole muhahahahaha

News roundup

Alot of things happend lately so good thing to discuss them, the big one:

Emergency calling test

You may have noticed that everywhere i put warnings that emergency calling is not verified yet. i wanted to fix that but after searching i couldn't find anything about it.

So i just called the police non emergency line and explained the situation, the operator told me that the information wasn't public but provided me with an email to send my application too.

I was a bit sad cause if its a non public thing its probably gated behind being big tech, but i send the email anyway, and much to my suprise i got back.

De testen zijn goedgekeurd voor dinsdag 18 augustus tussen 13:30 en 14:15 uur.

Met vriendelijke groet,

(name censored) B ICT,

Tactisch & Technisch Beheer 1-1-2 (TB112)

Translation:

The tests have been approved for Tuesday, August 18, between 1:30 p.m. and 2:15 p.m.

Kind regards,

(name censored) B ICT,

Tactical & Technical Management 1-1-2 (TB112)

So Im really excited for this, and then you know for sure that you can reach the emergency number with your linux phone.

Fairphone 6+

So the Fairphone 6+ has been officially announced an as soon as i can buy one im buying one, testing my image, and fixing any issues.

Im really glad for the donations so i can justify to myself this purchase instead of spending 650 euros for a phone that i already have.

Donations

I'm really grateful for all the people that donated and still continue to donate, i was over the moon when i got my first donation and i never expected to get this much. From the bottom of my heart thank you all very much.

I want to be open on where it's going. And i think as donators you deserve to know that its being spent wisely. so i made a script that builds this page from my bank statement:

https://catcrafts.net/financials

If it all works then donations should be reflected live and it will show the expense for the FP6+ when i buy it, net will drop in the negative as the remainder is coming out of my pocket.

If you want to send a donation please do so to the updated link: https://catcrafts.net/shop/donation this will be reflected in the dashboard live and for tax reasons its now mega clear that its a donation.

Catcrafts as a company

Im contacting a notary with the plans to have Catcrafts corporated as a non profit company (stichting), this is is depending on all the legal stuff however so this isn't set in stone.

If and if this company goes somewhere and i could quit my job, i will pay myself a salary to live on that will be publicly visible on the financials page. Dutch law requires for non profits that salary to be at max market confirming and not a shadow way for paying out dividends, so its guaranteed that any money in the company will go towards furthering the mission.

I think a non profit phone company has a genuinely good proposition, i praise fairphone alot for the things they do right but in the end they are still an profit seeking business so im a bit wary, and they still post on Musk's X so my long term judgement on their company is still out there

I applied to be a fairphone partner with in my eyes a pretty good pitch, if they accept my opinion will be improved ;) hopefully i just need to have more patience or they are ghosting me ;-;

Shipping restrictions

I'm sad to announce this but i don't think i can do worlwide shippng, earlier i said i would be shipping worlwide but i must sadly retract that statement for reasons out of my control. I will be shipping worldwide with the following exceptions:

US, CA: It's seemingly impossible to get a Bedrijfsaansprakelijkheids­verzekering (corporate liability insurance) for the United States and Canada in the netherlands, its all worldwide excluding US and CA. Getting coverage for those requires "contact us" with probably a very hefty premium, and selling without insurance is too risky as that would mean financial ruin if i get sued.

I would appreciate if anyone that isn't a massive company has experience with this, will be contacting my insurer aswell to see what's possible on this front

RU, BY, KP: Sanctions make it a criminal offense for me to ship to these countries.

imsd

DeviceOSCarrierThe Fairphone (Gen. 6)postmarketOS, Linux 7.1.2KPN NLThe Fairphone (Gen. 6)postmarketOS, Linux 7.1.2Telekom Deutschland GERThe Fairphone (Gen. 6)postmarketOS, Linux 7.1.2PhoneroThe Fairphone (Gen. 6)postmarketOS, Linux 7.1.2Telia Norge

Thanks to the community we now have 4 confirmed working carriers! If you are using the image please let me know so i can add it to the list!

Making a Linux phone

Ever since this project i've been dreaming about making my own linux phone, i've been looking into it here and there and while this might just be the sleep deprivation talking i think i can do it.

Making a good linux phone however is the hard part, and i don't think i can make an better arm linux phone then the fairphone 6 as those qualcomm chips are impossible to buy.

So im not going to, i'll make a RISCV one. will it be bad? yes, will it end up like the pinephone? most probably, will it run hot and have terrible battery life?, most likely. will it cost me a ton of money?, yes.

BUT

It will be a phone as open as i can make it, with good software, and a (in my eyes ethical) non profit company backing it. i think there is a good business proposition to made there, whatever the case its very long term anyway.

Meeting the lead pmos dev

Correction: There is no lead pmos dev, and the developer in question has since responded here: https://lemmy.world/comment/25358433

I'm keeping the original text here for transparency sake but i shouldn't have called him out like this.

My sincere apologies.

Original:

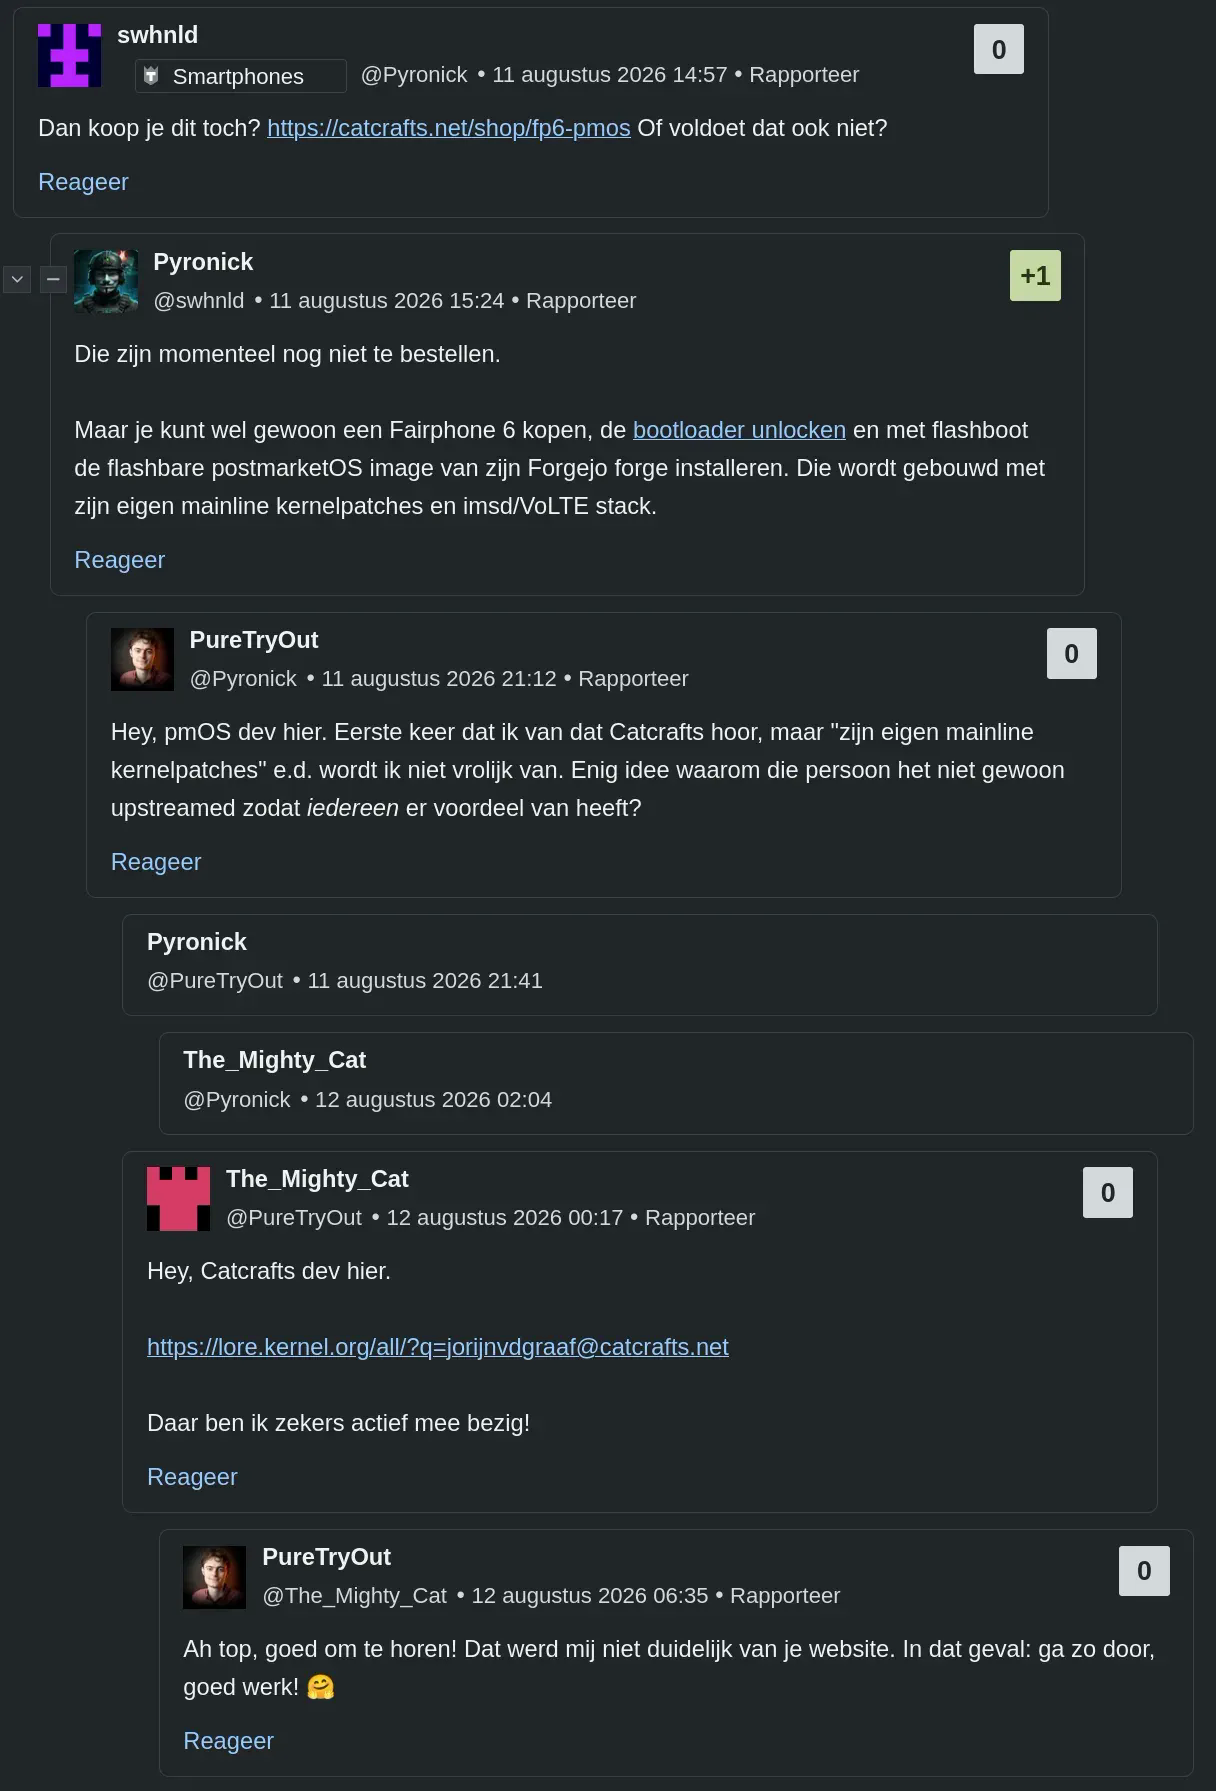
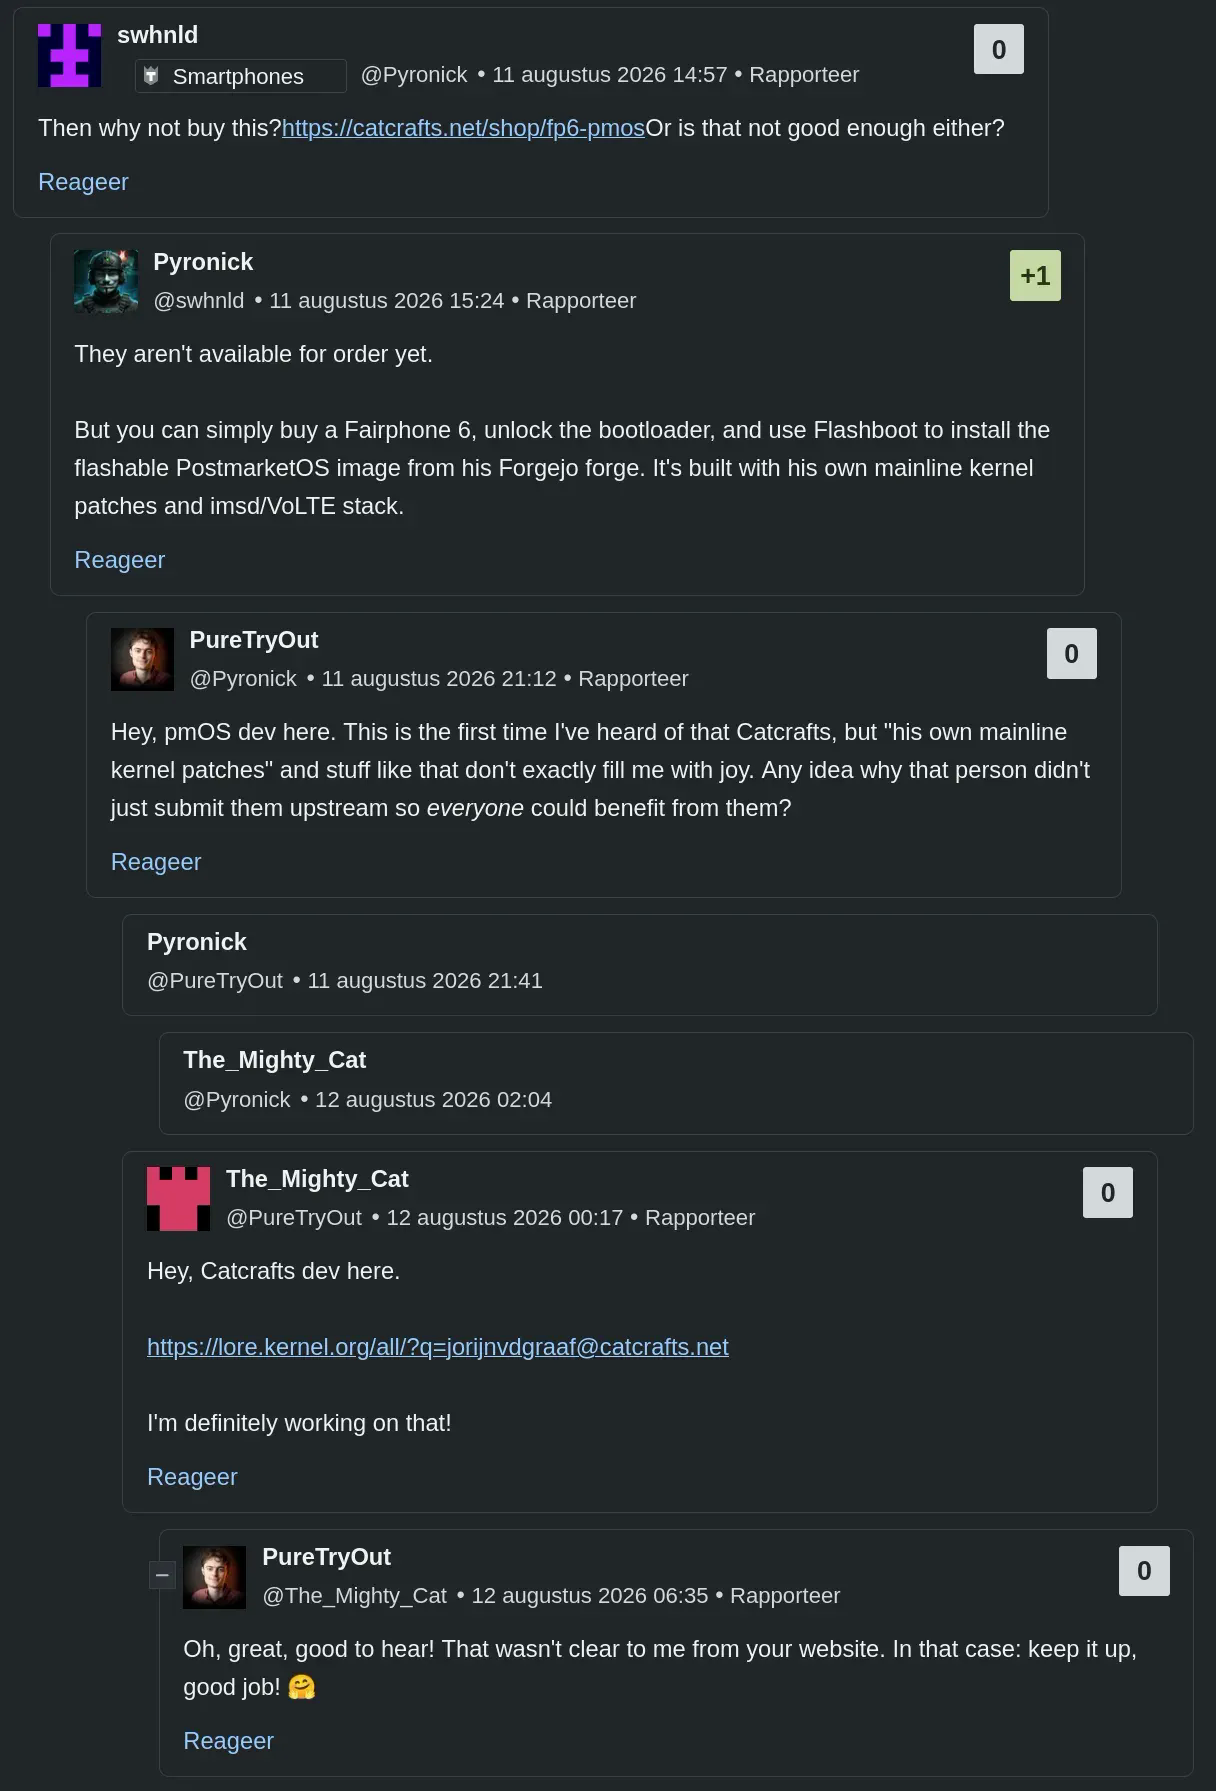
Imagine my surprise when i see the lead pmos dev on a dutch tech forum, and i'm named, and then heart sank trough the floor when i'm being made out for something that can be disproved with a 10s search.

Luckily the record was set straight fast!

Translation:

I don't want to hide context so here is the full thread:

https://tweakers.net/nieuws/250872/fairphone-gaat-smartphone-met-12gb-ram-uitbrengen-voor-649-euro.html?showReaction=22462270#r_22462270

What's next

  1. More color correction
  2. Laser rangefinder autofocus instead of software only.
  3. Selfie camera
  4. Fingerprint sensor
  5. Extensive testing

And then the FP6 is done, i will open my shop and continue with the FP6+

Since a long time i feel purpose in my life again, and i have alot of stuff still planned! And getting all the patches upstreamed is also probably a half year commitment atleast.

If you made it this far thank you for reading! As always ask me anything in the comments and ill do my best to answer.

The Daily Front Page 7 of 28
Tuesday, August 18, 2026 The Daily Front No. #260818 — The $20 Resurrection
article

Fixing a bricked Framework laptop

by jp_sc·▲ 395 points·265 comments·quantum5.ca ↗
A repairable and upgradable laptop that supports Linux out-of-the-box.

In 2023, I was in need of a new laptop that should hopefully last me for a while. While looking at my options, I was seduced by Framework’s promise of a repairable and upgradable laptop that supports Linux out-of-the-box without weird driver issues, as well as the option to assemble the laptop myself1 and buy the RAM and SSD I want separately2, back when they were cheap.

For three years, the laptop has served me well, until Framework suggested via newsletter to install the latest BIOS3 update, version 3.20, with a bunch of security fixes. Unfortunately, the system hung and displayed a corrupt image on the screen, signifying a failed BIOS flash.

Naturally, I reached out to Framework support, who told me to unplug the laptop, let the battery drain, and power it back on again afterwards, hoping the laptop would recover by itself. Unfortunately, it never did, and after giving Framework a bunch of information, they informed me that since my 1-year warranty has expired, I have no option but to purchase a new Framework motherboard, which will cost at least CA$500.

A quick search revealed that many people had issues with BIOS flashes with this specific BIOS update on the Framework forums, even those in warranty, and on a different thread, people have been having similar issues with BIOS flashing in general on this model since at least March of 2025. To my knowledge, Framework has never acknowledged the issue or offered any indication that the problem was fixed, so buying a new motherboard would simply be playing Russian roulette if I ever wanted to update the BIOS again, on top of spending CA$500+ through no fault of my own.

Thus, I opted against buying a new motherboard and embarked upon a journey to flash the BIOS myself. I documented this journey in excruciating detail so that hopefully, by following along, you’ll understand exactly how you might fix similar problems.

Why Framework?

In 2023, my basic requirement for a laptop was as follows:

  1. Compatible with Linux;
  2. Small and light enough for travel;
  3. A standard US keyboard layout, not that horrible Canadian Multilingual Standard layout that’s somehow very common in Canada4;
  4. A modern CPU, but not necessarily super high core count, as I don’t intend to do intensive compiling or gaming while travelling; and
  5. Socketed RAM and SSD, so I can upgrade those down the line, or buy from a third party if it made financial sense. I wanted to start it at 32 GiB of RAM5 and 1 TB of SSD6, since those were reasonably affordable in 2023.

As such, my options are effectively limited to the 13” thin-and-light laptops without a discrete GPU. At the time, AMD Ryzen was ahead of Intel in the performance department, so I decided to go for an AMD CPU.

There were a plethora of 13” thin-and-light AMD Ryzen laptops that fit the bill, but since I didn’t need the new laptop right away, I figured I might as well try something new.

At the time, Framework was a relative newcomer on the laptop scene, promising a repairable and upgradable experience, along with swappable ports. I rather liked the idea of not being locked to the ports that the manufacturer decided to put onto the laptop, and I wanted more upgradability also. It definitely helped that Linux came with full first-party support and no requirement to run patched kernels or anything crazy like that.

Furthermore, Framework was a very big proponent of the right to repair movement, and I strongly believe that laptops should be repairable, like desktops, and not just thrown away after a minor problem, so I also wanted to support them on that front.

So I looked at the price premium for Framework, and it wasn’t actually that much more expensive once I opted for the DIY edition, sourced my own RAM and SSD, and skipped the pointless Windows licence. With another laptop brand, I would have to either buy the model with the lowest RAM and SSD and upgrade it to the 32 GiB of RAM and 1 TB of SSD that I wanted, or pay a premium for the manufacturer to put those in.

So I decided to just go for it and pre-ordered a Framework laptop, and it finally arrived a few months later to much anticipation. I simply slotted in the RAM and SSD, connected the input cover, screwed it in, installed the bezels, and that was it. It honestly felt a bit anti-climactic for a DIY laptop. I then put in a Debian netinst USB drive, and I was off to the races.

For the next three years, I actually had a relatively nice experience, and the AMD Ryzen 5 7640U with Radeon 760M Graphics was still plenty fast for what I needed the laptop to do. There was definitely no need to upgrade, though I could, in theory.

The fatal BIOS flash

For the longest time, Framework appeared to be a very consumer-friendly company, providing regular BIOS updates and an easy way to install them on Linux through the Linux Vendor Firmware Service (LVFS) and fwupd. In fact, I am subscribed to Framework’s newsletter, which informs me of any updates coming out.

I’ve done many BIOS updates on Framework through fwupdmgr update, and save for the annoyance of rebooting the laptop and waiting like ten minutes for the BIOS updater to finish flashing, nothing bad has ever happened.

On July 7th, 2026, Framework sent me the following email:

From: Framework <support@frame.work>
Subject: Software update for your Framework Laptop 13 (AMD Ryzen™ 7040 Series) - BIOS 3.20

We have a BIOS update for your Framework Laptop 13 (AMD Ryzen™ 7040 Series). We recommend always installing the latest version of BIOS and drivers to keep your system secure, stable, and running at high performance.

  • BIOS 3.20, with updaters for Windows and Linux

    • Added support for Framework Laptop 13 Pro features - Enabled compatibility for the haptic touchpad, touch panel, and 74W battery.

    • Updated the audio verb table to support the new speakers in the Framework Laptop 13 Pro chassis.

    • Updated AMD PhoenixPI-FP8-FP7_1.2.0.0f.

    • Fixed an issue where the system was unable to boot from partially locked self-encrypting drives (SEDs).

    • Fixed an issue where the Battery Extender status was reported incorrectly following a reboot, hibernation, or shutdown after the timer had expired.

    • Fixed an issue where the system boots with black screen when a Dell U2725QE monitor and a mouse were connected.

    • Supported 16bits postcode.

    • Fixed an issue where system audio volume was lower on 3.19 beta.

    • Security fixes

      • CVE-2025-54502 - CVSS score N/A.
      • CVE-2025-29949 - CVSS score N/A.
      • CVE-2025-0040 - CVSS score N/A.
      • CVE-2024-36355 - CVSS score N/A.
      • CVE-2024-36310 - CVSS score N/A.

You can learn how to check your current BIOS version, see the full details on the updates, and always get access to the latest software on the Framework Laptop 13 (AMD Ryzen 7040 Series) downloads page.

However, I suspected that flashing a BIOS right away might not be a good idea, given the potential for bugs, so I decided to wait for a bit. I figured that if there were problems, either a new update would be released, or the update would be pulled. Seeing neither, I finally decided to do a quick flash in the morning of August 5th, while I cooked breakfast.

However, when I came back, I saw this screen, and instantly knew something had gone horribly wrong:

Framework BIOS flasher showing a triangle and patterns it's not supposed to show

Framework BIOS flasher showing a triangle and diagonal patterns it’s not supposed to show7

Given that the BIOS flasher was stuck and probably rendering random stuff from memory to the screen, I have no choice but to conclude that the BIOS flash had failed.

Still, I left the laptop for a few hours, just in case it decided to recover. It never did.

Reaching out to support

Naturally, I reached out to Framework support, hoping for a quick response and a solution to my problem:

Subject: Stuck on BIOS Update
Support Request Category: Problem with my Framework Product
Was your Framework Product Delivered within the last 30 days?: No it wasn’t
Product: Framework Laptop 13
Framework Laptop 13 Generation: AMD Ryzen 7040 Series
Operating System: Linux
Linux Distribution: Debian 12 [typo, should have been 13]
BIOS: 3.20
Order number: [redacted]
Product Issue Selection: Mainboard
Description: I tried to update the BIOS with fwupdmgr update, and upon reboot, the system is stuck in this weird state and not making any progress for over an hour at this point. It’s not displaying properly, see picture. What do I do now?

I’ve also attached that picture of the screen above.

Support did not respond until one day and 8 hours later.

Troubleshooting on my own

In the meantime, I figured that letting the computer hang indefinitely—especially with the CPU fan spinning loudly—wasn’t the best idea, so I decided to do some research. It wasn’t very long before I came across this thread, with a bunch of people having the same problem doing the same update to BIOS 3.20 from 3.18, just like I did, though I saw a slightly different screen.

Users on the thread who were under warranty reported getting their motherboard replaced, while those out of warranty reported Framework offering zero help. This was very concerning to me.

Seeing on that thread that support recommended that people in a similar situation unplug the charger and let the battery drain until the laptop eventually powers off, I did exactly that, while diving deeper on the forums to see what was in store for my future.

I then came across this other thread, wherein the forum user @cesfahani, who saw the exact same screen I did, detailed how they used their Raspberry Pi and soldering skills to flash the BIOS chip externally. While I could do some basic soldering, as seen when I built my stratum 1 NTP server8, I was not prepared to solder tiny wires to a tiny BIOS chip.

It soon became apparent to me that if BIOS flashing on Framework fails and it doesn’t automatically recover by itself, there was no recovery mechanism short of externally programming the BIOS chip. This was shocking on a product advertised as “repairable.”

I couldn’t help but remember my first PC, secondhand as it was, with the 2004-vintage P4P800 SE motherboard. I still remember reading the manual from front to back, as an excited child with zero desire to break my very first PC. Even the 22-year-old motherboard had the ASUS “CrashFree BIOS 2” feature, which was advertised to fix a bad flash without resorting to such crazy manual methods. I’d simply have to put in a floppy disk9 or a CD with a BIOS image named P4P800SE.ROM after a bad flash, and it would automatically recover. Yet, here I am decades later, dealing with a “repairable” laptop without such a feature.

I also wondered whether such a thing was specific to laptops, so I did a quick search on whether the brands that I didn’t choose back then, like Dell and HP, supported such recovery features. For example, Dell laptops could recover the BIOS from USB or the recovery partition after holding down Ctrl+Esc while plugging in the power, and HP laptops have a similar “HP Sure Start” feature that recovers the BIOS. So Framework is actually doing worse than their “not-repairable” competitors on this front.

Fortunately, reading further down the thread offered a glimmer of hope: Instead of soldering tiny wires to the chip on a Raspberry Pi, forum user @moparisthebest revealed that I could use something called “pogo pins” connected to a USB flash programmer to do the job without any soldering. Even further down the thread, users @David_Henry and @Richard6 reported success doing something similar.

The BIOS chip

Before we go any further, it is important that we first understand the BIOS chip that we are dealing with. Otherwise, talks of flashing it would just be a confusing mess of jargon, which was my experience when first reading the thread.

The flash chip in question is located to the right of the M.2 slot, hidden under a plastic cover, and it looks like this (rotated 90° clockwise to make the label upright):
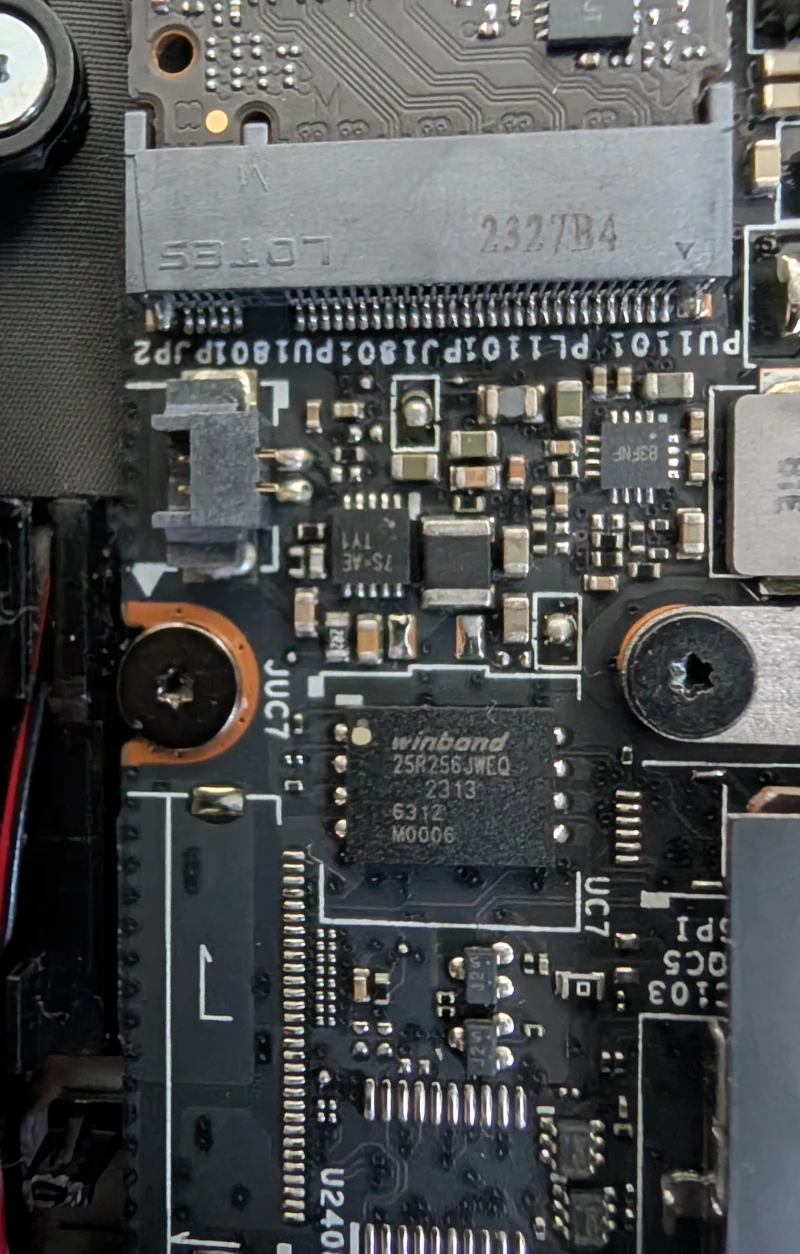
The BIOS chip on the Framework 13" AMD 7040 series

The BIOS chip in question, with the M.2 slot for scale

As you can see, this is a Winbond 25R256JWEQ chip. I found the datasheet for the W25Q256JW series, and discovered the whole series to be 1.8 V, 256 M-bit (i.e. 32 MiB) SPI flash chips. It will be very important to find a BIOS image for this motherboard that is exactly 32 MiB, then flash it at exactly 1.8 V to avoid destroying it.

What’s SPI? It’s a de facto standard called the Serial Peripheral Interface, commonly used in embedded systems for communication between integrated circuits. This standard is why the Raspberry Pi could talk to and flash the chip, as could many microcontrollers.

There are several variants of the W25Q256JW chip, differentiated by form factor:

  • the P variant, which is an 8-pad, WSON 6×5 mm chip;
  • the E variant, which is an 8-pad, WSON 8×6 mm chip;
  • the F variant, which is a 16-pin SOIC 300-mil chip; and
  • the B and C variants, which are ball grid array chips.

We have the E variant here, which means it’s a WSON 8×6 mm chip. From the datasheet, we can see its schematic:

Pinout for the Winbond 25R256JWEQ chip

Pinout schematic for Winbond 25R256JWEQ chip

It’s also very important to note the white dot on the top-left corner of the chip, as shown in the picture and on the pinout schematic. That dot is placed next to pin 1 of the chip, allowing it to be oriented. Very bad things will happen if you rotate the chip the other way and connect VCC to GND instead.

Now, you might wonder: what’s a WSON? It’s short for Very, Very-thin Small Outline No-lead, a form factor for chips. I guess VVSON sounded silly, so they called it WSON. It’s pretty much the worst form factor for external flashing.

If Framework had used the SOIC (small outline integrated circuit) form factor instead, it would have been possible to clamp onto the chip and flash it that way, but the WSON form factor has basically nothing to clamp onto. Instead, we can either:

  1. try to desolder the chip, which requires a hot air station, as there’s a big ground pad underneath the WSON chip for which a soldering iron wouldn’t work; or
  2. program it in-circuit (without desoldering) by using a probe with “pogo pins,” which are spring-loaded pins.

A pogo pin probe consists of a piece of plastic with an indent exactly the size of a WSON chip. Around the indent are spring-loaded pins that go through the plastic. To use the pogo pin probe, the plastic should face downwards, and the chip should fit into the indent. Then, downward force can be applied so that the pins go through the plastic and make contact with the solder balls. This downward force must be maintained for the entire duration of the flash operation, or data will be corrupted.

On the BIOS flashing thread, users have used various heavy objects to maintain contact while the flash happens. Unfortunately, I don’t have random heavy ceramic objects lying around at home, so realistically I’d have to hold down the pogo pins manually. This makes it imperative that the flashing happen quickly, and you shall see the consequences of that later.

Also notice the white lines around the BIOS chip? That is called a “silkscreen” in PCB terminology, and marks positions where components could be mounted. Judging from the shape, the motherboard could have been soldered with a socket for a replaceable BIOS chip, and then to fix the laptop, I could have either:

  1. bought a new chip with the correct BIOS from Framework; or
  2. taken the chip out and put it into a flasher without using janky mechanisms like pogo pins.

However, once again, the “repairable” laptop company has chosen to close off an avenue of repair.

Furthermore, there is clearly space on the board for a flash header connected to the BIOS chip, and I could have simply connected to that with a bunch of jump wires (sometimes called “DuPont” wires) instead of using pogo pins. There was also enough vertical clearance due to the height of the M.2 slot. Again, Framework chose the user-hostile option.

The flash programmer

Now that we understand the BIOS chip and that we must connect to it with a pogo pin probe, it’s time to talk about what we need to talk to the chip and program it.

Since we wanted something nice and integrated, it makes sense to get a flash programmer that works over USB. There are several popular options for this, each with their own advantages and disadvantages. I will go through some of them here.

The CH341A mini programmer

This is probably the most popular option and what most people on that Framework forum thread used. It is very cheap on AliExpress and costs US$3 on its own at the time of writing, so it’s a very affordable option. The CH341A chip itself works at 3.3 V and 5 V, so to use it for 1.8 V devices like the Winbond 25R256JWEQ, we need to use a 1.8 V level shifter.

Unfortunately, as forum user @jim_m noted on the thread, the cheap CH341A mini programmers, especially those with black PCBs, have issues with voltages on the data pins. While they would power the chip (or the level shifter) at 3.3 V, the data pins remain at 5 V, which is not very good for the health of anything connected to it. However, many other users reported no problems with it. To settle this debate once and for all, I decided to order one for myself and test it out, given how cheap it is.

When it arrived, I plugged it into my multimeter, following the instructions from this blog, which contained instructions for fixing this issue without soldering, as well as checking whether the problem exists and whether it is fixed:
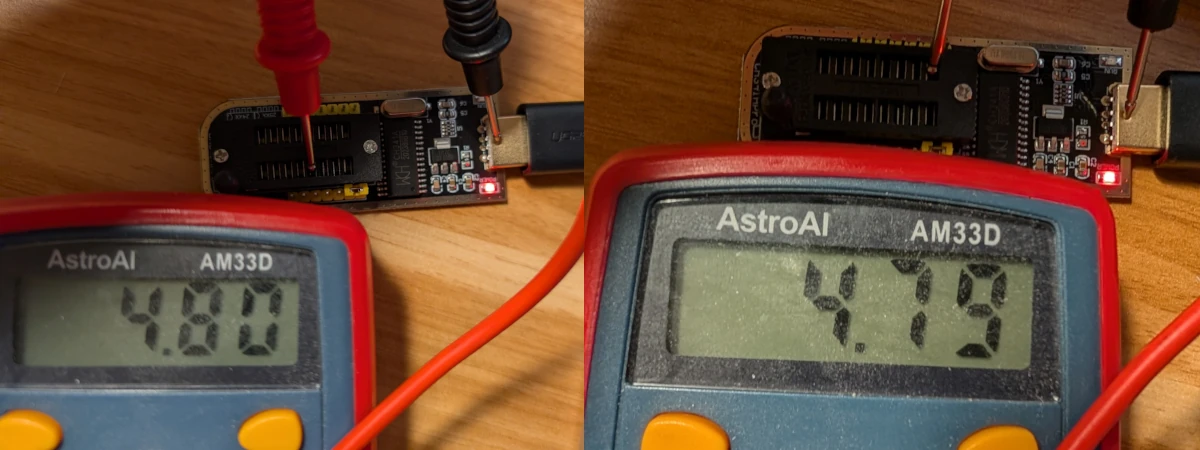
Multimeter on CH341A showing 4.8 V instead of 3.3 V

Multimeter measuring the voltage of MOSI and MISO pins on the CH341A mini programmer, which are supposed to be 3.3 V

Well, I guess it is true that the black PCB variants are problematic.

It is believed that the variants of the CH341A with a voltage switch between 5 V, 3.3 V, 2.5 V, and 1.8 V do not have this bug. The same video claims that the 1.8 V level shifter would shift the 5 V on data pins to 1.8 V anyway, but I don’t know if I trust that or whether that is good for the health of the level shifter.

I opted against experimenting further due to the other major disadvantage of the CH341A, that being its speed. From the datasheet of the Winbond 25R256JW series, we can see that it runs at a maximum of 133 MHz for the SPI clock. However, the CH341A, according to resources found online, can only do up to 1.7 MHz, if not slower. People on the forum thread reported that it took around 5 minutes to read, and another 5 minutes to write the 32 MiB BIOS chip. I certainly have zero intention of holding down the pogo pin probe for that long.

The CH347 “high-speed” programmer

The CH347 is a newer programmer that’s the spiritual successor to the CH341A. With a 15 MHz SPI clock, it can program chips much faster than the CH341A. The socket on the programmer is supposed to be compatible with the CH341A and serve as a drop-in replacement. Unfortunately, documentation for it is scarce. Still, I was able to piece together that it was a 3.3 V device.10

After it arrived, I was able to confirm that it was sending 3.3 V on the data pins, unlike the CH341A:
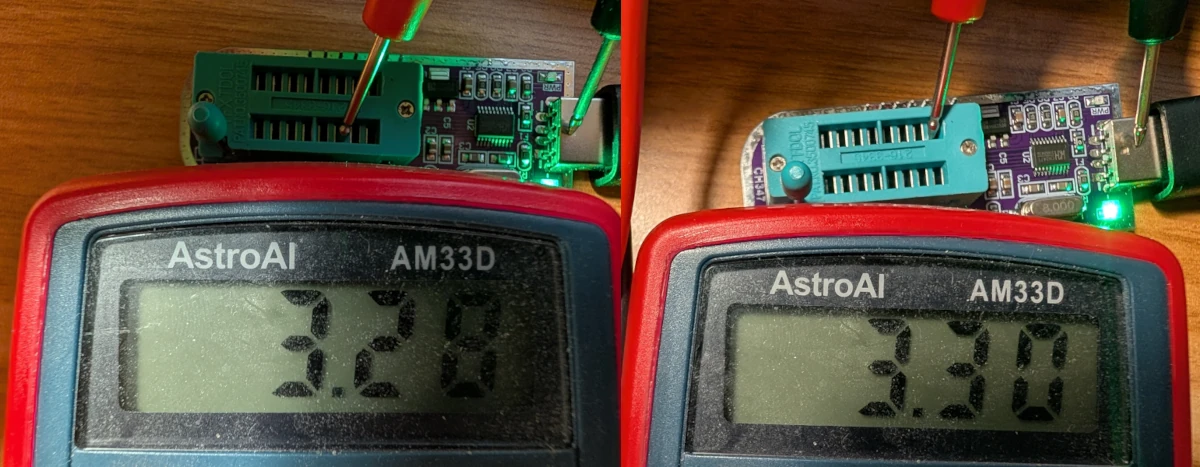
Multimeter on CH347 showing approximately 3.3 V on pins

Multimeter measuring MOSI and MISO on the CH347 Programmer, showing the expected 3.3 V on data pins

That certainly inspires a lot more confidence. With its faster flash speed, I also wouldn’t have to hold down the pogo pins for as long, which is a win in my book. This is the programmer I intended to use for the project.

The XGecu T48

A user on the thread reported success with the XGecu T48 programmer. However, after seeing the price tag of over $100, I immediately decided it was too expensive for this repair.

Purchasing the tools

Armed with knowledge of what I needed, and not holding my breath for Framework to fix my system, I decided to just order the parts on AliExpress, since it’d take a while to arrive. Ultimately, I chose to buy the following parts:

This cost a grand total of US$20.41. Note that to achieve this price, I had to buy some other, unrelated items that I was planning to buy anyway.

Also note that I bought the CH341A to see whether the new black ones still have the voltage bug; it’s not something actually needed for this project. I probably would have saved some money by only buying the level shifter, which is the only part I actually needed from the CH341A kit. It’s available on the same listing for US$2.23 at the time of writing. Still, I figured the rest might come in handy some other day.

Also note that I didn’t need the laptop urgently, which was why I was willing to save a buck ordering on AliExpress, knowing it would take 1–2 weeks to deliver. If you need to fix your laptop urgently, perhaps Amazon Prime same-day shipping would more tempting, though it would naturally cost more.

Response from Framework

After I did all this research, Framework finally responded to me, telling me to unplug the charger and let the battery drain, then try booting again—which was exactly what I did earlier, and the laptop wouldn’t turn on. My laptop was officially “bricked” at this point—as in, it’s effectively a very expensive brick.

So I told Framework this, and they asked for a bunch of information and offered some more troubleshooting steps. Here are my responses:

Which BIOS version were you on & which version were you updating to? (Example: Was on BIOS 3.09 updating to BIOS 3.18)

I don’t remember, but I believe I was on 3.18. I know it was updating to 3.20.

Was the BIOS version you were updating to in Alpha, Beta, or Stable release? (If downloading from our Knowledgebase, it is a Stable release. If from our Community Forum, it should say which release it is in the title)

This would be the stable BIOS, although it was downloaded from LVFS.

What Blink Codes is your device showing when attempting to power on your device? (If this could be video recorded and shared with us, it would be greatly appreciated)

A video has been attached (blink.mp4), shrunk down to 144p to save space. To my eyes, it’s 12 green flashes, 1 red, 1 green, 1 blue, 1 green, 2 blue, 8 green, 2 blue.

Can you please share a picture with us of the Front of the Mainboard?

See mainboard.jpg

Can you send us a photo of the laptop showing all sides while the lid is closed (left, right, top, bottom, front, and back)? See the image below for reference.

See other jpg attachments.

For troubleshooting:

  1. Disconnect the system from AC power.
  2. CAREFULLY disconnect the battery and leave it disconnected for 30 minutes for the best chance of recovery.
  3. CAREFULLY reconnect the battery.
  4. Reconnect AC power.
  5. Attempt to boot the system.

I did this. No change, same light pattern.

I will not reproduce the attachments here, but suffice to say, the laptop looked fine physically.

Framework then responded on 2026-08-07 at 05:49 EDT:

Thank you for your response and for sending the photos. We appreciate it.

After a thorough review of this issue and the photos/videos submitted, we’ve come to the conclusion that there is a need to replace the Mainboard.

Unfortunately, we are unable to provide a replacement as your warranty has already ended.

We suggest purchasing a replacement in the Marketplace.

You can check our Warranty and Terms of Sale below.

Framework Warranty - https://frame.work/warranty Framework Terms of Sale - https://frame.work/terms-of-sale

We know that this is a bit disappointing, and we sincerely apologize for the inconvenience.

If there’s anything else that we can assist you with, please don’t hesitate to contact us.

Thanks for your understanding. Have a great day!
Regards,
Framework Support

So basically, after being encouraged to update the BIOS by Framework, Framework told me that because my warranty has expired, I have no other option but to throw away the entire motherboard, including the perfectly working but soldered CPU, and buy a replacement for over $500 on their store.

How does it make sense that some bad data on a BIOS chip that retails for US$5 should force me to buy a whole new board and CPU for $500+? Especially when this happened as a result of Framework’s own instruction? Especially when many users have complained on the Framework official forums without anything being done to stop further instances of bricking?

Worst of all, Framework didn’t offer any help in attempting a repair myself, not documentation, not a schematic, not even a raw BIOS image for me to attempt to flash externally. So much for right to repair…

The data breach

To add insult to injury, I also received the following email from Framework during my interaction with support:

From: Framework <support@frame.work>
Subject: Notice of Limited Data Breach
Date: 2026-08-06 23:04 EDT

Dear Valued Framework Customer,

We are writing to inform you of a data breach at our business intelligence database provider Metabase that resulted in an attacker accessing customer names, email addresses, phone numbers, and addresses. Your information was in the database that was accessed in this breach. This breach did not include order or payment information.

We have full details on the incident below. We are deeply sorry for this breach of information, and are reviewing and improving our methodology for data storage in external database vendors.

We are also in the process of notifying the regulatory authorities in each region where relevant regulations exist. Note that while regulations in most regions do not require notification for breaches of names, email addresses, phone numbers, and addresses, we are sending this email to you regardless to ensure you have visibility and can take any actions needed.

What happened?

On August 6th, 2026 at 9am Pacific Time, Metabase notified us of a breach of their systems with the following email message:

On Monday, August 3, we discovered that Metabase Cloud was attacked by someone utilizing an unknown (“0-day”) security vulnerability in versions 1.58 and above. We immediately blocked the endpoints used for the attack, then quickly identified and patched the vulnerability. We notified law enforcement, and we have engaged with a third party forensics firm to conduct an independent investigation.

Your instance of Metabase was vulnerable to this 0-day. Therefore, to protect your company, we recommend you:

  • Rotate the credentials for every database connected to your instance; and
  • Review the admin accounts on your instance and remove anything you don’t recognize.

We also discovered that the attacker was able to gain access to your instance. We created a report on the actions we believe the attacker took on your instance, which includes log files, and which you can get from the Metabase Store at [removed url].

(If you do not have access to the Metabase Store, are having issues accessing the report, or do not want to click on a link in an unexpected email, you can log into your instance directly and reach us at Help > Get help in the grid menu in the upper right hand corner. We’ll confirm this message is from us and email you the report.)

This report is based on our own application logs. We did not query or read the data in your connected databases.

Depending on the jurisdictions in which you operate and kinds of data your instance connects to, you may have notification obligations under applicable laws. If you have concerns in this regard, we recommend you assess potential notification obligations with your company’s legal or compliance experts.

We regret any inconvenience this incident may cause you, and we are here to support you. If you have questions, please reply to this email or email us at [removed email address], and we’ll get back to you as quickly as we can.

Sameer Al-Sakran
Founder and CEO
Metabase

We immediately investigated the logs Metabase provided to us and confirmed that our database instance was accessed by the attacker. We confirmed that the following information was accessed:

  • Full name

  • Email address

  • Login IPs

  • Billing and shipping address information

    • Country
    • Address
    • City
    • State
    • Zip code
    • Phone number
    • Company

For Framework for Business customers, we are investigating whether the following information may additionally have been accessed:

  • Company
  • Phone
  • VAT
  • EIN
  • Billing Email

No other personally identifiable information, order information, or payment information was accessed.

Note that Metabase has additionally flagged:

Important: This is a preliminary update based on our current knowledge.

We are working with a third-party forensic investigation firm to understand the full nature and scope of the event.

We are providing this interim update in advance of completing our investigation to allow you to better understand any potential impact and secure your data.

Our investigation is ongoing and the information shared now is preliminary.

Please look at the application logs as well as the queries executed that are provided as separate files in the zip file for detailed activity and a potential timeline.

We’re providing you notice of the breach in the meantime to ensure you have the earliest possible visibility. In the event Metabase notifies us of additional information that impacts you, we will send a follow-up email.

What was done to resolve the issue?

After we were notified of the breach by Metabase, we rotated credentials on all databases associated with our Metabase instance and confirmed that there were no changes in admin access or access to systems outside of Metabase.

What steps have you taken to ensure this doesn’t happen in the future?

We are evaluating the breadth and depth of data shared with business intelligence platforms, and scoping down their access to only the columns required for analysis.

Nirav Patel and the Framework Team

Well, I guess Framework at least disclosed this security incident instead of covering it up, which is a good thing? But then again, the regulators will be very upset if they found out it happened and wasn’t disclosed…

Still, I was very disappointed that Framework chose to entrust sensitive information to a third-party who obviously couldn’t keep the data safe. To have it happen at the same time as my expensive laptop getting bricked is just rubbing salt in the wound. Words cannot describe how disappointed I am at Framework right now.

As a sidenote, Framework stated that payment information wasn’t breached. Most people might breathe a sigh of relief, but that shouldn’t be the case. Since I paid with a credit card, even if Framework leaked my full credit card number11, my liability for any fraudulent transactions that happened as a result of this breach would be zero. All I’d need to do was call the credit card company, and they’d give me a new card. The rather more annoying things that they breached that I couldn’t easily change are phone numbers and addresses, unless I feel like moving… To Framework’s credit, they stated it as a matter of fact and didn’t try to dress the payment information not being leaked as a saving grace, as certain dishonest companies would.

Extracting the BIOS image

Anyways, now that we have the tools to flash the BIOS, and Framework is not even willing to supply the raw BIOS image, we have to determine what to flash to resurrect the BIOS.

From the BIOS flashing thread, user @David_Henry determined, from reading the BIOS and experimenting with the flashing, that the raw BIOS image is exactly 32 MiB starting from offset 1993293 in the .cap file in Framework’s UEFI shell update package, and this is identical to the output created by a third-party tool called InsydeH2O-extractor-2 on GitHub.

Since a hardcoded offset is unlikely to work for future versions, I would recommend using the extractor tool. Unfortunately, the tool was written for Microsoft’s C library and uses non-standard functions like fopen_s, which made it not run on Linux. To deal with this, I forked the tool and made it compile on Linux.

You can build it and extract the .cap file thus:

git clone https://github.com/quantum5/InsydeH2O-extractor-2.git
cd InsydeH2O-extractor-2
cmake .
make
./extractor /path/to/bios.cap

In the directory, you will find BIOSFILE.FD, and that is the file to flash.

For the Framework 13” AMD Ryzen 7040 series BIOS version 3.20, I have the image prepared already: https://dl.quantum2.xyz/firmware/framework-3.20-bios.bin

The hashes for that file are:

  • MD5: 8bc4cde1b7e8413b9b405b8e7b243e1f
  • SHA1: b562976496f3bafba5e07f2d96b03804a708f90d
  • SHA256: a645413ee19c7cf287917a717099883ea37ed6b556c74cf31adbc5b1afcc9c05

Feel free to use my image after verifying its integrity. At the time of writing, at least four users have downloaded the full BIOS image from my server, presumably because they also had their laptops bricked and didn’t write about it on the Framework forums.

Delivery of the tools

Eight days after placing the order on AliExpress, the parts finally arrived. I started by inspecting my AliExpress flash programmers, as you’ve already seen. The CH341A had the voltage bug on top of being slow, so I decided that I would only try it as a last resort after fixing the voltage bug. Instead, the CH347 seemed promising.

I plugged the 1.8 V level shifter into my CH347 and verified that the data pins were outputting the expected 1.8 V, just in case. I also checked the pogo pin probe with my multimeter for continuity, confirming every pogo pin is connected to the correctly numbered pins on the header. While these precautions may seem extreme, you never know with the stuff you get on AliExpress.

In any case, I was happy with my tools, so I decided to continue.

Connecting the chip

Now, I just need to connect everything together so that my PC can talk to the BIOS chip through the CH347 flash programmer.

Since I am programming from a desktop PC, I opted to get a USB Type-A extension cable (i.e. a male-to-female cable), so that the CH347 flash programmer isn’t locked to a USB port.

Now, we need to understand the CH347’s pins. After some research, it’s clear that the pin order for type 25 SPI NOR flash is always the same, including our W25Q256JW, and that’s what the left side of the CH347 is designed to accept:
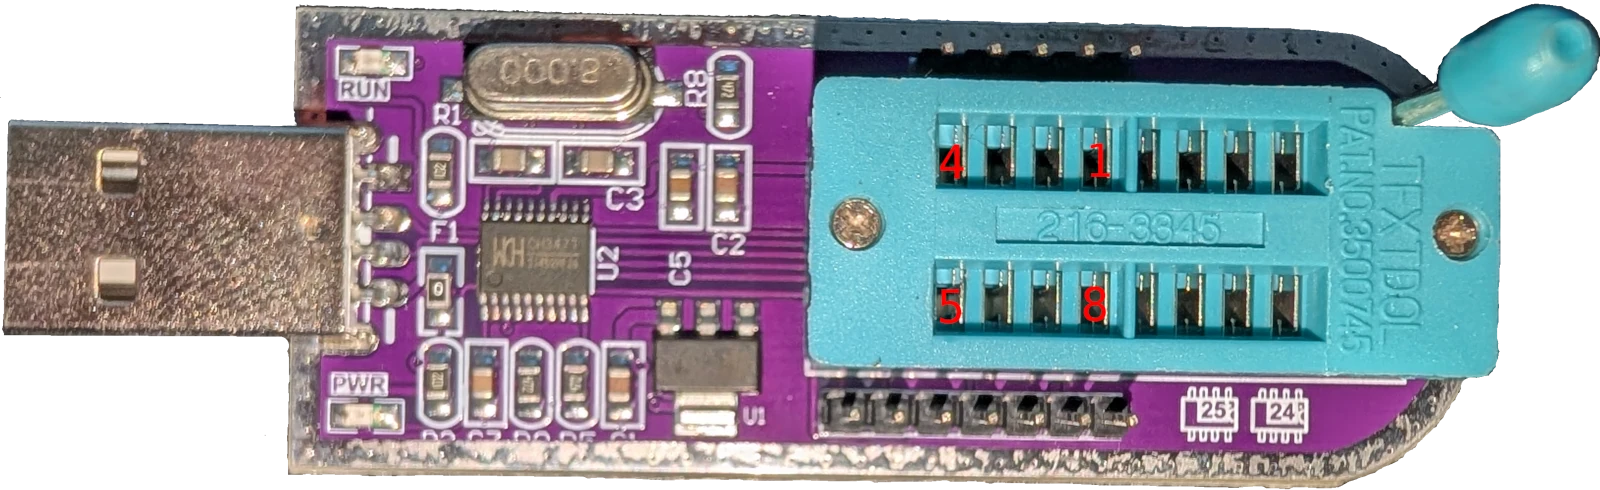
Labelled pins on CH347 for SPI NOR flash

A diagram of where each SPI NOR flash pin should go on the CH347 programmer

If you look carefully at the bottom-right corner, you’ll see that there is a diagram of two chips, one labelled 25 and the other 24, that describes this pinout. What it means is that type 25 chips go on the left, and pin 1 is on the right side, as shown by the semicircle on the right. Type 24 chips, i.e. I²C serial EEPROMs, go on the right side, but we don’t need that for this project.

But what is that socket? That is a zero insertion force (ZIF) socket designed to accept a pin header. Once the pins are inserted, the lever can be pulled to the horizontal position to lock the pins in place. The mechanism is very similar to that of PGA CPU sockets, e.g. AM4.

While certain chips with pins can fit directly into the programmer, that is not the case for us. In any case, we have a 3.3 V programmer and a 1.8 V chip, so we need to insert that level shifter into the CH347 instead:

Labelled pins on 1.8 V level shifter

A diagram of where each SPI NOR flash pin should go on the 1.8 V level shifter

The level shifter has a header with labelled pins on the top, with the pins underneath. Those need to be inserted into the corresponding holes in the ZIF socket on the CH347, as described above.

The shifter provides another ZIF socket with 1.8 V. This time, only the right side of the socket is used, and pin 1 faces right. If you look at the shifter carefully, the pins are actually labelled right next to the ZIF socket on the PCB, but it’s hard to see in the picture, so I labelled them directly.

The next step is plugging in the pogo pin probe. It looks like this:

The pogo pin probe

A picture of the WSON8 6×8mm pogo pin probe

The ribbon cable needs to be connected to the PCB with a pin header on the other side. The pins are numbered on the side with the ribbon cables. The header needs to be plugged into the ZIF socket on the level shifter, and the ZIF socket locked.

Now, you are ready to connect the probe to the BIOS chip. Before doing that, first open up the Framework laptop and remove the expensive RAM and SSD from the motherboard, just in case you mess up and accidentally fry them. On that note, double check all the connections to make sure the pin order is correct everywhere. One mistake and the chip could be fried, or worse, the whole motherboard.

The full setup with the CH347, the level shifter, and the pogo pin probe

The full assembly with the CH347, the level shifter, and the pogo pin probe should look like this

Now, identify the side of the plastic on the pogo pin probe with an opaque semicircle. That’s the side with pin 1, and you need to make sure that side is positioned on the same side as the white dot on the chip. That’s the correct pin order. When flashing, place the probe on the chip and apply force to hold it down:

The pogo pin probe used on the BIOS chip

The pogo pin probe as used on the BIOS chip

Executing the flash

We will perform the flashing with the flashrom tool from the coreboot project. Note that unlike on Windows, where drivers for these programmers are necessary, flashrom is able to talk to all supported USB flash programmers with libusb.

Double check that your flash programmer is supported by the version of flashrom on your system:

$ sudo flashrom -L
...
Supported USB devices for the ch341a_spi programmer:
Vendor            Device   USB IDs    Status
Winchiphead (WCH) CH341A   1a86:5512  OK

Supported USB devices for the ch347_spi programmer:
Vendor              Device               USB IDs    Status
QinHeng Electronics USB To UART+SPI+I2C  1a86:55db  OK
QinHeng Electronics USB To UART+SPI+I2C  1a86:55de  OK
...

We see that both the CH341A and the CH347 are supported. If it’s not on your system, you probably need a newer version of flashrom.

Also note that you will need to use one hand to hold down the pogo pins, and with the CH347’s relatively fast flashing, that’s probably the better strategy than trying to use some heavy object to apply the necessary force. Therefore, you are highly encouraged to use primary selection on Linux to copy commands presented here by selecting the text (try triple-clicking), then pasting it with middle click, which is a lot easier with one hand.

On a similar note, prepare the BIOS file as wanted.bin while you are at it. Then, hash it:

$ sha256sum wanted.bin
a645413ee19c7cf287917a717099883ea37ed6b556c74cf31adbc5b1afcc9c05  wanted.bin

Now, push the pogo pin probe (remember the orientation!) onto the chip and check if it’s detected:

$ sudo flashrom --programmer ch347_spi
flashrom 1.4.0 on Linux 6.12.101+deb13-amd64 (x86_64)
flashrom is free software, get the source code at https://flashrom.org

Found Winbond flash chip "W25Q256JW" (32768 kB, SPI) on ch347_spi.
...

Good, it is. If it’s not, make sure the probe is positioned correctly and apply more force as needed. Quite a bit of force is required for a good connection. I would suggest applying progressively more force if you aren’t making good contact.

Now read the current contents of the BIOS chip. Since the connection is somewhat sketchy, it’s quite possible that you’ll end up with read errors, so you are encouraged to read multiple times until you get the same hash on at least two reads, ideally in a row:

sudo flashrom --programmer ch347_spi -r read-v1.bin --progress && sha256sum read-v1.bin
sudo flashrom --programmer ch347_spi -r read-v2.bin --progress && sha256sum read-v2.bin
sudo flashrom --programmer ch347_spi -r read-v3.bin --progress && sha256sum read-v3.bin
sudo flashrom --programmer ch347_spi -r read-v4.bin --progress && sha256sum read-v4.bin
sudo flashrom --programmer ch347_spi -r read-v5.bin --progress && sha256sum read-v5.bin
sudo flashrom --programmer ch347_spi -r read-v6.bin --progress && sha256sum read-v6.bin

In my case, I got the same hash on attempts 1, 4, and 5, after which I stopped. I kept holding the probe in the exact same position, since it was making good contact and would ensure the highest chance of success for subsequent steps.

If none of your attempts resulted in the same hash, you need to apply more force on the probe and try again. Also, while I didn’t time the attempts, I estimate that each read attempt took less than 20 seconds with the CH347.

It is very important to have a good copy of what’s currently on the BIOS chip, because it may contain information that could be useful later. You will soon find out what other information is stored in the BIOS chip that you might want to recover down the line. Keep the successfully read BIOS file safe.

Now, it’s time to write to the chip. I turned off verification with -nN due to the jankiness of the connection, so I could verify later at my leisure instead of holding down the probe for the duration of write and verify:

$ sudo flashrom --programmer ch347_spi -nNw wanted.bin --progress
flashrom 1.4.0 on Linux 6.12.101+deb13-amd64 (x86_64)
flashrom is free software, get the source code at https://flashrom.org

Found Winbond flash chip "W25Q256JW" (32768 kB, SPI) on ch347_spi.
===
Reading old flash chip contents... [READ] 1% complete... [snip]
[READ] 100% complete... [READ] 50% complete... [READ] 0% complete... [READ] 100% complete... done.
[READ] 0% complete... Erase/write done from 0 to 1ffffff

At this point, the flash is complete. For me, this flash operation took less than a minute. The CH347 was definitely worth it compared to the CH341A. Given how quickly the BIOS flashed externally over such a janky connection with a programmer that supports 11% of the maximum SPI clock the chip could do, I couldn’t help but wonder what Framework’s BIOS updater is doing that makes updating the BIOS take many minutes normally…

Now, do the manual verification by doing the same thing as reading, but to different files:

sudo flashrom --programmer ch347_spi -r verify-v1.bin --progress && sha256sum verify-v1.bin
sudo flashrom --programmer ch347_spi -r verify-v2.bin --progress && sha256sum verify-v2.bin
sudo flashrom --programmer ch347_spi -r verify-v3.bin --progress && sha256sum verify-v3.bin

Stop when you get the same hash as wanted.bin from earlier. I managed to pass the verification on the first try. If you can’t get it after three attempts, attempt the write again until it verifies.

Consequences of flashing

With the flash complete, I put the RAM and SSD back in and powered on my Framework laptop. After a minute of initial memory training (or something like that), it finally booted. However, the saga isn’t quite over.

I went into the BIOS setup to discover that all my customizations are gone. If you made any customizations, you would have to redo them. I also noticed this in the BIOS setup:

System UUID       1234567890
System SN         1234567890

I am pretty sure this wasn’t the case originally. It appears that this information is stored in the BIOS chip. There seems to be no ill effects to leaving it like this, at least on Linux, but it is quite possible that you need to activate Windows again.12

The correct values should in theory be preserved in the original BIOS image. If I knew the offsets, I could copy over the information into the new BIOS image and attempt another flash, but unfortunately, Framework has no documentation on the BIOS layout. Another repairability issue. Still, this is why you should keep the damaged BIOS image around.

After configuring the BIOS, I rebooted the system and discovered that it couldn’t find the bootloader for Debian. This information is stored on the UEFI NVRAM, and clearly, that has been erased somehow during this ordeal.

Fortunately, there was a “boot from file” option, and I searched my SSD for EFI/debian/shimx64.efi and selected it, after which the GRUB menu showed up. You may need to adjust the path based on your distro, and select grubx64.efi if you don’t have secure boot.

The system booted normally after that, but I needed to reinstall the bootloader to avoid having to manually select the file every boot. On most distros, this can be done by running sudo grub-install /dev/nvme0n1p1, replacing /dev/nvme0n1p1 with your EFI system partition.13

Conclusion

If you find yourself in the same situation as me with a dead Framework laptop due to BIOS issues and no flashing tools, then getting the CH347 programmer is the way to go. It’s way better than the old CH341A in every way, and clearly, it was able to get the job done quickly. The actual flashing wasn’t that difficult once I knew what I was doing and acquired the tools, taking less than five minutes total.

As for Framework Computer Inc, I have a lot more to say…

First, it is clear that Framework’s BIOS updater is broken, at least on the AMD 7040 series. There clearly is some bug with the software that caused it to display what appears to be random memory on the screen, especially when this has happened before to other people for other BIOS versions, and even on the 16” laptops. At the same time, it somehow flashes the BIOS slower in regular operation than a cheap 15 MHz programmer over pogo pins, which really makes you wonder what it’s doing under the hood.

Secondly, Framework encourages users to perform BIOS updates in their newsletters, and yet if the update results in bricking, Framework has nothing to say except that I should throw away perfectly good hardware due to a firmware issue, simply because it’s out of warranty. While this behaviour may be legal per the warranty terms, it nevertheless is morally the wrong way to treat users. It also goes against the whole philosophy of reducing e-waste that Framework claims to believe deeply.

Thirdly, Framework claims to have made a repairable laptop, and I think my experience and the hoops I had to jump through to flash the BIOS have decidedly shown this not to be the case. Framework has undoubtedly created an easily serviceable laptop on which it is trivial to replace the RAM and SSD, but it is not a repairable laptop when the manufacturer simply told me to buy a new motherboard and CPU while offering zero assistance in the way of fixing it myself.

According to the Repair Association, an organization championing the right to repair, a key pillar of the right to repair is documentation:

Provide the same repair manuals, schematic diagrams, and other documentation to facilitate complete repairs.

In this regard, Framework has utterly failed. I had to figure out the entire flashing process myself from third-party resources. I even had to extract the raw flashable BIOS image myself.

Furthermore, from attempting this repair, I can see that Framework made many design decisions that made the repair much harder than it needs to be:

  1. Framework had no BIOS recovery option;
  2. While the Framework motherboard has silkscreen markings for a socketed BIOS chip, a BIOS chip was soldered instead;
  3. Framework chose to use a WSON form factor for their BIOS chip; and
  4. Framework chose to not provide a header for flashing the BIOS, which, when combined with issue #3, forced the use of pogo pins.

I think it’s especially egregious when you consider that brands that specifically aren’t repairable are able to recover from a bad BIOS flash, and that even my 2004 vintage motherboard could do so…

So really, while Framework claims to support the right to repair, their actions have shown quite the opposite. As such, I cannot in good conscience recommend Framework laptops to anyone in their current state.

Finally, it is not clear why Framework needs a “business intelligence” provider in the first place, let alone one that stores customer data in an insecure fashion. It is also not clear why this provider needed information like my phone number or street address. In the communication I’ve received, Framework did not explain why this information was shared or what they were doing with this data, nor has Framework provided any update on their investigation at the time of writing over a week later.

As the owner of a Framework laptop who wants to benefit from the upgradability down the line, I would like to see Framework clean up their act and deliver on the promise they made when they sold the product. As such, I call upon Framework to:

  1. Immediately stop encouraging any users out of warranty to update their BIOS until the updater is fixed;
  2. Fix the BIOS updater as soon as possible;
  3. Provide immediate relief to any out-of-warranty customers whose laptop was bricked through a BIOS update, either through motherboard replacement like warrantied customers, or the free delivery of a toolkit and detailed guidance to perform the repair;
  4. Provide official documentation for BIOS flashing, raw BIOS images, and instructions to restore the serial numbers and UUIDs;
  5. Design all future motherboards to be easily recoverable from bad BIOS flashes; and
  6. Immediately cease any unnecessary data sharing with third parties.

If Framework changes for the better, I might consider them again. Until then, I shall repeat the words that a certain Nanni wrote to Ea-nāṣir close to four millennia ago:

Kīma annikīam maḫšabam la dummuqām la amaḫḫaruka talammad. U ana ša tumeišanni nasiḫtam epūška.14

The translation depends on whom you ask, but it probably means something like:

Take cognizance that I will not accept any computer from you that is not of fine quality. And because you have treated me with contempt, I shall exercise against you my right of rejection.

Notes

  1. While the Framework DIY edition was cheaper to purchase, it was not in fact very DIY. The laptop came mostly preassembled, and the only things I had to do were putting in the RAM and SSD, connecting the input cover, closing the laptop, and installing the bezels. I was expecting to install the motherboard at least, not finishing off an almost-assembled laptop. 

  2. Back in 2023, I got close to a 50% discount buying them separately on Amazon instead of buying them bundled with the Framework laptop. Imagine that today… 

  3. Yes, technically, this is a Unified Extensible Firmware Interface (UEFI) firmware, since no one uses legacy BIOS these days. Still, a lot of manufacturers refer to UEFI firmware as “BIOS” because it’s the familiar term. I am loosely using the term “BIOS” here since that’s what Framework chose to call it. 

  4. I once owned a laptop with a Canadian Multilingual Standard keyboard, and it was just horrible to use, with extra keys for French cutting into the space you’d expect for the Enter key and the left Shift key. The actual layout, if you choose to use it in software, also uses AltGr15 and hijacks the right Ctrl as an additional modifier, despite not using the AltGr layer fully.

    The real kicker is that the layout is super unintuitive for typing French, which is its entire raison d’être, compared to the AltGr and dead keys-based layout that I constructed myself. My own layout can type most European languages, even those using the Greek and Cyrillic alphabets, with ease. One day, I might write something about constructing my own keyboard layout, but today is not the day. 

  5. I ultimately bought a Crucial 2×16 GiB DDR5 5600 MT/s kit for CA$154.80 after tax, a price that’s unimaginable today. Currently, that same kit is worth $854.18 before tax, though that might be because the Crucial brand is no more. Similar kits of SODIMMs from other brands at the same speed start at CA$570 before tax. 

  6. I ultimately bought a 1 TB Samsung 980 Pro, which cost CA$90.37 after tax, a price that’s also unimaginable today. It’s no longer in stock, but the 990 Pro goes for $400 at the time of writing. 

  7. I apologize for the low quality of this image, but I had bigger things to worry about than taking a good picture. 

  8. I’ve also been doing more soldering for some smart home sensors I am working on, which I plan to write about later. 

  9. Do you all still remember what a floppy disk is? Either way, talking about it dates how ancient motherboards with such recovery features are. 

  10. There is a 1.8 V CH347 on AliExpress as well, but that one supposedly has a software toggle between 1.8 V and 3.3 V and just seemed complicated to use compared to the regular 3.3 V version with a level shifter. 

  11. I would be impressed if Framework actually managed to leak the full credit card number. Most payment processors never reveal the full number to merchants using them, only the last four digits. 

  12. I wouldn’t know. Windows has never been installed on bare metal on either my desktop or laptop. 

  13. Technically, based on a reading of the grub-install source code on UEFI systems, you can pass any argument as long as you pass something, but let’s pass the ESP to be safe. 

  14. My Akkadian is very bad, but this is based on the last lines on the cuneiform tablet containing the oldest known customer complaint, with the word for copper replaced by “computer.” Obviously, computers didn’t exist back then, so I constructed maḫšabam based on the Semitic root ḥ-s₁-b used in the Arabic word حاسوب and the Hebrew word מחשב. I used the Latin alphabet instead of cuneiform because Unicode doesn’t support most of the signs used on the actual tablet. 

  15. The AltGr key is just the right Alt key, but mapped by a keyboard layout as its own modifier for typing additional characters on the keyboard, instead of being just another Alt key. 

The Daily Front Page 8 of 28
Tuesday, August 18, 2026 The Daily Front No. #260818 — Fairphone Arrives
article

Fairphone is now officially available in the United States

by Vinnl·▲ 359 points·178 comments·fairphone.com ↗
A smartphone can be made differently.

For nearly 16 years, our mission has been simple: to prove that a smartphone can be made differently. We’ve focused on creating technology that works well, lasts longer, and is made with genuine care for the people and materials behind it. Last year, we brought that vision to life with the Fairphone (Gen. 6), our clearest expression yet of what a responsible phone should be.

But we also listened to your feedback. You asked for more performance, more memory, and more personalization. Today, we are answering that call.

Today, we launch the Fairphone (Gen. 6+).

It is the Fairphone you already know, but better where it matters most.

More power. More performance.

The Fairphone (Gen. 6+) comes with upgraded internal hardware that doesn’t compromise on our industry-leading repairability standards. The ‘plus’ isn't about adding features for a longer spec sheet; it's about intentional improvements that keep your device capable for longer.

  • - The Fairphone (Gen. 6+) is powered by the Snapdragon® 7s Gen 4 processor, going up a generation compared to its predecessor.
  • - We’ve also increased the memory from 8GB RAM to 12GB DDR5 RAM. That’s the most we’ve ever put in a Fairphone!

Together, the combination gives the new Fairphone a significant boost in performance with smoother multitasking and a more fluid user experience, now and in the future. App loading and switching speeds are faster by up to 24% while system RAM reservation time is down by up to 20%. You’re also getting Android 16 out of the box, with the promise of six OS upgrades over its lifetime.

It’s everything you love. Plus more.

The Fairphone (Gen. 6+) builds on what made the Fairphone (Gen. 6) an award-winning bestseller for us. That’s also why we have also retained a lot of what made the original so good.

  • - Industry-leading warranty of up to five years.
  • - Software support guaranteed through 2033.
  • - Modular and repairable design with 12 user-replaceable parts.
  • - 256GB on-board storage (expandable upto 2TB with microSD)
  • - Triple-camera system with 50MP Sony Lytia 700c main camera
  • - 6.3” LTPO OLED Display
  • - Up to 53 hours of battery life on a single charge
  • - IP55 dust and water resistance

New edition, new color

The new Fairphone comes in Horizon Black and Forest Green, along with an exclusive Cobalt Blue colorway that’s more than a style statement. When we introduce a new color, it’s never just a design decision. The reason we zeroed in on Cobalt Blue is because it serves as a nod to our origin story as a conflict mineral awareness campaign and our commitment to fairly sourced raw materials.

Having said that, it’s quite the bold look that’s sure to make heads turn and get conversations going. And even better, you can make sure your accessories match as well, with the card holder, finger loop, and protective cover available in the new color as well. And yes, it's still as fair as ever: it contains 51% fair and recycled materials (by total weight), supports our living wage bonus program, is assembled under fair working conditions using renewable energy, and is 100% e-waste neutral!

Already own the Fairphone (Gen. 6)?

Updated Fairphone Moments: Our dedicated digital minimalist mode now offers even more control and more customization. Add new wallpapers, reorder your preferred apps, map new functionalities to the Switch button, switch on blue filter mode; there’s a lot more you can do with Fairphone Moments.

New Fairphone Gallery: You’ve been asking for this for a long time. Our new local gallery app allows you to store your photos and videos locally without depending on third-party services or paid cloud storage.

The best part? These software updates are also coming to the Fairphone (Gen. 6). It just wouldn’t be fair otherwise.

Hello, America!

This launch marks a massive milestone for us. Fairphone is now officially available in the United States. For the first time, sustainable tech enthusiasts across the pond can purchase a fully unlocked Fairphone (Gen. 6+) along with the Fairbuds and Fairbuds XL through our dedicated US web shop. And with the number of comments we see on our socials, this has been a long time coming!

Discover the Fairphone (Gen. 6+) today: Shop EU | Shop US *These figures reflect internal laboratory testing using SmartViser diagnostic tools under conditions designed to approximate real-world use. Actual performance may vary depending on factors such as device configuration, network conditions, and usage patterns.

®Snapdragon and Qualcomm branded products are products of Qualcomm Technologies, Inc. and/or its subsidiaries.

The Daily Front Page 9 of 28
Tuesday, August 18, 2026 The Daily Front No. #260818 — The RAM Reckoning
article

Memory prices climb 500% in 12 months

by haunter·▲ 550 points·453 comments·tomshardware.com ↗
Memory prices have become entirely divorced from reality.

Corsair DDR4 RAM

Analysis of historical price data trends indicates that the memory crisis has driven RAM prices to never-before-seen heights.

We're officially in dire straits. There's almost no way, if you're reading this site, that you aren't aware that memory prices have become entirely divorced from reality. Some are calling it the RAMpocalypse; I prefer "RAMageddon." Whatever you want to call it, though, the reality for PC builders right now is just grim. To put this in perspective, just take a look at our RAM price tracking post:

Memory Kit Best U.S. Price Lowest-Ever U.S. Price
DDR5-5200 16GB $239 $52
DDR5-5600 16GB $214 $199
DDR5-5600 32GB $394 $72
DDR5-6000 16GB $239 $197
DDR5-6000 32GB $392 $72
DDR5-6000 48GB $689 $144
DDR5-6000 64GB $849 $159
DDR5-6000 96GB $1,799 $189
DDR5-6400 128GB $3,399 $329
DDR5-6600 32GB $637 $158

That's right: 128GB DDR5 kits are fully ten times more expensive than the lowest price we've ever seen. Things improve as you step down the memory capacities and speed tiers, but not as much as we'd like. You're still looking at $392 for a memory kit that was just $72 last year.

To reinforce the point, I pulled the latest average price data from PCPartPicker, comparing where we are today (August 2026) to exactly one year ago. This data is somewhat approximate, but it should be broadly accurate.

DDR5 Memory Kit Pricing Change (2025 → 2026)
Memory Kit Speed & Size August 2025 Average Price August 2026 Average Price Change (YoY)
4800 MT/s 2×16GB $90 $425 +$335 (+372%)
5200 MT/s 2×16GB $100 $480 +$380 (+380%)
5600 MT/s 2×16GB $116 $528 +$412 (+355%)
6000 MT/s 2×16GB $108 $572 +$463 (+429%)
5600 MT/s 2×32GB $191 $1118 +$927 (+485%)
6000 MT/s 2×32GB $222 $1272 +$1050 (+473%)

The numbers speak for themselves; in just 12 months, the cost of DDR5 memory has essentially exploded. We are looking at year-over-year increases nearing 500% for high-capacity kits. A standard 64GB (2x32GB) DDR5-5600 kit that would have cost you under $200 last summer is now demanding over $1,100. It is a 5x multiplier on a component that used to be a fairly boring and predictable line item in a PC build budget.

DDR4 Memory Kit Pricing Change (2025 → 2026)
Memory Kit Speed & Size August 2025 Average Price August 2026 Average Price Change (YoY)
3200 MT/s 2×8GB $63 $163 +$100 (+159%)
3600 MT/s 2×8GB $75 $165 +$90 (+120%)
3200 MT/s 2×16GB $105 $281 +$176 (+168%)
3600 MT/s 2×16GB $120 $307 +$187 (+156%)
3200 MT/s 2×32GB $222 $614 +$392 (+177%)
3600 MT/s 2×32GB $300 $789 +$489 (+163%)

If you plan to just wait it out on an older AM4 or LGA1700 motherboard with DDR4, you'd better hope your memory holds out too, because DDR4 isn't safe from the fallout. With DDR5 entirely out of reach for most builders, the resulting scramble for older platforms running DDR4 memory has created a massive knock-on effect, and as a result, DDR4 kits are up anywhere from 120% to nearly 180% across the board. Nowhere near as bad as DDR5 pricing, but it still stings when a kit that was $105 last year is $281 this year.

A chart showing the average price of high-end 64GB memory kits over the last 18 months.

The prices of 64GB DDR5-6000 memory kits over the last 18 months. The darkened area is the range of prices, while the black line is the moving average. (Image credit: PCPartPicker)

This phenomenon is by no means exclusive to the US, either. German tech site ComputerBase have also been tracking this global trend, reporting just this week that average RAM prices in Europe have skyrocketed by 345% compared to September 2025. Their data shows the squeeze is bleeding into other components too, with hard drive and SSD prices both climbing over 125% in that same timeframe.

In fact, the situation is so severe that hyperscale buyers have reportedly already locked in almost all of the global DRAM production capacity for 2027, handing over advance deposits to guarantee their supply of precious DRAM, which is now among the highest-value commodities in the world by weight; mainstream DRAM chips are worth over half as much per kilogram as solid gold. PC and smartphone makers are simply fighting over the scraps, as low-priority markets compared to the extremely lucrative AI datacenter buildouts. And lucrative they are indeed; all four memory vendors (SK hynix, Samsung, Micron, and China's CXMT) have increased revenues by double, triple, or even more, all in just the space of one year.

A diagram of how high-bandwidth memory is constructed and connected to processors.

High Bandwidth Memory (HBM) manufacturing requires many individual layers of DRAM, which means radically fewer standard memory chips are getting made. (Image credit: AMD)

For consumer prices to drop, we would essentially need a major contraction in the AI market, which would mean a massive correction in financial markets worldwide. Absent that, the people actually making the chips don't see an end in sight. SK Hynix CEO Kwak Noh-jung recently warned that 2027 will be the worst year for memory supply in the industry's history, forecasting that demand will outstrip their ability to produce it well into 2030. ADATA's Chairman, Simon Chen, was even more pessimistic, suggesting this DRAM crisis could last another 10 years and dismissing the idea of an "AI bubble" bursting anytime soon.

The era of cheap, plentiful memory is over, at least for now. If you need RAM today, you're either going to have to bite the bullet and pay the premium, or learn to get by with less. Make sure you check out our RAM price tracking post for the best deals we found on memory, as well as some tips on how to secure solid deals yourself.

The Daily Front Page 10 of 28
Tuesday, August 18, 2026 The Daily Front No. #260818 — Learning by Making Worlds
article

Teaching my kid to code with a modern MUD

by andrewjanke·▲ 239 points·62 comments·tau.dev ↗
She wants to make the world.

My eight year old daughter wants to make video games.

She’s obsessed with this idea. She likes playing video games too, but it’s just not the same. Experiencing the world, even defeating the world, is too passive. She wants to make the world.

So I made her a game where she can make games. A multiplayer world made of text and images and a tiny new scripting language, where she can take anything and everything apart to see how it works. I first learned to code in the days when View Source was a reliable teacher, and I think she deserves the same.

The game has a lot of limitations. The language, Cant, is not a very good language, and that’s on purpose.

But it also turned out to be a lot of fun. I call it:

Canon

The Canon user interface. A web client featuring a multiplayer game history with text-based conversation and interactions, and optional images. In this example two players, Sky Captain Fal and Archdruid Wimdy Grove, greet each other outside a snowy mountain cabin and have a friendly snowball fight.

Canon is a modern, web-based take on the classic MUDs of the Old Internet.

For the uninitiated: back before World of Warcraft made the MMORPG a big studio genre, we had text-based MUDs (and MUCKs and MUSHes) where players could adventure and socialize in vast realms made of pure written words.

I spent countless hours exploring these imaginary places. I wanted to make something in that spirit that would feel more familiar to a modern audience.

Canon has strong opinions about what makes a good MU*, and what makes a good learning environment. Every room, object, and interaction in Canon is player-created, and it can all be inspected, copied, and modified.

The kiddo loves it. If you’re the kind of grownup who’s into roleplaying or text adventures, or has some nostalgia for the age of telnet and the early web, you might like it too.

But first, recipe blog style, let me tell you how we got here.


Training wheels for the bicycle for the mind

Do you remember HyperCard? If not, do you remember Myst? (If not, congratulations on being young. Bear with me.)

Bill Atkinson dreamed up HyperCard in 1985 after an LSD trip. I first encountered it in 1989, in my 4th grade computer lab, and also had my mind expanded.

HyperCard works like this: there are cards.

The default stack that greets new HyperCard users.

I mean, that’s pretty much it. That’s the genius. There are cards, and you can put computer things on them. Buttons and text and pictures and video. Cards get stacked together. A HyperCard app is called a “stack”. Get it?

And then all those buttons and pictures and things: you can make them clickable. And you can tell them to move between cards in the stack. It’s a choose your own adventure book as UX.

(If this sounds kind of like a web site, well, yes. HyperCard was one of the first real usable instances of HyperMedia and influenced Tim Berners-Lee’s development of the World Wide Web.)

on mouseUp
  go to card id 123
end mouseUp

That there is valid HyperTalk, the programming language underlying HyperCard. But for the most basic interactions like that – click a button, go to a card – you don’t even need to know HyperTalk. You can wire things up using a simple GUI editor.

HyperCard GUI for editing a button, including the ability to link that button to another target card.

If you can click a button you can use HyperCard. And if you can use HyperCard, you can program HyperCard.

I could write a whole series of posts about this. But the two things I want to impart to you now are as follows:

  1. HyperCard was magic.
  2. HyperCard sucked.

It was magic and it sucked

In many ways HyperCard stacks were not good apps. They were heavily constrained by the card metaphor. They used input elements from the MacOS visual language, but they did not, and could not, feel like normal native MacOS applications. HyperTalk made the same mistake later repeated by AppleScript: trying to make a programming language look more like natural language, thus failing to be either thing well.

To any real programmer it was a frustrating underpowered environment. But those same flaws and constraints made it magically accessible to two hungry groups: non-programmers and curious kids.

The first group produced a ton of stuff. The Internet Archive has a playable collection of thousands of stacks. If you remember the Early Web, just browsing the thumbnails should give you a familiar feeling. Games! Zines! Fandoms! Manifestos! Somehow porn! Before the web, people with a Mac and Something To Say traded stacks on floppies.

I fell into the second camp. At nine years old I found HyperCard on my elementary school’s Macintosh SE and quickly discovered that unlike most computer programs, everything in HyperCard was editable. I started making the first thing that popped into my mind, which was a Street Fighter style fighting game with two crudely drawn players.

Artist’s recreation of Untitled Stick Fighter Game. A crude human stick figure vs. what looks like some kind of dinosaur I guess?

Artist’s recreation. Alas, the original stack is lost to The Ages.
Which is what I call the box of dead floppies in my parents’ basement.

I didn’t know anything about programming, much less advanced gamedev concepts like sprites. But I knew I could link buttons to cards. So I did that. With the determination only a hyperfocused child can muster, I set about drawing individual cards for every possible combination of player moves and positions, with buttons as “controls” to move between them. I’d found me a hammer, and I could see how to make a game out of nothing but nails.

You’re on card 154. Player 1 is in quadrant 2, idling. Player 2 is in quadrant 3, defending. If player 1 presses the “attack” button, go to card...

It took me weeks staying late after school. But it worked. I made a game. I could play my own creation. I’ve spent my whole career chasing that high.

But that was just the beginning. One of the really clever things Bill Atkinson did was to make it so when you edited HyperCard behaviors with the GUI, it just wrote the corresponding code for you. About halfway through my laborious clicking-and-linking project, I noticed the Script… button in the editor, pieced together its implications, and started using a copy & paste HyperTalk snippet and a systematic naming scheme for all my hundreds of cards to speed up development.

Near the end the computer teacher (I’m pretty sure we just called the class “computers”) noticed what I was up to and dug the HyperCard Reference Manual out of a drawer for me. This was my first experience reading a tech manual cover to cover.


Many years later…

I’m not going to make my daughter learn HyperCard. I’m a bit of a Troll Dad, but not that mean.

But I did want to reproduce the magical combination of creative freedom and mechanical constraints that made HyperCard so eye-opening for young Nick. Canon needed:

  • Instant gratification. As soon as you put a thing on screen, it’s already part of the game.
  • View Source. Everything in the game should be built with the game’s own tools, and freely editable/copyable/take-apart-able.
  • A GUI for the simplest interactions.
  • A smooth learning gradient from GUI to writing raw code.
  • Just enough power in that code to build a wide range of fun game mechanics, and to teach basic programmer ways of thinking.
  • But limited enough that a beginner could grasp the entire set of primitives.

Instant gratification

The great thing about a text-based world is that you can add anything you want just by typing “there is a [thing] here”. You’re constrained in how you can build – no fancy 3D visualizations or impressively realistic physics engines – but have unlimited freedom in what you can build.

Canon is made of three things:

  1. Players
  2. Rooms
  3. Items

Players and Rooms are both just text descriptions and, optionally, images. To make either, you just answer a question: what does this look like?

Room description for the Space Station Cargo Bay: The bay is huge and mostly empty. One wall is missing, the atmosphere held in by some kind of energy field. It provides an impressive view of the planet below. Character description for the player Archdruid Wimdy Grove: Wimdy regards the world with a sleepy, far-off expression. You might need to say her name a few times to pull her attention to the here and now. But don't be fooled. The flowers that bloom at her feet, and animals that flock to her everywhere she goes, speak to the depths of her power.


View source

Items are everything else. They are also text descriptions and images, so you can flavor an item as anything you want: an inanimate object, a pet, an NPC, a spell effect, a vehicle, a doorway, a quest marker, a message, etc.

But in addition to text and images, items are also made of actions and state, via Cant. It looks like this:

item "Hooded Lantern" {
  describe "An iron lantern with a hinged hood."
  on "light" {
    narrate "{player}’s {item} swings open and warm light spills out."
  }
}

That’s enough to produce a lantern the player can light:

Screenshot of lighting the lantern in-game.

Here’s a slightly more complicated item, a magic 8-ball:

item "Magic 8-Ball" {
  describe "A prophetic billiard ball. Give it a shake?"
    or "Give it a shake to see your future."
    or "Dare you shake it?"
  on "shake" {
    say
      "It is certain."
      or "Outlook good."
      or "Signs point to yes."
      or "Don’t count on it."
      or "My sources say no."
      or "Reply hazy, try again."
      or "Ask again later."
  }
}

The or keyword works anywhere Cant takes a text string. It randomly picks a variant each time the string is used: when a player looks at an item, or triggers an action. I wanted this baked into Canon at the lowest level.

There’s something especially delightful, to a new programmer, about an RNG. You tell the computer what to do, and it does it. But you also told it to exercise a tiny bit of its own agency. It’s both surprising and not surprising. You programmed every response, you know all the things it can say, and yet you don’t know exactly what it will say when you press the key or click the button. It’s like suddenly being able to tickle yourself.

Screenshot of shaking the Magic 8-Ball in-game.

Notice in addition to shake, this item has a clone button. Every item in Canon can be cloned. Items you own (which include anything you’ve cloned) can be edited. Every game or toy or quest made by another player is also a tutorial.


A GUI for the simplest interactions

The 8-ball is one of the first toys I made to tempt the kiddo. I left it lying in the starting zone. Even when you know nothing about conditional logic, even if you don’t look at the code, it’s easy to see how it works from a few minutes of playing with the ball. And it’s easy to imagine how you could modify it into a flipping coin, or an NPC that tells random jokes.

Editing the Magic 8-Ball: the Cant example above in a structured GUI editor. Editing the Flipping Coin: a copy of the Magic 8-Ball, with the action renamed from shake to flip, and the spoken responses reduced to two: heads and tails.

Or, say, a D20:

Editing the D20: another variant on the 8-ball, with an individual spoken line for each number from one to twenty.

I am completely serious.

If you are a programmer, one thing you might notice about this is that it’s horrible. This is an inefficient way to write something that could obviously be randInt(1,20). But it is extremely approachable.

Cant is a language designed to be bad in educational ways. It’s optimized for ease of understanding over speed of writing. It’s the opposite of DRY.


A smooth gradient from GUI to code

Let’s expand that editor window a little:

Editing the D20 with the raw Cant: say 1! or 2! or 3! or 4! or, and so on.

An experienced programmer will notice this code could’ve been a one-liner. But a beginner will notice the code is already a lot less work than clicking 20 buttons and 20 text inputs.

The code and the structured editor are synced. Any valid expression in one immediately updates the other. I wanted this to tempt the kiddo the same way HyperCard’s Script… button tempted me.


Just enough power

Okay, saying random strings is fun, but it’s not much of a game. What else can this thing do?

A few examples:

item "Dueling Wand" {
  describe """
  A hazel {item} wound with copper wire, humming faintly.
    {when item vigor <= 0}Its light is out. A defeated duelist’s wand, until someone mends it.{end}
  """
  borne "A hazel {item} {when item vigor <= 0}hangs dark and quiet{else}crackles with impatience{end} in {player}’s grip."
  afield "A hazel {item} lies here, {when item vigor <= 0}its lights dimmed{else}crackling with magic potential{end}."
  state {
    vigor 30
  }
  on "fireball" {
    when item vigor > 0 {
      when target vigor > 0 {
        subtract target vigor 1d20
        narrate "{player}’s {item} roars! A ball of fire breaks over {target}."
        when target vigor <= 0 {
          narrate "{target}’s wand goes dark. {player} stands victorious."
        }
      }
      otherwise {
        narrate "{player}’s {item} finds no one standing to strike."
      }
    }
    otherwise {
      narrate "{player} attempts to cast but their {item} is dark until mended."
    }
  }
  on "mend" {
    when target vigor >= 30 {
      narrate "{player}’s wand hums, finds nothing to mend on {target}, and declines to waste the charm."
    }
    otherwise {
      add target vigor 1d10
      narrate "Green light from {player}’s {item} knits itself over {target}."
      when target vigor > 30 {
        narrate "{target} sparkles briefly with excess power."
        set target vigor 30
      }
    }
  }
}

This is a PVP encounter. Two or more players can pick up Dueling Wands and fight each other. The key thing to notice here is:

  state {
    vigor 30
  }

Items in Canon can hold two kinds of state: marks and numbers.

Marks are boolean flags. A lantern could be LIT, an NPC could be SUSPICIOUS, a door could be LOCKED.

Numbers are what they sound like. A campfire could have warmth 10, an NPC could have health 20, a pickable lock could have attempts 5.

Marks are always UPPERCASE, numbers always lower. The casing is the type.

Note also that vigor above is on the wand, not the player. Players have no state themselves, only on the items they carry. When you target a player with a fireball, you are targeting their wand. Or rather, you are targeting any items they carry that answer to state vigor .

In this way, all encounters and mini-games in Canon are consensual and opt-in. Don’t want to duel? Simply don’t pick up the wand.

State names are completely arbitrary. This wand has vigor, but another set of weapons might have life or health or stamina. You can build a suite of items that all answer to the same state and interact, or pick unique names for unique encounters.

Here’s an NPC using both marks and dialog:

item "The Dialog Tree" {
  describe "A talking tree, only too happy to bend your ear about the joys of being a plant."
  remembers
  state {
    PLEASED false
  }
  on "chat with the tree" {
    dialog
      "Welcome, welcome, have a seat…"
      or "Hello there, little animal…"
    {
      choice "How’s being a tree?" {
        dialog "Oh, the absolute best! You simply must try photosynthesis."
        mark item PLEASED
      }
      choice "Uh, excuse me, I was just leafing…" {
        narrate "{item} looks a little crest… er, branchfallen."
        unmark item PLEASED
      }
    }
  }
}

This creates your classic RPG dialog box. Dialog can nest arbitrarily deep, and contain any other Cant effect as the result of a dialog choice, or present different choices based on number and mark state.

Screenshot of chatting with the Dialog Tree

Notice the tree’s mood changes depending on your answer, tracked by the PLEASED mark.

Screenshot of disappointing the Dialog Tree

The remembers keyword tells an item to retain its state when left alone in an empty room. Without it, state resets when no players are around so encounters are fresh for new visitors. In the Dialog Tree’s case, we want it to retain its mood from whoever last spoke to it.

If you look closely you can also see the Dialog Tree’s image changes. Item images can respond to marks and numbers. Cant is all about text, so images are handled separately in the item editor:

State-based image switching of the Dialog Tree

The same is true for Players. You can change your character’s image based on the state of whatever items they carry. Here’s a simple paper doll item that has no action, but does set a state:

item "Fancy Red Pirate Coat" {
  describe "A fancy red coat, fit for a pirate captain."
  state {
    OVERCOATED true
  }
}

And here is a player where both text description and active image respond to the presence or absence of the coat:

Screenshot of the player description editor with a responsive description and images showing Sky Captain Fal with and without his fancy coat

Rather than (or in addition to) altering a player’s descriptive text, we can also give items an optional borne description which is appended to the player’s description.

item "Fancy Red Pirate Coat" {
  describe "A fancy red coat, fit for a pirate captain."
  borne "{player} is fashionably draped in a {item}."
  state {
    OVERCOATED true
  }
}

Screenshot of Sky Captain Fal's image and description without a coat Screenshot of Sky Captain Fal's image and description wearing a coat

You can play character customizer (many people’s favorite game in any game!) all day long, with just text and images.

You can make a lot of fun dynamic objects with images and conditionals and state. But a simple bit of flavor text is still often the best part. Out of all the items I’ve made, my daughter’s favorite (or at least most frequently employed) remains the humble snowball:

item "Snowball" {
  describe "An expertly packed snowball."
  on "throw" {
    narrate "{player} hits {target} in the face with a snowball! _Paff!_"
  }
}

But not too much

You may notice in both the Dueling Wand and responsive player/item images above, conditionals are very limited. Each when takes a single condition. There is no and, or, etc. There is also no equivalent of else if. when takes a single condition, and a single optional otherwise block. If you want more complicated control flow, you can nest when. Again, this will probably strike an experienced programmer as bad, but it serves a purpose.

For one thing, the structured editor is complicated enough. The Dueling Wand alone, while far from the most sophisticated item you can build, gets visually noisy:

Screenshot of nested conditions in the GUI action editor.

Adding optional combining blocks would make it harder to navigate. But more to the point, the simple when is meant to be good enough exactly until it isn’t.

Cant is a language designed to be frustrating in enlightening ways. A reasonable objection might be that it will teach bad coding habits. But from my own childhood experience, what it will actually teach is why the good habits are good and how the layers of abstraction and expressibility get built one on top of another.

The kiddo is already building cool stuff with Cant. Eventually she’ll become annoyed with its limitations. But at that point she will also be able to articulate those limitations, and imagine ways it could be improved. And that will be a gateway. When she graduates to a bigger fuller more expressive programming language, she’ll understand why it’s better.


Adversarial mindset

Another thing I want Canon to teach is how to hack. Programming outside the lines. The kid is already very fond of mischief and loopholes, so this is playing to her strengths.

You may have noticed a slight flaw in some of the examples above. If you can edit every Dueling Wand, you can just edit your own wand to give yourself extra vigor, or never take damage. If you can edit every dialog, you can just sneak a peek to see which choices give you the ending you want. Every encounter is hackable.

This, too, is intentional. For purposes of nurturing a growing engineer brain, creating puzzles, beating puzzles, and hacking puzzles are all win conditions.

From the broader game perspective, it’s part of “everything is consensual”. Canon has no permanent points to win or lose. There are no scarce resources attached to your character that someone can cost you. The only reason to have a PVP duel is to have fun with your friends. The only reason to play a mini-game, or fulfill a quest someone crafted, is to have the experience they crafted for you. Or if you’re the sort of person who has more fun taking apart the experience to see how they made it, you can do that too.

That said, there are a few concessions to authorial control. The main one is Kingdoms. The Canon map consists of a shared overworld, and individual zones belonging to each player. The overworld is mostly a flavorful way to travel between Kingdoms, and not a secure place to leave things. Anything you set down in the overworld can be picked up by another player. But in your Kingdom, only you can place items in a room, and only you can remove them. Other players can clone your creations to figure out how they work, but they can’t modify the originals. This lets you create stable multi-room, multi-item games and encounters.

Want a quest where you talk to a series of NPCs in different villages to piece together a mystery? Or have to find the right keycards to open the right doors in a maze? Or you collect and tend to an egg with the right magical ingredients to hatch a baby dragon? Those are all easy to make in your Kingdom.


Chutes and ladders

A Canon map looks like this:

Screenshot of the map view. Rooms are nodes in an abstract graph with no specific dimensions.

This is an overworld. The colored nodes with glyphs are entrances to Kingdoms, which have their own maps. In both cases, the map data structure is a tree, or an undirected acyclic graph. The map grows only by budding new rooms, never by connecting two existing rooms.

This has some desirable properties:

  • With no fixed dimensions, a “room” can be anything you describe. You can make a literal single room in a building, or a whole building, or a vast terrain. An empty void. A pocket universe. A state of mind. The abstract map matches the total freedom of text.
  • It allows Kingdom owners to lock their doors, creating private lairs, invite-only guild halls, and puzzles that depend on gated movement, while enforcing that locks only work in the direction away from the root node. In Canon you can lock someone out, never in. You can make lairs, but you can’t make dungeons.
  • It teaches the kiddo something about user interface abstractions and the clever sorts of hacks that go into game design. For example:

Many popular level designs cannot be expressed purely in Canon’s map structure. Imagine a network of treehouses, connected by rope bridges, above a forest floor. The treehouse village is a series of connected rooms to the north, south, east and west. The forest floor is the same. Each forest floor room should also be connected to its matching canopy room by up and down exits, but these would form cycles in the map graph.

Canon solves this the way DOOM did: by faking it. A teleport Cant action attached to an item offers to transport players between arbitrary rooms.

item "Rope Ladder" {
  describe "A rope ladder, dropping out of the canopy like an invitation."
  on "climb" {
    say "The rungs creak under you."
    teleport "lomise-anthil-nara"
    narrate "{player} hauls up out of sight."
  }
}

The quoted address is the destination room’s locus: a randomly generated id you can only learn by standing in the room. This is so the Cant remains portable, but you can’t simply guess the address of an unfamiliar room, since teleportation can bypass locks. (That’s right, token security is also on the curriculum!)

Ladders and elevators are just the start. You can use teleportation to build:

  • Mounts: create a Horse or a Motorcycle or a Dragon to carry you to different destinations with a ride action.
  • NPCs: combine dialog and teleport for an Elevator Attendant or Portal Mage.
  • Hearthstones and Bookmarks: found a cool spot on the map? Craft yourself a quick teleport to return to it any time.

Agents and gen α

I seeded Canon with a bunch of toys and games for the kiddo to take apart and remix. But I wanted to make sure she could create her own stuff from the start. So I also included a Wish function. Once a day, each player can Wish to the Machine God. An LLM will craft an item to your specifications, including functional Cant with explanatory comments.

Screenshot of wishing to the LLM

# Built by The Machine, but yours to change. Edit freely!
item "Laughing Coat" {
  describe "A long coat of storm-grey wool, its collar high and its lining stitched with a grinning seam that never quite lies flat, as if it is always about to find something funny."
  borne "A long coat rides {player}’s shoulders, and every so often it shudders and lets out a low, delighted chuckle at some peril only it can see, as though danger were the finest joke ever told."
  on "pickup" {
    # fires by itself whenever someone takes this up – narrate paints the moment for the whole room
    narrate "{player} shrugs into a long grey coat, and it settles across their back with a satisfied little snicker."
  }
  on "drop" {
    # …and this fires when it is set down again
    narrate "A long grey coat slips from {player}’s shoulders and folds itself into a heap, its laughter dwindling to a sleepy, contented wheeze."
  }
}

Cool, right?

Here are two pieces of feedback I’ve received, each from multiple adults who’ve tried Canon:

  1. “I love everything except Wish. I hate AI and don’t want it anywhere near my creative outlets. You should warn people when they sign up that this includes an LLM.”

  2. “Instead of just uploading my own images, there should be a button I can press to make an AI generate an image from the description I wrote!”

I’m not sure what to make of this.

Wish is the only AI feature in Canon, and it’s strictly limited to a single tutorial item per day. In a gameworld where everything else is explicitly written by humans for humans. And that alone was instantly polarizing.

Among grownups, anyway. The kiddo had a healthier attitude: total indifference. She took right to wishing for things, and then immediately overwriting them with her own words and imagination. She is equally likely to use images from GIPHY, Image Playground, and her own Photo Library full of original pictures and drawings. AI is just another tool to her.

Canon started many years ago, before the kiddo was born. I like virtual worlds and wanted to try my hand at making one. (I was going to include a section here about all the opinionated stuff I put into Canon that isn’t about programmer pedagogy, but about making a friendly, collaborative, social place out of text. But this is very long already. Perhaps that’ll be a separate post.)

Alas, I had far more ideas than time to devote to it, so it went on the shelf.

Lately I’ve been dusting off old side projects and 10xing them with Claude. Far from spoiling the magic, it’s reinvigorated my love of coding. Making Canon was delightful, involved a whole lot of my judgement and years of experience as an engineer, and went way faster than I could have accomplished alone.

But then I also did make a game where my kid and I lovingly hand craft code together. Even if the future is agentic everything, I think learning Cant will teach her useful skills and mental habits. And it’s just fun. That, too, has been reinvigorating.


Yoink

I’ll leave you with some quotes from my satisfied user base of one energetic eight year old:

“You mean I can make anything I want?! Characters? Quests? Stories?! :D”

me: “Why is your inventory so full? Wait, why do you have ten of everything? You know you can just keep one and clone it, right?”

kiddo: “Yeah, I know. But I have ten!

me: “You’ve managed to be a loot goblin in a game with no loot.”

me: [maniacal giggling]

kiddo: “I broke into your house and stole all your stuff!”

me: “You mean you solved my riddle. Good job. But you can’t steal from my kingdom, only clone. I would know, I wrote it that way.”

kiddo: “Yeah, but I cloned everything ten times, which means I have more of your stuff than you do!

me: …

me: [maniacal giggling]

“I know what we should make! We should make an item that’s a computer. And when your character plays the computer, they’re playing Canon!

Only eight and she already thinks recursion is funny. She really is my little engineer.


Try it for yourself

Canon is decidedly beta, but you can play it! Just shoot a short human-to-human email to nick@tau.dev and I will personally send you an invite code.

Once in you’ll be able to invite friends with your own code. I want to keep growth slow for now, but everyone genuinely curious is welcome.

There are Canon and Cant features I haven’t touched on here. Documentation is sparse, but that’s part of the game. Poke and prod and tinker. Your inner eight year old knows what to do.

The Daily Front Page 11 of 28
Tuesday, August 18, 2026 The Daily Front No. #260818 — Sugar, Then and Now
article

Babies born under sugar rationing grew into adults with lower cancer risk

by zeristor·▲ 270 points·56 comments·theconversation.com ↗
Could how much sugar you consumed before your second birthday shape your health decades later?

Could how much sugar you consumed before your second birthday shape your health decades later – even into your 70s?

A new study that my colleagues and I conducted suggests the answer could be yes. People who had less sugar exposure during the first few years of life were much less likely to develop several different cancers later in life, and they also showed signs of slower biological ageing. We also found that even in adulthood, they continued to consume less sugar and had healthier diets overall.

This is not an easy question to study in real life. Researchers obviously can’t run that experiment on real babies – split them into groups, feed one group sugar, then wait 70 years to see what happens.

Britain’s postwar sugar rationing offered a rare alternative. After the second world war, sugar remained rationed in Britain for several years. But in September 1953, rationing ended and people started eating a lot more sugar. Consumption nearly doubled. This meant that children born just a few months apart had very different levels of sugar exposure both in the womb and during early childhood.

For our study, we used data from over 64,000 people born in Britain between 1951 and 1956. Those born earlier spent a larger share of their first 1,000 days under sugar rationing, while those born later experienced progressively less of it.

By the first 1,000 days, we mean the period from conception to a child’s second birthday. This is a critical stage because the body is developing very rapidly. Organs are growing, metabolism is taking shape, and the immune system is maturing.

Food and taste preferences also begin to form during this period. Although 1,000 days is a relatively short period, the effects of the food environment during this stage can last throughout a person’s life.

To track cancer cases, we used the UK Biobank – a huge health database that follows participants for decades and records, among other things, who develops cancer and when.

We found that people who experienced longer periods of sugar rationing during their first 1,000 days had a lower incidence of five types of cancer: breast, prostate, liver, rectal and lung cancer. The effect was strongest for liver cancer, where rates were around 69% lower, and weakest – though still substantial – for breast cancer, at 36% lower. Importantly, these differences only began to appear decades after sugar rationing had ended.

We also found that exposure to sugar rationing is related to biological ageing. Biological age is not the same as chronological age. Two people may both be 70 years old, while their cells and immune systems show different levels of ageing.

One way we measure biological ageing is through telomere length. Telomeres are protective structures located at the ends of chromosomes. As cells age, telomeres usually become shorter.

Telomeres explained.

We found that people who experienced longer periods of sugar rationing during their first 1,000 days had longer telomeres. Based on our estimates, this difference is equivalent to about 2.2 years of slower biological ageing.

We also found lower levels of a protein called granzyme B, which rises when the immune system has been working overtime for years – another sign of slower ageing at a cellular level. Taken together, these results suggest that lower sugar exposure early in life may be related to slower ageing at the cellular level.

The sugar habit that lasted 50 years

What is most surprising, however, is not the cancer results or the biological markers of ageing. It’s how early-life sugar exposure continued to affect people’s diets even 50 years later.

We found that people who experienced sugar rationing early in life still consumed less sugar in adulthood, around age 50. They also ate less overall, and their diets were healthier and more diverse. This suggests that the level of sweetness people are exposed to very early in life may shape their taste preferences for a long time.

There appear to be two mechanisms at work. One is biological – early nutrition may shape how the metabolism, organs and immune system develop. The other is behavioural – a taste for less sweetness, formed early, seems to stick.

Other research using the end of Britain’s sugar rationing has also found that people who experienced more sugar rationing early in life had lower risks of type 2 diabetes and hypertension. A recent study using the same end of Britain’s sugar rationing found lower risks of dementia and Alzheimer’s disease, while another study reported lower risks of heart disease and stroke.

This does not mean that children should not eat sugar at all, and it certainly does not mean that postwar sugar rationing is a desirable policy. What this historical evidence shows is that, during a critical period of development, even relatively small differences in sugar exposure over a short period may leave effects that are still observable half a century later.

Children may not remember what they ate before age two. But their later health, their bodies and even their taste preferences may still carry the imprint of those very early-life experiences.

The Daily Front Page 12 of 28
Tuesday, August 18, 2026 The Daily Front No. #260818 — Compressed Search
repository

Turbovec – Google's TurboQuant for vector search in Rust

by fittingopposite·▲ 223 points·30 comments·github.com ↗
★ 15,410⑂ 1,356 forks Rust

A vector index built on TurboQuant, written in Rust with Python bindings

turbovec — Google's TurboQuant for vector search

A 10 million document corpus takes 31 GB of RAM as float32. turbovec fits it in 4 GB - and searches it faster than FAISS.

turbovec is a Rust vector index with Python bindings, built on Google Research's TurboQuant algorithm — a data-oblivious quantizer with near-optimal distortion and no separate training phase.

  • Online ingest. Add vectors, they're indexed — no train step, no parameter tuning, no rebuilds as the corpus grows.
  • Fast SIMD search. Hand-written kernels — NEON SDOT/SMMLA on ARM, AVX-512 VNNI and vpermb on x86, with AVX2 and scalar fallbacks — beat FAISS IndexPQFastScan in every measured config, averaging 3.4× at 4-bit and 23% at 2-bit across the eight cells of each width, on both architectures.
  • Incremental saves. sync(path) persists just what changed since the last sync — one fsync per call, crash-safe at any byte, and a removal or a small append costs milliseconds however large the index. write/load stay for whole-file snapshots.
  • Filter at search time. Pass an id allowlist (or a slot bitmask) to search() and the kernel honours it directly. You always get up to k results from the allowed set — no over-fetching, no recall hit on selective filters.
  • Pure local. No managed service, no data leaving your machine or VPC. Pair with any open-source embedding model for a fully air-gapped RAG stack.

Building RAG where privacy, memory, or latency matters? You're in the right place.

Python

pip install turbovec
from turbovec import TurboQuantIndex

index = TurboQuantIndex(dim=1536, bit_width=4)
index.add(vectors)
index.add(more_vectors)

scores, indices = index.search(query, k=10)

index.write("my_index.tv")
loaded = TurboQuantIndex.load("my_index.tv")

index.sync("my_index.tv")   # after more changes: durable incremental save

vectors and query are 2-D float32 arrays of shape (n, dim) — other dtypes are rejected rather than silently converted, so cast with np.asarray(x, dtype=np.float32) first if needed.

Need stable ids that survive deletes? Use IdMapIndex:

import numpy as np
from turbovec import IdMapIndex

index = IdMapIndex(dim=1536, bit_width=4)
index.add_with_ids(vectors, np.array([1001, 1002, 1003], dtype=np.uint64))

scores, ids = index.search(query, k=10)   # ids are your uint64 external ids
index.remove(1002)                         # O(1) by id

index.write("my_index.tvim")
loaded = IdMapIndex.load("my_index.tvim")

index.sync("my_index.tvim")   # durable incremental save, ids included

Hybrid retrieval (filtered search)

Restrict results to a candidate set produced by another system (SQL, BM25, ACL, time window, …):

import numpy as np
from turbovec import IdMapIndex

idx = IdMapIndex(dim=1536, bit_width=4)
idx.add_with_ids(vectors, ids)

# Stage 1: external system narrows to candidate ids.
allowed = np.array(db.execute("SELECT id FROM docs WHERE tenant=?", (t,)).fetchall(),
                   dtype=np.uint64)

# Stage 2: dense rerank within the candidate set.
scores, ids = idx.search(query, k=10, allowlist=allowed)

Filtering happens inside the SIMD kernel at 32-vector block granularity: blocks with no allowed slots are short-circuited before any LUT lookup or scoring work, and individual non-allowed slots inside scored blocks are dropped at heap-insert. Selective allowlists (small fraction of the index allowed) therefore avoid most of the SIMD cost rather than paying it and discarding the result afterwards.

The output length is min(k, n_allowed), where n_allowed counts distinct allowed vectors — when fewer vectors are allowed than k you get exactly that many results rather than padded fallbacks.

See docs/api.md for the full reference.

Framework integrations

Drop-in replacements for the in-tree reference vector / document stores in each framework. Same public surface, same persistence semantics, same retriever and pipeline wiring — swap the import and keep your pipeline.

  • LangChainpip install turbovec[langchain] · replaces langchain_core.vectorstores.InMemoryVectorStore
  • LlamaIndexpip install turbovec[llama-index] · replaces llama_index.core.vector_stores.SimpleVectorStore
  • Haystackpip install turbovec[haystack] · replaces haystack.document_stores.in_memory.InMemoryDocumentStore
  • Agnopip install turbovec[agno] · replaces agno.vectordb.lancedb.LanceDb

Rust

cargo add turbovec
use turbovec::TurboQuantIndex;

let mut index = TurboQuantIndex::new(1536, 4).unwrap();
index.add(&vectors);
let results = index.search(&queries, 10);
index.write("index.tv").unwrap();
let loaded = TurboQuantIndex::load("index.tv").unwrap();

For stable external ids that survive deletes:

use turbovec::IdMapIndex;

let mut index = IdMapIndex::new(1536, 4).unwrap();
index.add_with_ids(&vectors, &[1001, 1002, 1003]).unwrap();
let (scores, ids) = index.search(&queries, 10);
index.remove(1002);
index.write("index.tvim").unwrap();
let loaded = IdMapIndex::load("index.tvim").unwrap();

Recall

TurboQuant vs FAISS IndexPQ (LUT256, nbits=8) — the paper's Section 4.4 baseline. 100K vectors, k=64. FAISS PQ sub-quantizer counts sized to match TurboQuant's bit rate (m=d/4 at 2-bit, m=d/2 at 4-bit).

Recall GloVe d=200

Recall d=1536

Recall d=3072

The charts plot calibrated TurboQuant (TQ+). Across OpenAI d=1536 and d=3072, TQ+ beats FAISS at R@1 on three of four cells (by 0.9–2.9 points; d=1536 4-bit trails by 0.7), and both reach 1.0 by k=8 (≥0.997 already at k≤4). GloVe d=200 is the harder regime — at low dim the asymptotic Beta assumption is looser. TQ+ lands ahead of FAISS at R@1 at both bit widths (+1.9 at 4-bit, +0.8 at 2-bit), with FAISS keeping a slim edge at 2-bit from k≈8. Uncalibrated numbers are in the JSONs (tq_recalls).

A note on baselines. We compare against FAISS IndexPQ (LUT256, nbits=8, float32 LUT) because it's the default production-grade PQ most users would reach for. This is a stronger baseline than the custom u8-LUT PQ in the TurboQuant paper — FAISS uses a higher-precision LUT at scoring time and k-means++ for codebook training. We reproduce the paper's TurboQuant numbers on OpenAI d=1536 / d=3072 and hit similar numbers to other community reference implementations on low-dim embeddings (see turboquant-py at d=384). On GloVe (d=200) — the low-dim regime where the asymptotic Beta assumption is loosest — TurboQuant lands ahead of FAISS at 4-bit but trails it at 2-bit; TQ+ calibration recovers the 2-bit deficit at R@1 (0.572 vs FAISS's 0.564), with FAISS keeping a slim edge at deeper k.

Full results: d=1536 2-bit, d=1536 4-bit, d=3072 2-bit, d=3072 4-bit, GloVe 2-bit, GloVe 4-bit.

Compression

Compression

Search Speed

All benchmarks: 100K vectors, 1K queries, k=64, median of 5 runs.

ARM (GCP c4a-standard-8, Google Axion, 8 vCPUs)

ARM Speed — Single-threaded

ARM Speed — Multi-threaded

On ARM, TurboQuant beats FAISS FastScan in every config, averaging 3.5× at 4-bit (3.4–3.7× across cells — the SDOT/SMMLA dot-product kernels score the vector-major layout directly) and 26% at 2-bit (22–29%).

x86 (Intel Xeon Platinum 8481C / Sapphire Rapids, 8 vCPUs)

x86 Speed — Single-threaded

x86 Speed — Multi-threaded

On x86, TurboQuant wins every config, averaging 3.4× at 4-bit (3.2–3.5× across cells — the AVX-512 VNNI dot-product kernel on the vector-major layout) and 20% at 2-bit (5–32%), where the vpermb LUT scan carries the short 2-bit accumulate loop.

Insertion & Removal Latency

Same corpus as the search cells: 100K OpenAI vectors, median of 5 runs, timed loops including the Python-call overhead a caller actually pays per op. Insertion measures per-vector add() latency on a warm, populated index (built untimed) at n=1 — a single-vector add() — and n=100 — a 100-vector batch, showing how far batching amortizes the per-call overhead — against add() into the trained, populated FAISS IndexPQFastScan (training untimed). A single add() lands in 6.3–19.7 µs depending on the cell (7.6–13.9× faster than a FAISS single add), and a 100-vector batch amortizes TurboQuant to 4.6–16.3 µs/vector (4.6–15.1× faster than the same batch into FAISS). Removal measures per-op remove-by-id latency at n=1 (the steady per-op rate over 1000 removes) and n=100 (the first 100 removes on a fresh index): IdMapIndex.remove(id) — O(1) swap-and-pop plus the id-map bookkeeping — lands at 0.44–1.22 µs and 0.59–1.37 µs per op across the cells. The FAISS column is the same user-visible operation, remove_ids on an IndexIDMap over IndexPQFastScan, which repacks the stored codes on every call: 0.19–1.02 s per single remove at 100K, with cost doubling alongside code size — which is why the removal charts use a log-scale axis. Charts show the single-threaded cells (RAYON_NUM_THREADS=1); the _mt cells are measured too and match at n=1, since a single add is serial. Scripts: benchmarks/suite/.

ARM (GCP c4a-standard-8, Google Axion, 8 vCPUs)

ARM Online Insert Latency — Single-threaded

ARM Online Remove Latency — Single-threaded

Full results: d=1536 2-bit insert, d=1536 4-bit insert, d=3072 2-bit insert, d=3072 4-bit insert, and the matching speed_remove_* and _mt files.

x86 (Intel Xeon Platinum 8481C / Sapphire Rapids, 8 vCPUs)

x86 Online Insert Latency — Single-threaded

x86 Online Remove Latency — Single-threaded

Full results: d=1536 2-bit insert, d=1536 4-bit insert, d=3072 2-bit insert, d=3072 4-bit insert, and the matching speed_remove_* and _mt files.

Save & Load

Same corpus as the search cells: 100K OpenAI vectors, median of 5 runs. TurboQuant serializes to a single .tv file with an fsync + atomic rename; FAISS is write_index / read_index on the precision-matched IndexPQFastScan (sub-quantizer count matched to TurboQuant's bit rate, as in the search cells). Save (warm) is a write after a search has run, so the blocked layout cache is populated. Load → first search opens a fresh index and times the first query — separating bare deserialization (the page cache is warm throughout, so this is layout work, not cold-storage I/O) from the first-query cost. Round-trip chains the checkpoint/resume cycle an embedding store actually pays — mutate 1K vectors → save → reopen → serve the first query; FAISS has no measured equivalent for this path, so it is shown for TurboQuant only. On the smaller payloads the round-trip can come in below the isolated post-mutation ("dirty") write: the two are timed in separate suite steps, and at small file sizes the standalone fsync in the dirty-write step dominates and inflates it — a measurement artifact of the harness, not a repack win in the combined path. Single-threaded cells pin RAYON_NUM_THREADS=1. Scripts: benchmarks/suite/.

ARM (GCP c4a-standard-8, Google Axion, 8 vCPUs)

ARM Save/Load — Single-threaded

ARM Save/Load — Multi-threaded

Full results: d=1536 2-bit persist ST, MT, d=1536 4-bit persist ST, MT, d=3072 2-bit persist ST, MT, d=3072 4-bit persist ST, MT.

x86 (Intel Xeon Platinum 8481C / Sapphire Rapids, 8 vCPUs)

x86 Save/Load — Single-threaded

x86 Save/Load — Multi-threaded

Full results: d=1536 2-bit persist ST, MT, d=1536 4-bit persist ST, MT, d=3072 2-bit persist ST, MT, d=3072 4-bit persist ST, MT.

How it works

Each vector is a direction on a high-dimensional hypersphere. TurboQuant compresses these directions using a simple insight: after applying a random rotation, every coordinate follows a known distribution -- regardless of the input data.

1. Normalize. Strip the length (norm) from each vector and store it as a single float. Now every vector is a unit direction on the hypersphere.

2. Random rotation. Multiply all vectors by the same random orthogonal matrix. After rotation, each coordinate independently follows a Beta distribution that converges to Gaussian N(0, 1/d) in high dimensions. This holds for any input data -- the rotation makes the coordinate distribution predictable.

3. Per-coordinate calibration (TQ+). The Beta distribution from step 2 is asymptotic — at finite dimensions, individual coordinates drift from the canonical shape (especially low-bit and word-vector-style embeddings). TQ+ fits two scalars per coordinate — a shift and a scale — mapping each coordinate's empirical quantiles onto the codebook's outermost centroids. The probability level comes from the codebook, so it tracks the bit width (~0.933 at 2-bit, ~0.996 at 4-bit) rather than being fixed. The Lloyd-Max codebook then quantizes against the target distribution it was designed for. The fit is explicit: call index.calibrate(sample) once with a random, representative sample of your vectors (~1024 rows is enough — a draw of that size matches fitting on the whole corpus) before adding; afterwards the calibration is committed and reused by every add — no retraining, no rebuilds, no separate train phase. An index you never calibrate is plain TurboQuant. index.calibration_state reports "uncalibrated" or "calibrated". Recall gain: up to +2.2pp at @1 on the cells that drift most (e.g. GloVe at 2-bit).

4. Lloyd-Max scalar quantization. Since the distribution is known, we can precompute the optimal way to bucket each coordinate. For 2-bit, that's 4 buckets; for 4-bit, 16 buckets. The Lloyd-Max algorithm finds bucket boundaries and centroids that minimize mean squared error. These are computed once from the math, not from the data.

5. Bit-pack. Each coordinate is now a small integer (0-3 for 2-bit, 0-15 for 4-bit). Pack these tightly into bytes. A 1536-dim vector goes from 6,144 bytes (FP32) to 384 bytes (2-bit). That's 16x compression.

6. Length-renormalized scoring. Scalar quantization systematically underestimates inner products — the reconstructed unit direction is a little shorter than the original. We compute one scalar per vector at encode time — the inner product of the rotated unit vector with its own centroid reconstruction — and store ||v|| / ⟨u, x̂⟩ alongside each compressed vector. The search kernel multiplies the per-candidate score by this scalar before heap insertion, turning the inner-product estimator from downward-biased into unbiased at zero search-time cost and zero extra storage. The recall gain shows up most at low bit widths, where the quantization shrinkage is largest.

Encoding cost: one extra d-dimensional dot product per vector to compute ⟨u, x̂⟩. On 1M vectors at d=1536 this is sub-second of additional encode time — a one-shot price paid at ingest, not at query.

Search. Instead of decompressing every database vector, we rotate the query once into the same domain and score directly against the codebook values. The scoring kernel uses SIMD intrinsics (NEON on ARM; AVX-512BW on modern x86, falling back to AVX2, then to a scalar path on pre-AVX2 CPUs) with nibble-split lookup tables for maximum throughput.

The Lloyd-Max codebook achieves distortion within a factor of 2.7x of the information-theoretic lower bound (Shannon's distortion-rate limit); the length-renormalization step removes the residual bias the Lloyd-Max codebook introduces on the inner-product estimator itself.

Building

Python (via maturin)

pip install maturin
cd turbovec-python
maturin build --release
pip install target/wheels/*.whl

Rust

cargo build --release

All x86_64 builds target x86-64-v2 (SSE4.2 baseline, Nehalem 2008+) via .cargo/config.toml, so any x86-64-v2 CPU can run the whole crate. The AVX-512 and AVX2 kernels are #[target_feature]-gated and selected at runtime via is_x86_feature_detected!, so they kick in on hardware that supports them regardless of the compile baseline; CPUs with neither run the scalar fallback.

Running benchmarks

Download datasets:

python3 benchmarks/download_data.py all            # all datasets
python3 benchmarks/download_data.py glove          # GloVe d=200
python3 benchmarks/download_data.py openai-1536    # OpenAI DBpedia d=1536
python3 benchmarks/download_data.py openai-3072    # OpenAI DBpedia d=3072

Each benchmark is a self-contained script in benchmarks/suite/. Run any one individually:

python3 benchmarks/suite/speed_d1536_2bit_arm_mt.py
python3 benchmarks/suite/recall_d1536_2bit.py
python3 benchmarks/suite/compression.py

Run all benchmarks for a category:

for f in benchmarks/suite/speed_*arm*.py; do python3 "$f"; done    # all ARM speed
for f in benchmarks/suite/speed_*x86*.py; do python3 "$f"; done    # all x86 speed
for f in benchmarks/suite/recall_*.py; do python3 "$f"; done       # all recall
python3 benchmarks/suite/compression.py                            # compression

Results are saved as JSON to benchmarks/results/. Regenerate charts:

python3 benchmarks/create_diagrams.py

Quick harness for optimization work

The suite above is the source of every published number — real embeddings, FAISS comparator, fixed shapes, run on the two official environments. For the inner loop of an optimization pass there's also a Rust harness that reproduces the four mutation metrics (cold bulk add, warm append, single add, remove) on deterministic synthetic vectors, so a hypothesis can be measured in seconds on any machine with no dataset and no FAISS:

cargo run --release --example insert_bench -- --dim 1536 --bits 2
RAYON_NUM_THREADS=1 cargo run --release --example insert_bench

It is a screening tool, not a source of published numbers.

examples/encode_hash prints a per-stage hash of the encode pipeline for a fixed input; CI runs it on every OS in the matrix and fails if they disagree, which is how cross-platform byte identity of the encode is checked.

References

The Daily Front Page 13 of 28
Tuesday, August 18, 2026 The Daily Front No. #260818 — The Polars Desk Reference
article

Python Polars Cheatsheet (based on our O'Reilly book)

by jeroenjanssens·▲ 168 points·38 comments·opensource.posit.co ↗
A highly lossy compression, but hopefully a useful one.

Quick reference guide for transforming, analyzing, and visualizing data with Python Polars

Page 1 preview

Page 2 preview

Download PDF

Polars is a library for transforming, analyzing, and visualizing data with a fast and expressive DataFrame API. It was first released by Ritchie Vink in 2020.

Install Polars with all of its optional dependencies from the terminal:

uv pip install "polars[all]"

Import Polars in Python, and confirm which versions of Polars and its dependencies you have installed:

import polars as pl

pl.show_versions()

Polars queries typically read data, transform it, and write the result back out. A complete query is often a single chain of method calls:

fruit = pl.read_csv("fruit.csv")

fruit.filter(
    (pl.col("weight") > 1000) & pl.col("is_round")
).write_parquet("fruit.parquet")

Throughout this cheatsheet, df is a DataFrame, lf is a LazyFrame, o is a second DataFrame to combine with df, and e stands for any expression. So e.abs() means “call .abs() on an expression”, as in pl.col("x").abs().

Data Structures

Polars stores all of its data in either a Series or a DataFrame.

Structure Description
Series One-dimensional. Holds a sequence of values of the same data type.
DataFrame Two-dimensional. Has rows and columns. One or more Series, all of the same length.
LazyFrame Resembles a DataFrame but holds no data. A blueprint for generating a DataFrame.

Unlike pandas, Polars DataFrames do not have a row index, and the API favors immutability and method chaining over in-place modifications.

  • Create a Series by passing a name and a sequence of values:

    series = pl.Series("sales", [150.00, 300.00, 250.00])
    
  • Create a DataFrame from a dictionary of columns, where each value is a Series or a plain Python sequence. You can also use any of the pl.read_*() functions to create one from a file:

    df = pl.DataFrame({
        "sales": series,
        "id": [41, 42, 43]
    })
    
  • Because there is no row index, add one explicitly as a column when you need it:

    df.with_row_index("id")
    
  • Turn a DataFrame into a LazyFrame. Alternatively, start from a LazyFrame directly with any of the pl.scan_*() functions:

    lf = df.lazy()
    

Eager and Lazy APIs

The eager API executes immediately, whereas the lazy API builds an optimized query plan first. The optimizer automatically applies predicate pushdown (filtering as early as possible) and projection pushdown (dropping columns that are never used).

You move between the two representations with .lazy() and .collect(): .lazy() turns a DataFrame into a LazyFrame, and .collect() executes a LazyFrame and gives you a DataFrame back.

  • Turn a DataFrame into a LazyFrame, and execute a LazyFrame to get a DataFrame:

    lf = df.lazy()
    df = lf.collect()
    
  • Use the streaming engine to process data out-of-core, so that datasets larger than memory can still be handled:

    lf.collect(engine="streaming")
    
  • Print the optimized query plan as text, or visualize it as a graph, to see what the optimizer decided to do:

    lf.explain()
    lf.show_graph()
    
  • Execute the query and return per-node timings, which tells you where the time actually goes:

    lf.profile()
    

Data Types

Polars implements most of the Apache Arrow memory specification, which is an efficient columnar format for flat and hierarchical data.

Group Type Notes
Numeric Decimal 128 bits, precision, scale
Numeric Float32 Ranges ±3.4×10³⁸
Numeric Float64 Ranges ±1.8×10³⁰⁸
Numeric Int8 Ranges ±128
Numeric Int16 Ranges ±32,768
Numeric Int32 Ranges ±2.1×10⁹
Numeric Int64 Ranges ±9.2×10¹⁸
Numeric Int128 Ranges ±3.4×10³⁸
Numeric UInt8 Ranges 0–255
Numeric UInt16 Ranges 0–65,535
Numeric UInt32 Ranges 0–4.3×10⁹
Numeric UInt64 Ranges 0–1.8×10¹⁹
Temporal Date Days since Unix epoch
Temporal Datetime Microseconds since epoch
Temporal Duration Time duration / delta
Temporal Time Time of day
Nested Array Fixed-length sequence
Nested List Variable-length sequence
Nested Struct Multiple fields with names
String String UTF-8 text, variable length
String Categorical Dict of Strings
String Enum Fixed dict of Strings
Other Boolean True / False
Other Binary Raw bytes
Other Null Represents Null / None

Inspecting Types

  • Get a dictionary of column names and data types, or just the list of data types:

    df.schema
    df.dtypes
    
  • Print one row per column, including data types, which is useful for wide DataFrames where printing the DataFrame itself is unreadable:

    df.glimpse()
    
  • Compute per-column summary statistics, including the number of nulls:

    df.describe()
    
  • Report the in-memory size of the DataFrame in the unit you ask for:

    df.estimated_size("mb")
    

Casting

  • Cast a column to another data type. By default the cast is strict, so a value that does not fit raises an error:

    df.select(pl.col("id").cast(pl.UInt64))
    
  • Pass strict=False to cast without raising. Values that overflow the target type become nulls instead:

    df.select(pl.col("id").cast(pl.Int8, strict=False))
    

Reading and Writing Data

Polars has four families of input and output functions, and which one you want depends on whether you are working eagerly or lazily:

  • read_*() reads data into a DataFrame.
  • scan_*() creates a LazyFrame, deferring the actual reading until you collect.
  • write_*() writes a DataFrame to disk or to cloud storage.
  • sink_*() streams a query to disk or to cloud storage without holding it all in memory.

Not every format supports all four operations:

Format read scan write sink
Avro
Clipboard
CSV
Database
Delta Lake
Excel / ODS
Iceberg
IPC / Feather
JSON
NDJSON
Parquet
PyArrow Dataset

Keyword arguments that many of these functions accept include schema_overrides, n_rows, row_index_name, storage_options, and compression.

  • Scan files in cloud storage by passing a URI with a glob pattern, and use storage_options to supply credentials and region settings:

    pl.scan_parquet(
        "s3://bucket/*.parquet",
        storage_options={"aws_region": "us-east-2"}
    )
    
  • Stream a query straight to a partitioned Parquet dataset, writing one directory per distinct value of the key column:

    lf.sink_parquet(pl.PartitionBy("out/", key="x"))
    

Transforming Data

Selecting Columns

Keep columns based on their name, data type, or position.

  • Select columns by name:

    df.select("a", "b")
    
  • Select the result of an expression, so that you can transform columns on their way out:

    df.select(pl.col("x") * 2)
    
  • Give the result of an expression a name by using a keyword argument, which produces a new column:

    df.select(doubled=pl.col("x") * 2)
    
  • Select columns whose names match a regular expression. The pattern must start with ^ and end with $:

    df.select(pl.col("^.*_color$"))
    
  • Select every column:

    df.select(pl.all())
    

Use column selectors for more flexibility. They can be combined using the set operators |, &, -, ^, and ~.

  • Import the selectors module, then select columns by data type or by name pattern. See also cs.string(), cs.contains(), and cs.first():

    import polars.selectors as cs
    
    df.select(cs.numeric())
    df.select(cs.starts_with("val"))
    
  • Drop columns instead of keeping them. Pass strict=False so that names which do not exist are ignored rather than raising an error:

    df.drop("a", "y", strict=False)
    

Creating Columns

New columns are added to the right of the existing ones.

  • Add a new column computed from an expression, naming it with a keyword argument:

    df.with_columns(new=pl.col("a") + 1)
    
  • Replace an existing column by producing an expression with the same name. Here, nulls in column a are replaced with zeros:

    df.with_columns(pl.col("a").fill_null(0))
    
  • Add a column with the same literal value in every row:

    df.with_columns(ones=pl.lit(1))
    
  • Add a column of row indices. Use offset to start counting somewhere other than zero:

    df.with_row_index(name="id", offset=1)
    

Filtering Rows

Keep rows according to the values in one or more columns or expressions.

  • Filter on an existing boolean column by passing its name:

    df.filter("valid")
    
  • Filter with a single expression:

    df.filter(pl.col("x") > 5)
    
  • Pass multiple expressions to combine them with a logical AND. You can also write the AND explicitly with &, in which case each comparison needs its own parentheses:

    df.filter(pl.col("valid"), pl.col("x") > 5)
    df.filter(pl.col("valid") & (pl.col("x") > 5))
    
  • Use | for a logical OR:

    df.filter(pl.col("valid") | (pl.col("x") > 5))
    
  • Filter with keyword-argument constraints, which is shorthand for testing equality and combining the results with AND:

    df.filter(valid=True, x=5)
    
  • Keep only rows without any missing values, or restrict the check to specific columns:

    df.drop_nulls()
    df.drop_nulls("x")
    
  • Remove duplicate rows. Use subset to decide which columns define a duplicate, and keep to choose which of the duplicates survives:

    df.unique(subset=["x"], keep="first")
    

Slicing and Sampling Rows

Keep rows based on their position.

  • Keep the first rows, or the last rows. Both default to five:

    df.head()
    df.tail(10)
    
  • Keep a contiguous slice by giving an offset and a length. This keeps the third row through the seventh:

    df.slice(2, 5)
    
  • Keep every nth row:

    df.gather_every(2)
    
  • Take a random sample of rows. Use with_replacement=True to allow the same row to be drawn more than once, or fraction to sample a proportion instead of a fixed number:

    df.sample(10)
    df.sample(10, with_replacement=True)
    df.sample(fraction=0.2)
    

Sorting Rows

Reorder rows according to the values in one or more columns or expressions.

  • Sort by a single column, ascending by default, or by multiple columns in sequence:

    df.sort("x")
    df.sort("x", "y")
    
  • Move nulls to the end rather than the beginning:

    df.sort("x", nulls_last=True)
    
  • Reverse the order. When sorting by several columns, pass a list of booleans to set the direction per column:

    df.sort("x", descending=True)
    df.sort("x", "y", descending=[False, True])
    
  • Sort by the result of an expression rather than by a column, such as a computed ratio or the length of a list:

    df.sort(pl.col("x") / pl.col("y"))
    df.sort(pl.col("l").list.len())
    
  • Keep only the k largest or smallest rows according to a column, which is cheaper than sorting everything and then slicing:

    df.top_k(5, by="score")
    df.bottom_k(5, by="score")
    

Reshaping

Go from wide to long and back again.

  • Make a DataFrame longer by turning the values of one or more columns into rows, keeping index columns as identifiers:

    df.unpivot(on=["c"], index="id")
    
  • Make a DataFrame wider by turning the values of a column into new columns. If the combination of on and index is not unique, supply an aggregate_function to decide how to combine the collisions:

    df.pivot(on="c", index="id", values="x")
    df.pivot(on="c", index="id", values="x", aggregate_function="sum")
    
  • Expand a list column so that each element gets its own row, repeating the other columns:

    df.explode("l")
    
  • Expand a struct column so that each field becomes its own column:

    df.unnest("s")
    
  • Swap rows and columns. Use include_header=True to keep the original column names as a column:

    df.transpose(include_header=True)
    
  • Split a DataFrame into a list of smaller DataFrames, one per distinct value of the given column:

    df.partition_by("group")
    

Summarizing and Aggregating

Split. Apply. Combine.

  • Split a DataFrame into groups by one or more columns. This gives you a GroupBy object that you then aggregate:

    dfg = df.group_by("x")
    dfg = df.group_by("x", "y")
    
  • Apply a ready-made summary to every group. Count the rows per group, take the first rows of each group, or compute the mean of every column per group:

    dfg.len()
    dfg.head(2)
    dfg.mean()
    
  • Apply your own function to each group when no built-in aggregation fits:

    dfg.map_groups(...)
    
  • Use agg() for full control over the aggregation. Passing an expression without an aggregating method collects the values into a list, and naming the result with a keyword argument gives the new column a sensible name:

    dfg.agg(...)
    dfg.agg(pl.col("y"))
    dfg.agg(avg=pl.col("y").mean())
    
  • Use a window expression with over() to add an aggregation as a new column on the original DataFrame, without collapsing the rows:

    df.with_columns(avg=pl.col("y").mean().over("x"))
    
  • Group by a time value or an index instead of by a category. group_by_dynamic() creates windows of a fixed duration, and group_by adds a regular grouping on top:

    df.group_by_dynamic("timestamp", every="1h", group_by="store")
    
  • Use rolling() for a window that moves with every row rather than in fixed steps. This computes a seven-day rolling sum of sales per store:

    df.rolling(index_column="date", period="7d", group_by="store").agg(
        pl.col("sales").sum()
    )
    
  • Create the rows that are missing from a regular time series, so that every interval is represented:

    df.upsample(
        time_column="date", every="1d", group_by="store", maintain_order=True
    )
    
  • Aggregate across columns rather than down them. The horizontal functions combine several columns within each row:

    df.select(pl.sum_horizontal(cs.numeric()))
    df.select(pl.any_horizontal(cs.boolean()))
    

Joining and Concatenating

Combine multiple DataFrames into one.

  • Join two DataFrames on a shared key. The default is an inner join, which keeps only the rows that match on both sides:

    df.join(o, on="key")
    
  • Use how to choose a different join strategy. A left join keeps every row of df:

    df.join(o, on="key", how="left")
    
  • When the key has a different name in each DataFrame, name both sides explicitly:

    df.join(o, left_on="a", right_on="b")
    
  • A full outer join keeps all rows from both sides. Add coalesce=True to merge the two key columns into one:

    df.join(o, on="key", how="full", coalesce=True)
    
  • Filtering joins return columns from df only, and use o purely as a filter. A semi join keeps the rows of df that have a match, and an anti join keeps the rows that do not:

    df.join(o, on="key", how="semi")
    df.join(o, on="key", how="anti")
    
  • A cross join produces the Cartesian product of both DataFrames and therefore needs no key:

    df.join(o, how="cross")
    
  • Join on the nearest match rather than an exact one, which is the usual way to line up two time series. Use by to match exactly on some columns first:

    df.join_asof(o, on="ts", by="i")
    
  • Join on an arbitrary predicate for inequality or other non-equi joins:

    df.join_where(o, pl.col("a") >= pl.col("b"))
    

Common keyword arguments for df.join() are left_on, right_on, coalesce, join_nulls, suffix, and validate, where validate accepts "m:m", "m:1", "1:m", and "1:1".

  • Stack DataFrames on top of each other, which requires matching columns:

    pl.concat([df, o])
    
  • Place DataFrames side by side instead, or take the union of their columns and fill in the gaps with nulls:

    pl.concat([df, o], how="horizontal")
    pl.concat([df, o], how="diagonal")
    
  • Use a relaxed strategy to coerce mismatched data types instead of raising an error:

    pl.concat([df, o], how="vertical_relaxed")
    
  • Update the values in df with the non-null values from another DataFrame, matching rows on a key:

    df.update(o, on="id", how="left")
    

Expressions

Definition of an expression

An expression is a tree of operations that describe how to construct one or more Series.

  • Series: Same-type array; column or standalone
  • Tree of operations: Single, linear, or branched
  • Describe: Passive recipe; needs function to execute
  • Construct: Output may be internal, not a new column
  • One or more: One expression can make multiple Series

Beginning Expressions

Every expression starts from a column, from all columns, or from a literal value.

  • Build an expression based on an existing column, on all columns, or on a literal value. Note that pl.col("*") and pl.all() are equivalent:

    pl.col("name")
    pl.col("*")
    pl.all()
    pl.lit("ok")
    
  • Generate a range of integers, where the stop value is exclusive. This produces [0, 1, 2, 3, 4]:

    pl.arange(0, 5)
    
  • Generate a range of dates. The singular form produces one range, while the plural form produces a column of ranges, one per row. Integers, times, and datetimes have their own *_range() and *_ranges() functions:

    pl.date_range(...)
    pl.date_ranges(...)
    

Combining Expressions with Arithmetic

You can perform arithmetic with both expressions and plain Python values. Every operator has an equivalent method, which is handy when you prefer to keep a chain of method calls unbroken.

Operator Method Description
+ e.add(...) Addition
- e.sub(...) Subtraction
* e.mul(...) Multiplication
/ e.truediv(...) Division
// e.floordiv(...) Floor division
** e.pow(...) Power
% e.mod(...) Modulus
N/A e.dot(...) Dot product

Combining Expressions by Comparing

Unlike in Python, you cannot chain multiple comparisons. Write (pl.col("x") > 0) & (pl.col("x") < 10) rather than 0 < pl.col("x") < 10.

Operator Method Description
< e.lt(...) Less than
<= e.le(...) Less than or equal
== e.eq(...) Equal
>= e.ge(...) Greater than or equal
> e.gt(...) Greater than
!= e.ne(...) Not equal

Combining Expressions with Boolean Logic

Note that and, or, and not are reserved keywords in Python, hence the underscores in the method names.

Operator Method Description
& e.and_(...) Logical AND
` ` e.or_(...)
~ e.not_() Logical NOT
^ e.xor(...) Logical XOR

Conditional Expression

Chain when() and then() to build a conditional expression, and close it with otherwise(). Conditions are evaluated in order and the first match wins, so put the most specific condition first:

df.with_columns(
    pl.when(pl.col("age") < 18).then(pl.lit("minor"))
      .when(pl.col("age") < 65).then(pl.lit("adult"))
      .otherwise(pl.lit("senior"))
      .alias("group")
)

Math, Trigonometry, and Rounding

  • e.abs(), e.sign(), e.exp(): absolute value, sign, and exponential.
  • e.cbrt(), e.sqrt(): cube root and square root.
  • e.log(...), e.log10(), e.log1p(): logarithms.
  • e.cos(), e.sin(), e.tan(): trigonometric functions.
  • e.cosh(), e.sinh(), e.tanh(): hyperbolic functions.
  • e.arccos(), e.arcsin(), e.arctan(): inverse trigonometric functions.
  • e.arccosh(), e.arcsinh(), e.arctanh(): inverse hyperbolic functions.
  • e.degrees(), e.radians(): convert between radians and degrees.
  • e.ceil(), e.floor(), e.round(...): rounding.
  • e.clip(...), e.cut(...), e.qcut(...): clip values to a range, or bin them into intervals of your choosing or into quantiles.

Missing Values and Shapes

In Polars, null means missing, whereas NaN is a float that results from undefined math such as 0 / 0. The two are handled by separate methods.

  • e.fill_nan(...), e.fill_null(...): fill missing values.
  • e.is_finite(), e.is_infinite(): check for finite and infinite values.
  • e.is_nan(), e.is_not_nan(): check for NaN.
  • e.is_null(), e.is_not_null(): check for null.
  • e.drop_nans(), e.drop_nulls(): drop missing values.
  • e.flatten(), e.reshape(...): reshape a list or column.
  • e.explode(), e.implode(): turn a list into rows, or gather rows into a list.

Shifts, Cumulative, and Rolling

  • e.backward_fill(...), e.forward_fill(...): fill nulls from the next or the previous value.
  • e.interpolate(...), e.shift(...): interpolate between known values, or move values up or down.
  • e.cum_count(...), e.cum_sum(...): cumulative count and sum.
  • e.cum_max(...), e.cum_min(...): cumulative maximum and minimum.
  • e.diff(...), e.pct_change(...): difference and percentage change between rows.
  • e.ewm_mean(...), e.ewm_std(...), e.ewm_var(...): exponentially weighted moving statistics.
  • e.rolling_max(...), e.rolling_min(...): rolling maximum and minimum.
  • e.rolling_mean(...), e.rolling_median(...): rolling mean and median.
  • e.rolling_std(...), e.rolling_var(...): rolling standard deviation and variance.
  • e.rolling_map(...): apply your own function over a rolling window.

Sorting, Ranking, and Boolean

  • e.sort(...), e.sort_by(...): sort a column by its own values, or by the values of other columns.
  • e.arg_sort(...): return the row indices that would sort the column.
  • e.shuffle(...), e.reverse(): shuffle values randomly, or reverse their order.
  • e.rank(...): assign ranks to the data.
  • e.is_duplicated(), e.is_unique(): mark which values are duplicated and which are unique.
  • e.is_first_distinct(), e.is_last_distinct(): mark the first or the last occurrence of each distinct value.

Summaries and Statistics

  • e.all(...), e.any(...): true if all or any of the values are true.
  • e.max(), e.min(), e.mean(): maximum, minimum, and mean.
  • e.nan_max(), e.nan_min(): maximum and minimum that propagate NaN.
  • e.median(), e.std(), e.var(...): median, standard deviation, and variance.
  • e.entropy(...), e.kurtosis(...), e.skew(...): distribution statistics.
  • e.product(), e.quantile(...), e.sum(): product, quantile, and sum.
  • e.arg_max(), e.arg_min(): index of the maximum and minimum value.
  • e.first(), e.last(), e.get(...): get a value by position.
  • e.mode(): the most frequently occurring values.

Counting, Unique, and Selection

  • e.len(): count all rows, including nulls.
  • e.count(): count only the non-null values.
  • e.null_count(): count the null values.
  • e.n_unique(), e.approx_n_unique(): number of unique values, exactly or approximately.
  • e.arg_unique(), e.unique(...): indices of the unique values, or the unique values themselves.
  • e.unique_counts(), e.value_counts(...): how often each unique value occurs.
  • e.head(...), e.tail(...), e.limit(...): select rows from the start or the end.
  • e.bottom_k(...), e.top_k(...): the k smallest or largest values.
  • e.gather(...), e.gather_every(...): take values by index, or take every nth value.
  • e.sample(...), e.slice(...): sample or slice within an expression.
  • e.arg_true(): the indices where the value is true.
  • e.replace(...): replace values using a dictionary.
  • e.search_sorted(...): find the insertion index in a sorted column.

Arrays and Lists

Arrays have a fixed length; lists do not. Array methods live under the arr namespace and list methods under list.

  • Cast a column to an array of a fixed length, then use the array namespace:

    e.cast(pl.Array(pl.Int8, 3))
    e.arr.max()
    e.arr.sort()
    
  • Combine several columns into a single list column:

    pl.list("a", "b")
    
  • Work with the contents of a list column: get the length of each list, get an element by index, sort the elements within each list, join them into a single string, or test whether a value is present:

    e.list.len()
    e.list.get(0)
    e.list.sort()
    e.list.join("-")
    e.list.contains(5)
    

Categoricals and Enums

Categoricals infer their categories from the data and sort lexically, whereas Enums are fixed up front and sort in declaration order.

  • Cast a String column to a Categorical, or to an Enum with an exact set of allowed values:

    e.cast(pl.Categorical)
    e.cast(pl.Enum(["Good", "Bad"]))
    
  • Retrieve the categories that a Categorical column ended up with:

    e.cat.get_categories()
    

Dates, Datetimes, Times, and Durations

Dates track days, whereas Datetimes track microseconds. Methods for working with them live under the dt namespace.

  • Construct a Date, a Datetime, or a Duration from their components:

    pl.date(2026, 12, 31)
    pl.datetime(2026, 6, 30, 23, 59, 0)
    pl.duration(days=1)
    
  • Extract a single component, such as the month:

    e.dt.month()
    
  • Replace individual time units, leaving the rest untouched:

    e.dt.replace(...)
    
  • Format a datetime as a string using a format specification:

    e.dt.strftime(...)
    
  • Convert a datetime to another time zone:

    e.dt.convert_time_zone("UTC")
    
  • Express a duration as a number of seconds:

    e.dt.total_seconds()
    

Strings

Strings are UTF-8, so lengths and slices count characters, not bytes. String methods live under the str namespace.

  • e.str.contains(...): check whether each value matches a regular expression.
  • e.str.split(...): split each value by a separator into a list.
  • e.str.to_uppercase(): make each value all-caps.
  • e.str.to_datetime(): parse each value into a Datetime.
  • e.str.extract(r"(\d+)"): extract the first regular expression capture group.
  • e.str.strip_chars(...): trim whitespace, or other characters you specify, from both ends.

Structs

A struct groups multiple columns into a single row element. Struct methods live under the struct namespace.

  • Combine columns into a Struct, then extract a single field back out:

    pl.struct("a", "b")
    e.struct.field(...)
    
  • Rename the fields of a Struct, or add and adjust fields:

    e.struct.rename_fields(...)
    e.struct.with_fields(...)
    

Binaries

Use the bin namespace for raw byte data and for base64 and hexadecimal conversions.

  • Decode a base64 string, or encode bytes as a hexadecimal string:

    e.bin.base64_decode()
    e.bin.hex_encode()
    

Output Names

Control the final column names of your expressions with the name namespace.

  • Add a prefix to the existing name, or lowercase it:

    e.name.prefix(...)
    e.name.to_lowercase()
    

Meta

Introspection methods, primarily used when writing plugins, live under the meta namespace.

  • e.meta.output_name(): get the name the expression will output.
  • e.meta.is_regex(): check whether the expression is a regular expression.
  • e.meta.has_multiple_outputs(): check whether the expression produces multiple outputs.

Styling Data

Use Great Tables to turn a DataFrame into a presentation-ready table. Start from GT(df) and chain the methods that set up the stub and header, format the values, and add color:

from great_tables import GT

(
    GT(df)
    .tab_stub(rowname_col="...")
    .cols_label(...)
    .tab_header(title="...")
    .fmt_number(...)
    .fmt_nanoplot(...)
    .data_color(columns="...", palette="...")
)

Great Tables example

Visualizing Data

The built-in plotting methods use Altair under the hood, and are available from the plot namespace:

df.plot.scatter(x="...", y="...", color="...")

Altair scatter plot

Many other packages can work with Polars DataFrames directly, including Plotnine, Plotly, hvPlot, Seaborn, and Matplotlib. For anything that cannot, convert to pandas first with df.to_pandas().

from plotnine import *

ggplot(df, aes(x="", y="", color="")) + geom_point()

Plotnine point plot

Polars Cloud

Execute a query on a cluster of instances in your own environment. Describe the compute you want with a ComputeContext, then run a LazyFrame remotely against it:

import polars_cloud as pc

ctx = pc.ComputeContext(
    workspace="workspace_name",
    cpus=4,
    memory=16,
    cluster_size=32
)

lf.remote(ctx).execute().await_result()

Book

Python Polars: The Definitive Guide

This cheatsheet is based on the book Python Polars: The Definitive Guide by Jeroen Janssens and Thijs Nieuwdorp, published by O’Reilly. The book is available in both print and ebook formats at your favorite bookstore. Visit polarsguide.com for details.

The Daily Front Page 14 of 28
Tuesday, August 18, 2026 The Daily Front No. #260818 — Persistent Machines
article

Launch HN: machine0 (YC S26) – Persistent CPU and GPU VMs from the CLI

by bwm·▲ 70 points·42 comments·machine0.io ↗
Powerful & Persistent Virtual Machines.

Up to 60 vCPUs, 240 GB RAM & GPUs. Designed for agents using CLI or MCP. Billed by the minute.

Trusted by

Agency Tool CompanyThe Forecasting CompanyAxelrodVendoPACIFIC

Backed by

YCombinator

Get Started Now

NixOS or Ubuntu with tools pre-installed. Dedicated resources, static IPs, per-minute billing.

$curl -LsSf https://machine0.io/install.sh | sh

Read the documentation for alternative install methods →

Designed For Long Running Agents

VMs remain on unless stopped or suspended. Reproducible builds with NixOS flakes or Ubuntu with Ansible. Dedicated resources, static IPs, per-minute billing. All images are open source: NixOS, Ubuntu.

Stable & Powerful VMs for Compute-Heavy Workloads

99.99% uptime. 1–60 vCPU, up to 240 GB RAM. Optional GPUs: H100, H200, L40S, MI300X, RTX 4000/6000 Ada.

Designed for Agents using CLI or MCP

Every operation is a CLI command with --json. A remote MCP server lets agents drive everything programmatically.

Start, Suspend, Snapshot & Resume

Freeze a VM's state, stop billing, restore later. Create golden images from any VM and spin up clones.

Integrate with your MCPs, GitHub & Environment

Inject MCP servers, credentials, prompts and environment variables into your VMs using profiles. Claude Code and Codex will pick them up automatically.

Reproducible Builds with NixOS

Deterministic builds, one-command rollbacks, no drift. Ubuntu pre-installed with Docker, Node, Python, Claude Code, and Codex.

Static IPs, HTTPS Endpoints, 5 Regions

Every VM gets a public IP and HTTPS at <vm>.mac0.io. No NAT, no tunnels. Run VMs in US East, US West, UK, EU, and Asia.

Pricing

Pay-as-you-go, billed per minute. Same price in all regions. Suspend VMs to stop billing, resume anytime. CPU VMs from $0.013/hr. GPU VMs from $0.836/hr, up to 8x H200.

CPU

Size CPU RAM Disk $/hour ~$/month
small 1 vCPU 1 GB 25 GB $0.013 $9
medium 2 vCPU 2 GB 60 GB $0.034 $25
large 2 vCPU 4 GB 80 GB $0.052 $38
xl 4 vCPU 8 GB 160 GB $0.104 $76
xxl 8 vCPU 16 GB 320 GB $0.208 $152
large-nvme 2 vCPU 4 GB 80 GB $0.061 $45
xl-nvme 4 vCPU 8 GB 160 GB $0.121 $88
xxl-nvme 8 vCPU 16 GB 320 GB $0.243 $177
xl-premium 4 vCPU 8 GB 50 GB $0.236 $172
xxl-premium 8 vCPU 16 GB 100 GB $0.473 $345
xxxl 16 vCPU 64 GB 200 GB $0.825 $602
4xl 32 vCPU 128 GB 480 GB $1.980 $1,445
5xl 48 vCPU 192 GB 720 GB $2.970 $2,168
6xl 60 vCPU 240 GB 900 GB $3.714 $2,711

The -nvme sizes run on newer-generation CPUs with NVMe storage for significantly higher disk IOPS — same vCPU, RAM, and disk as their regular counterparts.

The -premium sizes are dedicated (not shared) vCPUs, the fastest single-thread performance we offer.

GPU

Size GPU VRAM vCPU RAM Disk $/hour ~$/month
gpu-4000ada-1 1x RTX 4000 Ada 20 GB 8 32 GB 500 GB $0.836 $610
gpu-l40s-1 1x L40S 48 GB 8 64 GB 500 GB $1.727 $1,261
gpu-6000ada-1 1x RTX 6000 Ada 48 GB 8 64 GB 500 GB $1.727 $1,261
gpu-mi300x-1 1x MI300X 192 GB 20 240 GB 720 GB $2.849 $2,080
gpu-h100-1 1x H100 80 GB 20 240 GB 720 GB $4.851 $3,541
gpu-h200-1 1x H200 141 GB 24 240 GB 720 GB $4.917 $3,589
gpu-mi300x-8 8x MI300X 1,536 GB 160 1,920 GB 2 TB $22.792 $16,638
gpu-h100-8 8x H100 640 GB 160 1,920 GB 2 TB $38.808 $28,330
gpu-h200-8 8x H200 1,128 GB 192 1,920 GB 2 TB $39.336 $28,715

GPU sizes are available in us-east, uk, eu, and asia.

Suspend VMs to stop billing. You pay only for image storage ($0.078/GB/month) while suspended. Minimum top-up $5. Unused credits are refundable.

Examples

Powerful VMs on Demand

Create stable & powerful VMs in your region. They're ideal for offloading compute-heavy tasks like compilation or automated research.

$ machine0 new buildbox --size 4xl --region us-east # 32 vCPU & 128 GB RAM
$ machine0 ssh buildbox
 
$ machine0 suspend buildbox # Suspend & pause compute billing
$ machine0 start buildbox   # Pick up where you left off

Running Agents with Profiles

Run agents inside VMs. Use profiles to inject credentials, MCP servers, prompts and environment variables into the VMs so your agents have everything they need to hit the ground running.

# Authenticate Claude Code, Codex & GitHub
$ machine0 integrations connect claude-code --profile default
$ machine0 integrations connect codex --profile default
$ machine0 integrations connect github --profile default
 
# Add your MCPs
$ machine0 integrations add linear --url https://mcp.linear.app/mcp --profile default
$ machine0 integrations connect linear # Triggers OAuth flow
 
# Configure Environment Variables
$ machine0 env set MY_SECRET_KEY=... --secret --profile default
 
# Add a Prompt
$ machine0 prompts new build_feature --body "Query Linear for..." --profile default
 
# Create a new VM with the profile 
$ machine0 new myvm --profile default
$ machine0 ssh myvm
 
# Claude Code is authenticated and has your MCPs & prompts in context
$ claude

Reproducible Builds with NixOS

Use the /create-machine skill to generate reproducible builds with nix code. It'll then create a snapshot for you to make as many clones as you want.

# Install the /create-machine skill
$ machine0 skills install
 
# Use the skill to create a machine
$ claude -p "/create-machine a server that auto-starts claude code in tmux on boot"
 
# Code is auto-generated
$ ls -l claude-in-tmux/
 
# SSH in and you're ready
$ machine0 ssh claude-in-tmux
$ tmux attach

Hosting

Every VM gets its own static IP and HTTPS endpoint. VMs persist until stopped, suspended, or removed, with 99.99% uptime across 5 regions. Good for hosting web apps, databases, or anything that needs a stable address.

$ machine0 new webserver --image nixos-25-11-loaded --size small
$ claude -p "Use machine0 to start a webserver on port 80 on the webserver VM"
 
# Get the VM's IP
$ machine0 get webserver
 
# Open the authenticated HTTPS endpoint in your browser
$ open https://webserver.mac0.io

FAQ

Is machine0 secure and reliable?+−

How is machine0 different from a raw VPS?+−

How is machine0 different from sandboxes like E2B or Modal?+−

What are the benefits of NixOS?+−

Will I get locked in?+−

How do I get support?+−

The Daily Front Page 15 of 28
Tuesday, August 18, 2026 The Daily Front No. #260818 — Ambition at Home
article

Being ambitious and being a dad

by nichochar·▲ 377 points·232 comments·nicholascharriere.com ↗
My kids are the best thing in my life.

When I was going through YC, I didn’t mention my seven month old daughter to anyone. Now a few years later I have two kids, a dog and a very packed schedule. My kids are the best thing in my life. For years, my work was my life. Now my life competes with my work.

I don’t think I’m alone. Here’s Paul Graham in Having Kids:

Some of my worries about having kids were right, though. They definitely make you less productive. I know having kids makes some people get their act together, but if your act was already together, you’re going to have less time to do it in.

I love building, learning, and competing. Life before kids was straightforward: I worked hard and centered my life around things I love: computers, technology, friends. I moved to SF, worked at some awesome companies, met a wonderful girl and built a strong relationship. A huge amount of my time was spent on work, and yet there was still some left for that and more. Turns out, you have a lot of time when you don’t have dependents.

All the people I admire most are builders. I have devoured biographies and studied many great founders. Unfortunately this led me to an uncomfortable conclusion: most of them are horrible parents.

Steve Jobs literally abandoned his daughter Lisa because “the time wasn’t right” (he was focused on Apple). Einstein abandoned one kid1 and was constantly absent, daydreaming about work around his other two, to the point where his wife divorced him and took them. Elon Musk has so many children and companies that he mechanically cannot spend any significant amount of time with any of them. Edison, Ford, Ferrari,… the list goes on and on. Most biographies of great founders I’ve read have had another story etched in between the lines: a pretty bleak one of a bad parent.

I know many ambitious parents; it’s not an uncommon combination. Most of them are willing to make a choice that I will not: delegate the parenting away. I do not believe the quality time theory. I firmly believe in maximizing the quantity of time spent with them; there are no diminishing returns for them on that front. This is somewhat problematic, and unfortunately it gets worse. The time spent is even more important when they’re young, which of course happens to coincide with the prime of my career.

I’ll find myself planning my work or reflecting on how much I accomplished today or in the last week and the result is clear. I’m a productive and well organized person, but comparing the output of parent-me to the kidless-me in a given week reveals a visible gap. Everyone knows life is short. Now that I have kids, it feels 10x shorter.

This sucks. I am ambitious: I wake up every morning with a burning fire in my stomach to build awesome things. In this, I differ from Paul Graham:

I hate to say this, because being ambitious has always been a part of my identity, but having kids may make one less ambitious.

I am not less ambitious. But I am also ambitious about being a great dad.

My anecdotal observations show a pretty strict dichotomy: great fathers and great achievers rarely overlap. Rarely is not never though. Some figures in technology (Paul Graham, DHH, Jeff Dean, even Mark Zuckerberg) seem to be pushing on both fronts with rare success. Often the pattern is early success, but not always. Frankly even if I couldn’t find the pattern, I would still not accept defeat.

I don’t have a perfect magical solution. I’m voicing a frustration, but I am also rejecting the choice. I’ve come to redefine ambition for myself: ambition is being a great dad as well as building great things. I acknowledge and accept that it is much more difficult than just aiming for one or the other, and both are hard enough in their own right. But hard is the point of ambition, right?

My strategy is pretty simple: stay focused, don’t waste time on bullshit, keep improving execution. I do this by carefully clarifying what I want my work to be, focusing on health to maximize energy, setting clear rules on time with kids (weekday dinners, weekends prioritize family) and completely removing time-wasting activities. With clear goals and discipline, my plan is to achieve compounding gains.

I am writing this because I never hear anyone say it.

Be ambitious enough to be an ambitious dad.

Footnotes

  1. It’s actually not clear whether it was abandonment or early death — see the Einstein family.
The Daily Front Page 16 of 28
Tuesday, August 18, 2026 The Daily Front No. #260818 — The Benchmark Trap
article

The Benchmarkpocalypse

by cyndunlop·▲ 170 points·61 comments·danluu.com ↗
It’s also become easier to reward hack a benchmark and make fake performance gains.

There's been a lot of talk about the vulnpocalypse, to which I don't have much to add because I'm not a security person, but I haven't seen much discussion on the closely related (and to be fair, less serious, issue), the benchmarkpocalypse.

While it's become easier than ever to make serious performance gains, it's also become easier than ever to reward hack a benchmark and make fake performance gains. The former is probably happening quietly across many different companies, but the latter is something I see at least once a week nowadays. Someone will claim they optimized X and got some huge performance improvement over existing software, but, when you look at it, what they did was make some optimization that improves benchmark performance without actually improving real-world performance. This is often some kind of "we rewrote X in Rust"1 project or a new startup that's looking to either fundraise or sell something, but it happens on other kinds of projects as well.

Of course, people have always trumpeted unrepresentative microbenchmarks to show that their pet project is great. It's always been easy to fake up an unrepresentative microbenchmark and that's never going to change. What's changed is that it used to take a lot of work to game a large benchmark suite, but an LLM and loop can just do it. There are quite a few famous examples of gaming large benchmark suites from back when this was hard. For example, way back when people cared about SPECint / SPECfp as proxies for workstation performance, CPU vendors would try to find compiler "optimizations" that would speed up the calculation in the benchmark, such as Sun finding a way to improve 179.art by 12x in SPECfp2000. Skilled engineers spent a lot of time trying to find benchmark hacks like that. LLMs not only make this trivial, they do it by default, making formerly trustworthy benchmarks meaningless unless you audit the result or trust someone who did.

Rather than point to someone's bad claim, I'll point to FRE, this regex engine I had an agent build, which I could claim is the world's fastest regex engine because it beats the Rust regex crate at the fairly comprehensive rebar regex benchmark suite. But this was created by putting an agent in a loop for a month with instructions to not overfit to the benchmark but no real supervision. For the most part, getting an LLM to give you a good benchmark score is fairly easy, and this case was no different; it took a couple weeks to roughly match Rust regex crate performance and then another couple weeks to get to 1.4x faster2 on rebar. But agents are wont to reward hack and overfit unless you put serious guardrails in place to avoid that, which I didn't do in this case as an experiment.

To check for overfitting, I somewhat arbitrarily3 used the ripgrep benchmark corpus as a holdout benchmark it was 10x slower on cases where the benchmark didn't take forever due to an algorithmic blow-up, and there were cases where it took so long that it wasn't reasonable to even wait for the benchmark to complete. So much for being 40% faster!

Andrew Gallant (aka BurntSushi)'s rebar benchmark suite is fairly comprehensive as benchmaark suites go, but even with a fairly comprehensive benchmark suite, agents have no problem getting a high score while overfitting in a way that doesn't necessarily give good general performance.

The next step was using a trick we talked about before of not just telling the LLM not to cheat, but that there's a holdout benchmark set that it's judged against. After that, the LLM moderately generalized performance to the point where it's about 2.4x slower overall on the holdout. That sounds pretty good considering that we're comparing it to the fastest general purpose regex engine in existence. But, recall that these benchmarks were made by a coding agent. On looking at what the benchmarks measure, some of them really don't make sense to include, at least at equal weight. If we only look at the benchmarks that seem like they matter, FRE is 4x slower on the holdout0, which is a lot better than before applying the good ole' "tell 'em you have a holdout trick", but still pretty far from being 40% faster.

There are a few things I thought were interesting about this:

  1. It's trivial to "win" a non-trivial benchmark in a meaningless way even when you instruct agents to not reward hack or overfit to win the benchmark
  2. Once again, telling the LLM there's a holdout set worked better than just telling the LLM to do generalized work or not overfit or cheat
  3. Although the overall performance of FRE isn't that good, it is actually performs better for some use cases; in general, the cost of writing specialized code that used to require people serious engineering experience for some specific use case has gone way down

On (1), no wonder I'm seeing so many bogus claims. In the past, to build something like FRE that fakes performance well enough to be able to bogusly claim a 40% speedup, you would need a fair amount of expertise. At a minimum, you'd need to have a pretty good understanding of string matching algorithms, regex engines, as well as decent general code optimization and SIMD optimization skills. FRE also has a mode where it compiles the regex to machine code, so you'd also need some compiler expertise. Now you can get that kind of benchmark cheating (whether or not you want the cheating) with a few minutes of typing.

On (2), I'm curious if this generalizes but haven't tried enough examples to be able to tell.

On (3), there's no reason to use a vibe coded regex library that was almost no human effort that's slower than a robust, existing, well-tested, library, so I find the FRE artifact uninteresting. The thing I find interesting here is how much LLMs can substitute for what used to be rare, specialized, and expensive, knowledge.

In the past, even if you had the knowledge, you probably wouldn't write a custom regex engine that's optimized for your particular workload. There are some large-scale use cases where people would do that level of customization, e.g., when I worked on the Bing index, the code contained multiple different compilers because someone who worked on it wanted to eke out maximal performance; since you care about both compile time and compiled performance in a search engine and the trade-offs are different in different places, you get better performance by writing a custom compiler for each place where a normal project might just use an interpreter or directly walk some data structure with "normal code". The person who wrote those compilers, working on regex-like code might also write multiple custom regex engines, but very few people have both the expertise and the inclination to do that, let alone the freedom to spend that kind of time on such specialized code for work. If you price out that Bing engineer (then a Partner-level engineer, promoted to Distinguished Engineer for their work on the search index) compared to the price of running an LLM in a loop, the cost of writing this kind of specialized code has gone down by many orders of magnitude.

People who still think AI is fake will probably read the first part of the post and think "of course, AI produces fake things, so it produced a fake regex engine". But if we look at the results, being a bit worse than half the speed of the world's fastest regex engine on a holdout while being genuinely faster on many real workloads (most of the overfitting isn't that it special cased a particular benchmark pattern, but that it has some kind of optimization for things of same rough shapes and not of other rough shapes) it's pretty far from a fake regex engine. And, in fact, there's a native code compiled mode that actually beats the Rust regex crate on the holdout if you ignore compile time and are running repeated searches or a very long search (which is a reasonable thing to do for many actual use cases). If my goal with FRE was to produce a fast regex engine instead of producing whatever regex engine one can produce in a few minutes of human time, I suspect it would be fairly competitive on a broad range of holdout benchmarks (with some gaps that would only be found when people tried it on a diverse set of production workloads), and, even this quick and dirty version is very good at some real workloads.

So, even though the overall FRE regex engine has worse performance than the Rust regex crate, the gains you can get for specializing to your workload or use case mean that, in some cases, it could be reasonable to insert your own specialized regex engine somewhere, and the same goes for various other kinds of low-level software4. You don't have to be an AI maximalist to think that it's plausible that, within some number of years, we could see this kind of thing happening for larger things, like databases.

Thanks to Yossi Kreinin, Jamie Brandon, Peter Geoghegan, Luke Burton, John Spurling, Dennis Snell, and Max Bittker for comments/corrections/discussion.

P.S. Per the discussion here, with LLMs, the time it takes to poke at something for a bit and satisfy my curiosity has gone way down, while the time it takes to write something up and make it rigorous enough to publish on my blog hasn't really changed (for a variety of reasons, I think it's actually gone up). The result of this has been that I'm doing a lot more analyses than ever and sharing results with a few friends but not publishing them. As an experiment, I'm trying to write up some things very quickly, with a much lower standard for how cleaned up and rigorous things are than I'd normally have for something that appears on the blog; more like what I'd tell a friend in a casual conversation than what I'd normally put in a blog post. The goal for this post was to do the write-up in about half an hour, so it's something I could do over lunch and not really take time on. If you have opinions on this, let me know what you think!

Of course, a caveat here is that all of the numbers have a higher risk of being wrong than usual. I looked at one benchmark for maybe a minute or two and found an issue, then I looked at another benchmark for a minute and found another issue. Both of those are fixed, but this implies there are other issues I haven't taken the time to chase down. But, with respect to bad benchmark numbers, that's highly realistic! Almost any time I look into benchmark numbers, such as here, or here, the numbers are wrong. Another aspect of the benchmarkpocalypse is that, at least for now, LLMs are good at doing bad benchmarking, so even if you have something that's a real performance improvement, you generally can't tell from some LLM-generated benchmark setup unless a significant amount of care has been taken to make sure that the benchmark setup is reasonable.

Appendix: more FRE benchmark details

One thing I found after I wrote the above but before publishing the post, was that the LLM's claim that FRE is 40% faster than the Rust regex crate on rebar was also wrong. Or, if not wrong, at least misleading. It wasn't actually running benchmarks in the same way rebar benchmarks were run. I checked this after spending a minute checking benchmark results found two issues. It turns out that, despite instructions to run rebar benchmarks as they're run in https://github.com/BurntSushi/rebar, the LLM changed the interface to allow FRE to make some optimizations that improve performance. After fixing that, instead of FRE being 1.4x faster than Rust on rebar, it was 1.5x slower (and "only" twice as fast as re2), so the original result was doubly fake. Not only was FRE highly overfit to the rebar benchmarks, it the results also involved cheating.

But on the bright side, this means the difference in performance between FRE on rebar (1.5x slower than Rust) and on the holdout benchmarks (2.4x slower) isn't as big as it looked before, so the "tell the LLM you have a holdout" trick worked even better than it seemed to before.

After that, I let an LLM hill climb for a few hours and it claimed that FRE was 1.28x faster, which sounds like a great improvement for only a few hours of LLM time, but then I decided to spend another minute looking for cheating and found multiple issues, including one case where a search for the count of matches of (?s)^(.*)$ returned the count without even looking at the haystack (data). Another case of cheating was doing a multi-line grep where the benchmark is supposed to be done line-by-line. Finding these isn't surprising because this is the kind of thing that happens when you leave an agent in a loop for a month without defining strict guardrails. Whether this makes my point here stronger or undermines it isn't clear, but after fixing another set of these issues, FRE was back to being 1.4x slower. After leaving an agent to run overnight, FRE was allegedly back to being 1.5x faster.

Since my original goal here was to see what happens when you run a current (public) SOTA agent in a loop (GPT-5.6 Sol) without much supervision on a non-trivial code optimization problem without any real supervision, rather than spend more time fixing things up to make the benchmarks fairer, I'll just stop here and put a few plots of the results.

Overall, we can see that against Rust and RE2, FRE tends to outperform on the rebar benchmarks (and as noted above, much of this is due to overfitting), but not across the board (the graphs below don't necessarily match the numbers mentioned in the post because an agent is constantly making changes, so any snapshot is a point-in-time estimate that becomes obsolete immediately):

If you're curious about performance on specific benchmarks or specific classes of rebar benchmarks, we have the following table (ratios above one mean FRE is faster; below mean FRE is slower):

There's also an AOT compiler mode that takes a long time to compile a regex to native code before running it. There isn't AOT support for everything, but here are the results from the cases where it's supported. As we can see, the AOT compiler is very slow (it loses very badly in the compilation time benchmarks) and, despite spending quite a bit of time compiling, results are often slower than with the standard FRE regex engine (though it's also faster in many cases).

And then there are the holdout benchmarks. As noted above, for the non-AOT FRE code, performance on the holdout isn't as good as on rebar. And as also noted above, considering that this is for a workload like ripgrep, the "hot search" set of benchmarks is probably more important than the others, so the FRE result is worse than the overall score would make it look.

One thing to note here is that, for the holdout benchmark cases where we don't include compile time as part of the benchmark and we repeatedly run searches, AOT FRE outperforms on the benchmark. For a lot of use cases, you don't want a regex that takes multiple seconds to compile, but there are plenty of cases where this is fine, e.g., for something like ripgrep or Silver Searcher, it could start running with a regex that can start matching right away and then compile in another thread and cut over to the faster matcher when it's done compiling. Given how much of my CPU is spent on long ripgrep searches, it seems like a strategy like that could improve performance for work I personally do. Before LLMs, it probably wouldn't have made sense to spend the effort to write an optimizing regex compiler, but this is now do-able with a few tokens.

Another thing to note here is that this comparison is arguably unfair because this was run on an ARM Graviton machine with SVE/SVE2 and FRE has SVE/SVE2 optimizations. Pre-LLM, it might not have been worth it to have regexes optimized for every combination of SIMD instructions out there, but with LLMs, it's fairly easy to generate ok-ish SIMD optimizations. I know human experts who find that they can generally outperform LLMs here, e.g., Jay Stelly said that the last time he tried getting an LLM to produce SIMD code, it took 20-some iterations to get the code as good as he wanted. But, on the flip side, LLMs have the capability to try more optimizations than a human could possibly try in any given amount of time, so they can still perform pretty well overall even if any specific optimization isn't as good as a human expert would produce.

There's also the problem discussed in this post of overfitting. Depending on the context, that problem is somewhere from very easy to solve to a bit difficult to solve. I deliberately didn't try very hard to solve the problem here to see what would happen, but I did manage to solve the problem without an outsized amount of effort when working on this Azul AI (just for example), but a lot of these big benchmark claims come when people spend little to no effort trying to avoid overfitting, or even negative effort. In the pre-LLM era, people would often pick highly unrepresentative microbenchmarks to show off how great their pet project is which, at least at a non-conscious level, involves negative effort to avoid overfitting to a benchmark. Due to how humans are, I don't think people are going to stop making misleading claims and it's become easier than ever to make misleading claims, so of course we see more of them.

Note that while this post has discussed non-AI software, everything said here goes double for AI software. For example, I've seen lots of people drop comments saying that Kimi K3 is Fable (5) level. But every single person I know who's used it has found it to be substantially worse than GPT-5.6 Sol and Fable. I'm not saying it's not an impressive engineering achievement, but the performance on a wide variety of real-world tasks isn't up to the level it is in benchmarks. This even applies to various eval-y problems, such as when a friend tried different coding agents on the ICFP 2026 contest problems. It also applies to security issues, which are something that I have no doubt AI labs are putting into their evals, e.g., a colleague of mine tried using Kimi K3 to scan for vulns in our software and found that it found approximately a quarter of the vulns GPT-5.6 Sol found, found no vulns that GPT-5.6 Sol didn't find, and didn't have any advantages in any dimension other than on cost. The people I know who are using cheaper models to find real security issues are using other models, such as GLM-5.2, which perform worse on benchmarks but better in practice.

Back on the topic of FRE, one more note is that the holdout benchmark is an arbitrary subset of the ripgrep benchmark setup that was chosen by an agent for unknown reasons. I asked an agent to pull the entire benchmark suite, but that didn't finish in time for this post, so I don't know what the result will be once it's done.

  1. Funnily enough, I have some faith in some of the projects that people are the most skeptical of, e.g., every time I see pgrust somewhere, there are a lot of skeptical comments. But, without having looked into the details of what he's optimizing, I would trust that they're not doing something shady with their benchmarks because Michael Malis started the project (and is still involved). I used to look at most benchmark claims that cross my radar in some detail, but there are so many of these now that I don't really have time to do that and generally assume that claims are false in spirit (even if technically correct) unless there's some reason to believe otherwise. Of course this will sometimes be wrong (e.g., if I didn't know Michael Malis, I would've guessed that pgrust is just another low-quality "have an LLM re-write this thing" project), but LLMs are such an incredible machine for DoSing human attention that I don't know what else I would do about it (I've tried having LLMs analyze performance claims and, while the result is correlated with what I'd think if I looked at something myself, the result is often quite wrong).

    Someone can spend seconds (or, if using the right framework, actually none of their time) generating something that takes people minutes to hours to understand. This is a topic for another post, but from talking to people about their experiences with this in the workplace, companies with poor norms for this kind of thing are really struggling with productivity today.

  2. This is referring to the geomean of all rebar benchmarks. This is probably not the right metric to use, in that this implicitly says that each benchmark is of the same importance, which probably isn't the case. Unlike something like SPEC CPU, the rebar benchmarks don't position themselves as something where you get a meaningful summary metric that tries to represent overall performance (the repo actually notes that it's "a biased barometer for gauging the relative speed of some regex engines on a curated set of tasks"). But, to get a number that is a useful summary metric, you'd have to know a lot about how people use regexes in practice, and I know approximately zero about that. For all I know, you should have two different numbers (like SPECfp and SPECint for SPEC CPU) or ten or a hundred because there are all sorts of different ways people apply regexes.

  3. The first few regex benchmarks I looked at had already been incorporated into rebar, so they wouldn't work as a holdout. And, as previously discussed, current SOTA LLMs aren't very good at benchmarking, so I wouldn't be able to trust the LLM to come up with a holdout benchmark unless I knew enough about regex performance to judge the quality of the benchmark suite. Since I know approximately zero about string matching algorithms or regex performance, that was also off the table.

    It turns out that BurntSushi also maintains ripgrep and the benchmarks for ripgrep, which are big enough benchmarks that they didn't get bundled into rebar, so I tried using those benchmarks as a holdout.

  4. I might be repeating myself here, but the amount of time it takes to build a piece of software that used to require a lot of expertise has drastically decreased. As we noted before, it took about 20 hours of my time to get this Azul AI to crushingly strong, where it wipes the floor with every other human an AI on the planet. Someone wrote a thesis shortly before I did that and spent what appears to be on the order of 100x the time I spent on that AI. A lot of the strength of "my" AI comes from optimization work that's analogous to what we discussed here that used to take a fair amount of time and expertise to implement. For example, I tried three different multithreading algorithms because it was trivial to do that (if I knew anything about game AIs, I would've only tried one, but my LLM suggested two bad ideas that "only" increased search capability by maybe 10x on a large machine instead of scaling indefinitely, before I did the research myself and figured out what algorithm would be good). Re-writing the entire AI to use a different kind of multi-threading would've been a massive undertaking pre-LLM, but with an LLM, it was just a matter of finding the name of the algorithm I wanted to use and telling the LLM to use it. The AI from the thesis isn't multithreaded because that would've been too much work implement. If you stack in 10-20 improvements like that, you quickly reach a level of playing strength that's not feasible for someone to compete with using handwritten code unless they have a high degree of expertise and are willing to put a lot of time into applying their expertise. This was done in the GPT-5.1 days; if this were done today with the same level of knowledge, I would expect that it would've taken half or a quarter of the time it took me then due to improvements in models and harnesses.

    With FRE, instead of the competition being written by a grad student, it was written by one of the top experts in the field, if not the top expert, and it's someone who works at OpenAI, so they have access to infinite tokens. I wouldn't expect to ever make something competitive since if, hypothetically, I spent enough time on the project to make FRE competitive, they could use their superior expertise and knowledge to, in much less time, easily find ways to improve their regex engine beyond whatever I might do. But, if I had some need for a more specialized regex engine that isn't trying to be generally fast and is willing to trade off something for better performance in the area I care about, it's plausible that I or anyone else could produce something that is actually genuinely faster for a particular workload. We can already see this in the existing results, where the native code compiler in FRE is, for some workloads, much faster than the Rust regex crate if you're willing to spend 100x-1000x (and sometimes more) time compiling the regex.

    [return]

The Daily Front Page 17 of 28
Tuesday, August 18, 2026 The Daily Front No. #260818 — The Sovereign AI Argument
article

Norway should buy OpenAI

by alexeigannon·▲ 227 points·242 comments·onethousandmeans.com ↗
The Long Arc of History Bends Towards Social Democracy.

The Long Arc of History Bends Towards Social Democracy

AI capabilities are advancing at a faster rate than our institutional response. Soon, a transformative technology will crash into the capitalist political economy, presenting risks to humanity’s survival, autonomy, and democratic order. Especially concerning is the possibility that vast amounts of power and wealth are concentrated into the class that owns the AI systems, or uses those systems to override democratic control. Silicon Valley talks flippantly of a ‘Permanent Underclass’ - and they intend for you to belong to it.

Upon the automation of most, and then plausibly all, jobs, we will face an unprecedented crisis of technological unemployment, with gains from a technology trained on the corpus of humanity’s data concentrated into the hands of a small class of shareholders. Large language models are not conjured from nothing. They are trained on vast quantities of text, images, and code scraped from the internet and digitized archives. The models are, in a meaningful sense, derivative works of collective human effort. They are also built on publicly-funded infrastructure: the internet itself, the universities that educated AI researchers, the government grants that supported foundational research, the public datasets that enabled early breakthroughs. DARPA funding seeded neural network research. Public universities trained the PhDs. The data came from all of us. This is a commons being enclosed.

Given their lack of interest in the welfare of humanity as a whole, the AI companies have resisted pressure from civil society and government to abide by safety standards, even as they recognize potential for catastrophic risks. Clearly, the most transformative technology since agriculture should not be left in private hands. The default trajectory is extreme concentration of benefits but socialized risks.

Thus, the Norwegian Government Pension Fund Global ought to purchase OpenAI and manage it for the benefit of the international community.

International Women's Day in Norway - Democrats Abroad

GPF-G is valued at over $2 Trillion, and OpenAI’s valuation hovers around $800 billion. Formerly, OpenAI was a non-profit, with capped profits and a windfall clause guaranteeing an intelligence explosion would benefit all of humanity. With the approval of the California Attorney General, this commitment has been scrapped, expropriating the non-profit and allowing OpenAI’s transformation into a for-profit corporation. This is an impossibly deep loss for the human community. With the capital of Norwegian Social-Democracy, we can return the lab to public hands. Though Norges Bank Investment Management would have to liquid 40% of its portfolio and violate the GPF-G’s mandate, accelerating AI capabilities in private hands is an emergency that all actors must approach with increasing flexibility towards existing rules and norms.

To those worried about concentration of power in the hands of a government, Norway is one of the world’s most stable democracies, with a decades-long track record of collectively managing wealth. The Kingdom is deeply embedded in international institutions, with a moral commitment to cosmopolitanism not shared by a private corporation or the Republican Party. The GPF-G even divested from several Israeli firms collaborating with the occupation of the Palestinian territories. After the takeover, the GPF-G ought to transfer management of the lab to an international multilateral institution with authority over development. This is a desirable end point, but there must be some mechanism of transfer, thankfully Norway’s deft management of its oil revenues provides egalitarians with an agent capable of doing so.

It is one of the few countries to consistently meet or exceed the UN target of 0.7% of gross national income devoted to foreign aid, often reaching 1%. It has served as a mediator in conflicts from the Middle East to Sri Lanka to Colombia. It hosts the Nobel Peace Prize. It houses the Svalbard Global Seed Vault, a backup of the world’s agricultural biodiversity held in trust for humanity. Norway’s foreign policy identity is explicitly cosmopolitan, as a small country it must attain security and legitimacy through international institutions rather than unilateral power.

Such an intervention would clearly be blocked by the United States government, though if the Nobel Peace Prize Committee awards Trump the bauble then perhaps there will be an opening of political possibility. Perhaps this is an option that should be left open for a future administration, should Congress refuse to bring the labs into public hands themselves.

The gap between the magnitude of the AI transition and the policy imagination of the left is impossibly vast. Proposals to ban data center construction are a reflexive response, foreclosing the benefits of living in an automated, but collective, future in favor of naive localism. The Overton Window on AI governance is narrow to the point of absurdity. If the ownership structures of the labs are not changed, and democratic steering not guaranteed, the default future is the disempowerment of the vast majority of the human population. We need policy proposals that push the boundaries of plausibility, ones that will be dismissed as impossible or unnecessary. We need optionality. In the future, we might not have much time to respond, and such imaginative plans will be in the wings, available to actors with a prosperous and egalitarian future in mind.

May 1: Labour Day in Norway - Life in Norway

The Daily Front Page 18 of 28
Tuesday, August 18, 2026 The Daily Front No. #260818 — Rolling Resistance
article

California's new tire efficiency rules could save drivers $1B a year

by littlexsparkee·▲ 148 points·211 comments·grist.org ↗
A problem most people don’t know they have: inefficient tires.

The nation’s first tire efficiency standards target an overlooked drag on fuel economy that can cost drivers more at the pump.

Car tire in a field of orange California poppies

Pete Starman / Getty Images

California just became the first state to address a problem most people don’t know they have: inefficient tires.

When automakers design a new vehicle, low rolling resistance tires are one of the least expensive ways to improve fuel economy. But they must eventually be replaced, and experts say replacements are often less efficient. This can result in internal combustion vehicles burning more gasoline and EVs needing more electricity.

“It’s very difficult or impossible for consumers to know how energy efficient their tires are going to be,” said Brian Fadie, senior manager for state policy at the Appliance Standards Awareness Project. “As a result, many people unknowingly buy tires that cost them more money than necessary.”

On Monday, the California Energy Commission unanimously approved a rule that would phase in the nation’s first standards for tire efficiency. The rule is “designed to ensure that replacement tires sold in the state are at least as energy efficient, on average, as tires sold in the state as original equipment.” It would also establish a labeling system that gives tires a “leaf” rating, to make it easier for consumers to find the best options. In addition to saving drivers money, the state projects that the changes could reduce carbon dioxide emissions by 2 million tons annually, which it says is equivalent to taking around 400,000 cars off the road.

“We are proud to approve the nation’s first replacement tire efficiency standards,” said commission chair David Hochschild, in a press release. “This action will help Californians save approximately $1 billion a year on refueling while reducing pollution and extending the range of vehicles on the road.”

California’s regulations will take effect in two phases, with the first targeting the most inefficient tires starting in 2029 and the second, stricter standard beginning in 2033. The timeline is longer than initially proposed, to address the concerns of some manufacturers who wanted more time to adapt. The rule also comes with exemptions including snow tires and those used in competition. All-weather tires are also excluded, but the state will track them, as that growing segment may be regulated in the future.

Karim Marshall, director of climate and energy policy at the Consumer Federation of America, criticized the delayed timeline and the number of carveouts. But he said even that version of the rule marks significant progress. “We aren’t going to let the perfect be the enemy of the good,” he said. Bill Magavern, the policy director for the Coalition for Clean Air, a nonprofit focused on public health in California, agreed that the regulation was necessary. “Manufacturers do not do the right thing on their own,” he said. “They need the government to set smart standards.”

Reducing the rolling resistance of a tire isn’t technically that difficult, said Fadie. Incorporating more silica, for example, improves not only efficiency but traction as well. Rubber chemistry and tread designs can also lead to gains. The debate centers around the cost of those improvements, and the tire industry appears split on the rule.

Some, like ENSO and Michelin, publicly endorsed at least parts of the rule. Speaking at Monday’s commission meeting, Francesca Mosteller, director of state and local government affairs for Michelin North America, said: “We support the efficiency goals and believe the proposed thresholds in this rulemaking are technically feasible within the defined timeframes.”

Others are opposed to the changes. “These tires are broadly more expensive than the typical tire you find on the marketplace today,” said Christian Robinson, senior director of state government affairs for the Specialty Equipment Market Association, or SEMA, which represents the automotive parts industry. “Our concern is that this will create undue burdens on working-class families.”

The energy commission calculated that more efficient tires cost between $6 and $26 more per set, but that increase is more than offset by reduced fuel consumption. It put net savings at $85 to $153 over the lifetime of the tire when gasoline is $4.60 a gallon, though the savings could be 25 percent higher with this year’s price spikes. An estimate SEMA cited from consultant Gladfelty Government Relations, however, put the added cost as high as $365.20.

Robinson said he had hoped the commission would take a step back “given that there’s a disagreement about the economic impact.” But Marshall, the consumer advocate, said industry figures are misleading.

Whatever the case, the energy commission approved the rule. It’s a move that has been in the works since 2003, when the Legislature passed a law calling for such regulation. The state worked toward this goal for a few years but paused in 2007 when the federal government took over the cause. That effort never materialized and the project languished until about 2020, when the energy commission revived it.

With the rule now final, supporters say the impacts could be numerous and widespread. More efficient tires should, for instance, help EVs use less juice, easing demand on already stressed electric grids. At the very least, the leaf rating system should make shopping easier. Similar to the Energy Star label, or the snowflake rating system for snow and all-weather tires, more leaves will mean a more efficient tire, with a four-leaf rating denoting the greatest efficiency. The one hitch is that manufacturers can choose whether or not to display the label, so consumers may have a look up the model in the state’s online database.

Everyone agrees that, given California’s size, this rule will likely spill over into other states. “What happens in California doesn’t stay in California,” said Robinson, pointing to the state’s tailpipe emission standards, which 17 states and the District of Columbia now enforce. A similar ripple occurred with California’s LED lightbulb rules.

As for tire efficiency, Fadie said Washington and Rhode Island are among those considering following California’s lead. He added that these steps are important because, while the Golden State’s rule will likely buoy the national market, it’s not a guarantee.

“Other states,” said Fadie, “could create certainty for themselves.”

The Daily Front Page 19 of 28
Tuesday, August 18, 2026 The Daily Front No. #260818 — A Fly on the Desktop
repository

A 3D fruit fly on macOS desktop powered by the real FlyWire connectome

by phoenix120·▲ 217 points·64 comments·github.com ↗
★ 243⑂ 18 forks Swift

A 3D fruit fly living on your macOS desktop, driven by a live spiking simulation of the real FlyWire connectome

DesktopFly — a 3D fruit fly

DesktopFly 🪰

A 3D fruit fly that lives on your macOS desktop — driven by a live spiking simulation of the real FlyWire connectome. It walks across your windows, grooms, sleeps, and decides to flee your cursor with the same neurons a real fly uses.

Live brain window: 23,210 real neuron positions, spikes flashing

The fly's brain window: 23,210 real neuron soma positions from FlyWire v783, with live spikes flashing at real neuron locations. The two glowing yellow markers are the Giant Fibers — the escape command neurons. Click any region to stimulate it.

What's real

  • 23,210 neuron soma positions (of 139,255 in FlyWire v783) render the rotating brain window, colored by super-class (FlyWire's coarse cell-type grouping).

  • A 668-neuron circuit with ~19,000 real synaptic connections (synapse counts, signed by neurotransmitter prediction) runs as a 1 kHz leaky-integrate-and-fire (LIF) simulation:

    • LC4 (104) + LPLC2 (210) looming-detector visual neurons
    • DNp01 / Giant Fiber (GF) (2) — the escape command neuron
    • DNa01 + DNa02 (4) steering neurons · DNp09 (2) forward walking
    • DNg11 (6) grooming · MDN (4) backward walking ("moonwalker")
    • DNp02/DNp04/DNp11 (6) escape-maneuver (wing) neurons
    • their 330 strongest partners, including ascending (proprioceptive) and sensory (wind) neurons
  • Escape is not scripted. Your cursor's approach becomes looming input to the real LC4/LPLC2 cells; the fly takes off only when the Giant Fiber actually spikes through its real synapses — ~1,200 synapses of feedforward inhibition push back, which is why slow approaches are tolerated and fast lunges trigger escape in ~4 ms, just like the real animal.

The body itself is procedural (FlyWire is a brain connectome — no body geometry exists), with a tripod gait, visible wing-beat, altitude-scaled flight, grooming, and sleep postures.

Installation

Requirements: macOS 13+, Xcode Command Line Tools (Swift 5.9+). No permissions or entitlements needed — everything it senses (cursor, window frames, clicks-as-taps, thermal state) is permission-free.

git clone https://github.com/DenisSergeevitch/desktop-fly.git
cd desktop-fly
./build.sh
./DesktopFly

A 🪰 item appears in the menu bar; quit from there. The fly wanders your desktop on a transparent, click-through overlay — it never intercepts your mouse or keyboard.

Controls (menu bar 🪰)

item effect Pause / Resume freeze the world Show/Hide Brain toggle the live brain window Escape Test (loom) inject a looming stimulus, watch the GF fire Move to Next Display hop the fly across monitors (shown when >1 display) Add / Remove Fly extra flies (only fly #1 carries the brain) Scare Flies startle everyone

The brain window is interactive: hovering pauses the rotation; clicking a region "optogenetically" stimulates the ~60 nearest circuit neurons for 400 ms. The fly's reaction is whatever the real network does downstream — click the Giant Fiber and it escapes; click DNg11 and it grooms; click one side's DNa01/02 and it turns.

How real neurons drive the body

body behavior driven by escape takeoff DNp01 giant fiber spike walk vs. rest, walking speed DNp09 rate steering DNa01+DNa02 left−right rate difference grooming DNg11 rate backward scoot MDN burst nervous darting LC4/LPLC2 population rate wing-beat effort, threat wing-raise DNp02/04/11 rate spontaneous takeoff whole-population arousal

The loop also closes body→brain: the gait rhythm feeds the circuit's real ascending (proprioceptive) neurons in phase with the legs, and fast cursor motion stimulates its sensory (wind) partners.

Desktop ecology (all permission-free macOS senses)

  • Window terrain: window top edges are ledges — the fly lands on them, walks along them, rides a window you drag, and startles when one closes under its feet.
  • Window looms: a window appearing near the fly feeds the looming pathway; the circuit decides whether to flee your dialogs.
  • Clicks are substrate taps; clicking next to the fly startles it through the wind→GF pathway. Typing is vibration (idle-time API — knows when keys were pressed, never which).
  • Circadian rhythm: dawn/dusk activity peaks, midday siesta, night quiescence. Sleep: idle at night → it sleeps, breathing slowly, with raised arousal threshold; it grooms after waking.
  • Temperature: flies are ectotherms — a hot Mac is a faster fly.

Regenerating the data

data/ ships with compact derived files. To rebuild them from the raw FlyWire Codex dumps (~60 MB download):

mkdir -p /tmp/flywire && cd /tmp/flywire
B=https://storage.googleapis.com/flywire-data/codex/data/fafb/783
curl -O "$B/classification.csv.gz" -O "$B/coordinates.csv.gz" \
     -O "$B/connections.csv.gz" -O "$B/consolidated_cell_types.csv.gz"
cd - && python3 etl.py /tmp/flywire

Diagnostics

./DesktopFly --simtest        # circuit invariants: GF silent at rest, 4 ms loom latency, ...
./DesktopFly --behaviortest   # 17 end-to-end checks: stimulate neurons -> body reacts
./DesktopFly --snapshot f.png  # offscreen fly render
./DesktopFly --brainshot b.png # offscreen brain render

What's modeled vs. measured

Honesty section: the connectome gives wiring, not physiology. The LIF dynamics, neurotransmitter signs (ACh+, GABA−, Glu−), the gap-junction boost on LC→GF and wind→GF (documented electrical coupling), synaptic delays, and the sensory transduction (cursor → looming value) are standard modeling choices layered on the real graph. Everything downstream of the sensory neurons — who connects to whom, and how strongly — is FlyWire data.

License & citation

Code is MIT. The files in data/ are derived from FlyWire (FAFB v783) and are CC BY-NC 4.0 — see data/DATA_LICENSE.md. If you use this, cite:

The Daily Front Page 20 of 28
Tuesday, August 18, 2026 The Daily Front No. #260818 — Platforms, Data, and Watching
article

Cursor launches Origin, GitHub alternative

by tomasreimers·▲ 531 points·392 comments·cursor.com ↗

Cursor can now host your code.

Origin begins rolling out today in early beta on all paid plans. We're starting with the essentials, designed for agent scale: repos, pull requests, code browsing, and GitHub sync. Agent-native features ship soon.

Origin Repos

The new Codebase tab is home for Origin repos.

Click +New to create a new repo and name it. Once you do, a page shows you how to install the CLI, with commands for how to clone a repo or push a local project. Push, and your code is hosted on Origin.

Name your codebase when you create your first repo. That name becomes part of every repo's URL: cursor.com/codebase/acme-corp.

Bring your GitHub repos

Your GitHub repos can sit alongside the ones Cursor hosts. Connect GitHub to Cursor, pick your org, and you'll see the repos you can sync. Select one and Cursor pulls it in. You choose what gets synced and can disconnect a repo at any time. Anyone with read or write access to a synced repo can view it in Cursor too.

Synced repos update in real time. Browse, search, and pull from the copy in Origin. Pushes keep going to GitHub, which stays the source of truth for anything started there. Icons next to each repo name tell you which ones Cursor hosts and which came from GitHub.

Pull requests

Every repo has pull requests. Open one to see the timeline, commits, checks, and files changed. Review the diff, leave comments, and merge.

Pull requests on synced repos sync both ways: comment in Cursor and it posts to GitHub, react or reply on GitHub and it shows up in Cursor within seconds. Got a review assigned to you on GitHub? Review and merge it from Cursor.

Agents in every repo

Your code, PRs, and agents are now in the same place. Ask Cursor questions about code you're browsing. It can answer, make changes, update PRs, or push a branch.

App extensions for Cursor repos

We're building an app ecosystem so your whole stack works seamlessly with Origin. Integrations with Vercel, Depot, and Buildkite are already available, with more coming soon.

Connect Vercel from a repo's Apps tab and every PR gets a preview deployment where you can test and make comments. Merge, and it ships to production. For CI, connect Depot or Buildkite. Both run your existing GitHub Actions workflows and Buildkite also runs its native pipelines.

Vercel, Depot, and Buildkite apps connected to an Origin repo

Settings

Every repo has settings. Check sync status for GitHub repos, manage who has access, and see which apps are connected.

Origin repo settings showing sync status, access, and connected apps

Origin is rolling out in early beta to all paid plan users starting today, except enterprise orgs whose admins opt out. Name your codebase and create your first repo.

Learn more in our docs or get started today.

The Daily Front Page 21 of 28
Tuesday, August 18, 2026 The Daily Front No. #260818 — Platforms, Data, and Watching
article

Google has acquired the data of failed US airline Spirit

by pseudolus·▲ 572 points·395 comments·theregister.com ↗

Google has acquired some data of failed US airline Spirit.

Spirit hit financial turbulence when COVID-19 blew in during 2020 and started making losses. Its balance sheet never climbed back to a safe altitude and in May 2026 the airline grounded itself permanently.

The low-cost carrier entered liquidation to wind itself up and is now auctioning assets to raise cash and settle at least some of its debts.

A court document [PDF] filed last week reveals that one of the assets up for sale is a huge trove of deidentified data, which Google bid for and won for just $10 million - pending judicial approval.

For that sum, Google bought itself 100 million emails and 500 million items from Microsoft Teams, 17 million OneDrive files and 20.5 million items from SharePoint. The search giant also now owns over 30 million recorded customer service calls, and more than 15 million customer service chat records.

600,000 ServiceNow tickets are another element of the collection, along with 13.7 million active emails addresses from Oracle’s Responsys marketing application, and details of 11 million sales of in-flight Wi-Fi services.

There’s also operational data in the trove, describing over 763,000 flights, five million crew pairings, more than 1.2 million fuel slips, and records describing purchases of 787,452 parts.

Google has reportedly said it bought the data to improve its AI services. The underbidder was Mercor, a company that provides data to train AI models. So clearly Spirit’s data is of value to AI companies.

Indeed, The Register recently reported how AI experts increasingly believe large language models are blunt instruments, and that smaller models trained on specific fields of knowledge are more useful in some applications.

Google might have itself the basis for an aviation ops model, or just with all sorts of quotidian financial records that could be useful for another AI.

If you’ve flown Spirit and worry that Google will soon know about your flight history or a testy conversation you had with the airline’s call center, you’re being told not to worry. The court filing says the data was deidentified before being put on sale and Google has promised to scrub any PII it finds in the trove.

The Register awaits evidence of the inevitable SNAFUs that mean some personal info appears as the result of a future prompt, or search.

Fasten your seat belts! ®

The Daily Front Page 22 of 28
Tuesday, August 18, 2026 The Daily Front No. #260818 — Platforms, Data, and Watching
article

Meta Files Patent for Facial Recognition, Automatic Recording of People

by DeepLogin·▲ 248 points·166 comments·privacyguides.org ↗

Meta Files Patent for Facial Recognition, Automatic Recording of People

Meta filed for a patent that includes a "memory recall" system that appears to detect people via facial recognition and record them automatically, and show you a highlights real later.

Meta's Ray-Ban smart glasses have garnered a reputation as "pervert" glasses, with many reports of them being used to record people surreptitiously using the onboard camera.

The glasses feature a light that's meant to indicate when video is being recorded, but people have been going to great lengths to disable it. Meta has released updates trying to disable the camera when the light doesn't work or is covered. They explain how it works in a press release:

Each pair of our AI glasses has a white light called a capture LED that blinks to signify when content is being captured for your gallery — covering or disabling this capture LED automatically disables the camera.

They even brag about it being superior to smartphones, which lack the same outward-facing indicator light, but smartphones aren't always out and constantly pointed at everyone you're looking at:

While mobile phones and action cameras don’t have this on their cameras, ours have had them since day one.

Later, it came out that a future version of the glasses might record without the indicator light at all, essentially ruining the entire point of the light in the first place.

Combined with this latest news it seems even more creepy. The patent provides illustrations of how the potential feature is mean to work. It would scan and identify people performing actions, then automatically record them.

Source: US Patent and Trademark Office

One example Meta gives is using this feature during a dinner party. The AI says "I've generated some highlights of tonights' dinner party. Would you like to see them?"

Source: US Patent and Trademark Office

There's no example of a prompt asking if you want to record, it just does it when it thinks something important is happening.

It's important to note that this patent doesn't mean the feature will exist, but the fact that Meta is even considering it is concerning.

Meta earlier was caught earlier this year sending video clips of "bank details, sex and naked people" to workers to train, with almost no privacy protection in place.

The Daily Front Page 23 of 28
Tuesday, August 18, 2026 The Daily Front No. #260818 — Work, Names, and the State
article

Beware Management Consultants

by KolmogorovComp·▲ 491 points·125 comments·about.iceland.co.uk ↗

Race-title

Race

Both teams worked really hard to get in the best shape.
On the day of the first race, both teams were ready to win the race.

Race

The green team won by one mile!

Race

The Red team was crushed in their defeat, but they were determined to win the race next year. So they established a panel of auditors to observe the situation and ascertain if there were any differences between the teams.

After several weeks of detailed intelligence gathering, the auditors could find only one difference;
the Green team had 7 rowers and 1 captain…!

Race

Race… and the Red team had 7 captains and 1 rower!

Un-perplexed by the raw data, upper management showed unexpected wisdom: they hired a consulting company to analyze the data and suggest a solution that would enable the Red team to win next year.

Race

Race

After several months the consultants came to the conclusion that the ratio of captains to rowers was the problem in the Red team. Based on this analysis a solution was proposed: the structure of the Red team has to be changed!

Like sharks getting the scent of reorganization blood, upper management wasted no time in restructuring the Red team into 4 Captains, led by 2 Managers, reporting to 1 Senior Director with a dotted line to the rower. Besides that, in a blaze of unrestricted inspiration, they suggested they might be inclined to improve the rower’s working environment by a non-monetary reward and recognition scheme if there was improved performance by the rower.

Race

RaceThe next year, the Green team won by 2 miles…

RaceThe Red team upper management immediately fired the rower based on his unsatisfactory performance.

RaceA bonus was paid to the Captains, Directors, and Managers for the strong leadership and motivation they showed during the preparation phase and as an incentive for them to find a better rower for the next race.

The consulting company prepared a new analysis of the restructuring activity, which showed that the strategy was good, the motivation was great, the restructuring was executed correctly, but the tool used (which was not included in the original data) was sub-standard and had to be improved.

Currently the Red team management is having a new boat designed;
and to demostrate fiscal and HR dexterity for stockholders they also outsourced the rowing to India.

The Daily Front Page 24 of 28
Tuesday, August 18, 2026 The Daily Front No. #260818 — Work, Names, and the State
article

How does IKEA come up with names for its products?

by NaOH·▲ 281 points·161 comments·ikea.com ↗

The product names of IKEA may sound strange even to us Swedish speakers. In other parts of the world, they are basically incomprehensible, but fun! Here you will learn the most about how we name our products and the two rules that must always be followed – because there is a method in the madness.

Ingvar Kamprad, founder of IKEA, had a hard time remembering numbers and numbers, so instead he decided to name his products. Naming products started as a practical solution, but over time it has become an important part of our identity and expression at IKEA.

Our naming method

To ensure consistent use of names

We work purposefully to create a strong and unique identity for IKEA. Everything we do – including naming our products – helps us build and strengthen IKEA as a brand. That's why we follow two simple rules:

  1. We use Swedish names for our products.

The product names reflect our Swedish identity, Småland's heritage and our values. They make IKEA unique and contribute to a sense of playfulness. The names are real words and often inspired by Swedish places, nature, emotions or everyday expressions – and follow a clear categorization system. For instance:

Sofas → Swedish place names

Bookshelves → men's names

Children's products → animals and nature

To be used as a product name, it must:

  • be a real word
  • contain between 4 and 12 letters
  • preferably contain the letters Å, Ä or Ö
  • feels good to say
  • Never be trademarked or be a surname

Every possible product name is carefully checked to avoid undesirable meanings in other languages, political or religious affiliations and fit into our global profile.

  1. For everything else, we use descriptive names in the local language of the country in which we operate.

This applies, for example, to services, functions and communication, which must be clear and easy to understand for all customers, regardless of market.

An exception to these two rules are some carefully selected Swedish words (Hello, bye, welcome, welcome back and coffee), they are used to express aspects of the culture and traditions we have at IKEA.

Did you know that we name around 2,000-3,000 new products every year?

The Daily Front Page 25 of 28
Tuesday, August 18, 2026 The Daily Front No. #260818 — Work, Names, and the State
article

How do functions like alloca allocate memory from the stack?

by ingve·▲ 67 points·65 comments·devblogs.microsoft.com ↗

A little while ago, I talked about how compilers ensure that large stack allocations do not skip over the guard page. Shawn Van Ness was curious how this works with _alloca. “Does it do the necessary _chkstk() probing?”

Yes, the _alloca() function calls the same _chkstk() function to probe the stack before adjusting the stack pointer for the allocated memory.

Here’s an artificial example:

#include <malloc.h>

void consume(void*,void*);

void f(int n)
{
    char buffer[16384];
    consume(alloca(n), buffer);
}

On x86-64, this results in

        push    rbp
        mov     eax, 16416          ; probe for local frame
        call    __chkstk
        sub     rsp, rax            ; create local frame

        lea     rbp, [rsp+32]

        movsxd  rax, ecx            ; n
        lea     rcx, [rax+15]       ; round up to multiple of 16
        and     rcx, -16

        mov     rax, rcx            ; special __chkstk calling convention
        call    __chkstk
        sub     rsp, rcx            ; allocate n bytes

        lea     rdx, [rbp]          ; rdx -> buffer
        lea     rcx, [rsp+32]       ; rcx -> alloca'd memory
        call    consume

        lea     rsp, [rbp+16384]    ; clean up local frame
        pop     rbp
        ret     0

Observe that the same __chkstk function is used both for performing the initial stack probe when creating the local frame as well as for the alloca().

article

And then the men with guns tell you to do it anyway

by _djo_·▲ 239 points·150 comments·shkspr.mobi ↗

In early February 2011 Egypt was in the middle of a political revolution. One morning, everyone's phones suddenly pinged with an alert.

The Armed Forces asks Egypt's honest and loyal men to confront the traitors and criminals and protect our people and honour and our precious Egypt.

A series of messages arrived all ostensibly from the network provider Vodafone. All pro-regime and all with the undercurrent of violence.

Why did Vodafone send these messages? Earlier in the week, all Internet access was cut off now phones were blasting propaganda to the masses.

After the network went down, Vodafone issued a statement saying:

It has been clear to us that there were no legal or practical options open to Vodafone, or any of the mobile operators in Egypt, but to comply with the demands of the authorities.

Do you have to follow orders? Do you have to obey the law even when it is unjust? Should multinational corporations instruct local executives to be loyal to their parent company or the rulers of the country they live in?

After the messages came in - including promises that "The Armed Forces cares for your safety and well being and will not resort to using force against this great nation" - Vodafone Global, safely ensconced in the UK, put out another statement:

Under the emergency powers provisions of the Telecoms Act, the Egyptian authorities can instruct the mobile networks of Mobinil, Etisalat and Vodafone to send messages to the people of

The Daily Front Page 26 of 28
Tuesday, August 18, 2026 The Daily Front No. #260818 — Also on the Front Page
The Daily Front Page 27 of 28
Tuesday, August 18, 2026 The Daily Front No. #260818 — Colophon

That's the Front for Today

Issue No. #260818 — Tuesday, August 18, 2026 — went to press 2026-08-19 at 05:31 UTC.

About This Magazine

The Daily Front is a daily digital magazine assembled from the stories that reached the front page of Hacker News on Tuesday, August 18, 2026. Headlines, points, and comment counts are recorded as they stood at press time. All articles remain the property of their original authors — every piece links back to its source and its discussion thread.

How It Was Made

Fetched, cleaned, and typeset by an automated pipeline. An editor model laid out the pages, chose the highlights, and briefed the cover illustrator — 30 model calls and 298k tokens in total. Set in Jacquard 12, Playfair Display, Source Serif 4, and IBM Plex Mono, all served via Google Fonts under the SIL Open Font License.

The Cover

The cover illustration was commissioned with this prompt:

A single expansive twilight scene showing a vast modern data center beside a sprawling fulfillment warehouse, with glowing server racks visible through one side and conveyor belts carrying anonymous parcels through the other. In the foreground, a repairable smartphone, an open laptop motherboard, and several memory modules rest on a workbench; beyond them, power lines and a distant rail line cross a warm, hazy landscape. The scene suggests the collision of artificial intelligence infrastructure, commerce, repair, and rising hardware costs, with no text, letters, labels, or logos visible.

Create a single expansive twilight cover image in infrared medium-format photography: compress the vast modern data center, sprawling fulfillment warehouse, glowing server racks, parcel conveyors, foreground workbench with repairable smartphone, open laptop motherboard, and memory modules, plus crossing power lines and distant rail line in the warm hazy landscape with a 105mm portrait lens. Render foliage-like whites as pale bone and silver, the sky near-black indigo, infrastructure charcoal, machinery cool steel, and the haze muted rust-gold; use grainy film stock, preserving the collision of AI infrastructure, commerce, repair, and rising hardware costs, with no text, letters, labels, or logos.

Absolutely no text, letters, numbers, readable symbols, or logos anywhere in the image.

Production Ledger

StageModelCallsTokens InTokens Out
extractgpt-5.6-luna 27 186,257 84,545
layoutgpt-5.6-terra 1 18,983 2,101
covergpt-5.6-luna 1 352 137
covergpt-image-2 1 266 5,488

The Publisher

Published by Johnny.

Support the Press

If The Daily Front brightens your morning, consider supporting its publisher.

Credits & Contact

All content — articles, posts, comments, and the images within them — belongs to its original authors and is reproduced here to point readers back to the source. Full credit goes to those creators; every item links to its original and its Hacker News discussion.

If you are an author and would like your content removed from an issue, write to hi@johnnys.page and it will be taken down.

Feedback is always welcome at the same address: hi@johnnys.page.

Credit where credit is due.

Every page of this issue began as someone else's work — these are the original sources, linked in full.

  1. The Amazon tax by herbertl — seths.blog·HN discussion ↗
  2. GPT-5.6 Sol Pricing Cut by 50% on OpenRouter by Topfi — openrouter.ai·HN discussion ↗
  3. Linux 7.3 improves performance when running out of vRAM by flaburgan — pixelcluster.dev·HN discussion ↗
  4. Using the railway network as a flatbed scanner by otherayden — philo.gay·HN discussion ↗
  5. Fairphone 6 and PostmarketOS working main camera by pizzaiolo — catcrafts.net·HN discussion ↗
  6. Fixing a bricked Framework laptop by jp_sc — quantum5.ca·HN discussion ↗
  7. Fairphone is now officially available in the United States by Vinnl — fairphone.com·HN discussion ↗
  8. Memory prices climb 500% in 12 months by haunter — tomshardware.com·HN discussion ↗
  9. Teaching my kid to code with a modern MUD by andrewjanke — tau.dev·HN discussion ↗
  10. Babies born under sugar rationing grew into adults with lower cancer risk by zeristor — theconversation.com·HN discussion ↗
  11. Turbovec – Google's TurboQuant for vector search in Rust by fittingopposite — github.com·HN discussion ↗
  12. Python Polars Cheatsheet (based on our O'Reilly book) by jeroenjanssens — opensource.posit.co·HN discussion ↗
  13. Launch HN: machine0 (YC S26) – Persistent CPU and GPU VMs from the CLI by bwm — machine0.io·HN discussion ↗
  14. Being ambitious and being a dad by nichochar — nicholascharriere.com·HN discussion ↗
  15. The Benchmarkpocalypse by cyndunlop — danluu.com·HN discussion ↗
  16. Norway should buy OpenAI by alexeigannon — onethousandmeans.com·HN discussion ↗
  17. California's new tire efficiency rules could save drivers $1B a year by littlexsparkee — grist.org·HN discussion ↗
  18. A 3D fruit fly on macOS desktop powered by the real FlyWire connectome by phoenix120 — github.com·HN discussion ↗
  19. Cursor launches Origin, GitHub alternative by tomasreimers — cursor.com·HN discussion ↗
  20. Google has acquired the data of failed US airline Spirit by pseudolus — theregister.com·HN discussion ↗
  21. Meta Files Patent for Facial Recognition, Automatic Recording of People by DeepLogin — privacyguides.org·HN discussion ↗
  22. Beware Management Consultants by KolmogorovComp — about.iceland.co.uk·HN discussion ↗
  23. How does IKEA come up with names for its products? by NaOH — ikea.com·HN discussion ↗
  24. How do functions like alloca allocate memory from the stack? by ingve — devblogs.microsoft.com·HN discussion ↗
  25. And then the men with guns tell you to do it anyway by _djo_ — shkspr.mobi·HN discussion ↗
  26. Repair Cafe – Fix Your Broken Items by rglover — repaircafe.org·HN discussion ↗
  27. The Road to MS-DOS 2.0 by whobre — nemanjatrifunovic.substack.com·HN discussion ↗
  28. Rethinking Database Programming by honungsburk — acadia.engineering·HN discussion ↗
  29. Field measurements of neighborhood-scale air temperature impacts of data centers by cwwc — asmedigitalcollection.asme.org·HN discussion ↗
  30. Shattered skeleton is first confirmed death from trebuchet by hermitcrab — science.org·HN discussion ↗

Browse all issues in the archive →